Table of Contents
Learning to fly a powerkite is the first step to learning to kitesurf and is something you can continue to do to further improve your kite flying skills. Since 80% of kitesurfing is kite control, it is the best way to speed up the learning process. Powerkite flying is also useful for students who want to learn either kite buggying or kite landboarding, rather than heading into the water. Powerkite flying is taught on Day 1 of all of our group kitesurfing courses, at the beginning of the kite buggying and kite landboarding courses, and we also teach a standalone powerkite flying lesson.
Site Assessment
As with any kiting, the first stage of setting up and flying your powerkite is to perform a full site assessment of the location you have chosen. The site assessment is important to ensure the safety of you and others around you, as well as reducing the risk of damaging your kite.
Once you have performed a site assessment and decided it is safe to fly where you are, it is time to set up the kite. The instructions below are for a Peter Lynn Impulse Trainer, which we use in our school, but they will work for other 3 line trainer kites. We use the Impulse Trainer because it is incredibly easy to use, super fun to fly and pretty indestructible – you’re bound to crash the kite a few times as you learn so this is important! The Peter Lynn Impulse Trainer comes with pre-attached flying lines, making it very easy to set up.
Setting Up
During the site assessment you will have determined which way the wind is blowing, so you know which direction downwind is. You will also have noted how strong the wind is, which will affect your choice in kite size. The Impulse Trainer comes in 3 sizes; 1.5m, 2m and 3m. At The Kitesurf Centre use these on the majority of our lessons, though if the wind is particularly strong we may also use a Flexifoil Buzz 0.6m.

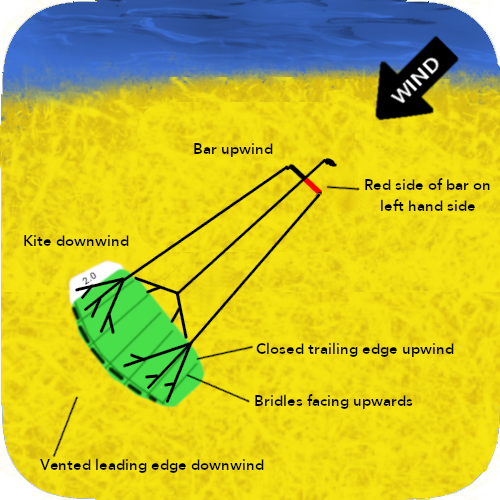
First, take the kite out of the bag and roll it out gently on the floor downwind of where you will be standing to fly it, with the lines on top of the kite and the open, vented edge (known as the Leading Edge) furthest away from you. Check the bridles are not tangled – if you have packed the kite away neatly (which you’ll learn later in this tutorial), this should not be a problem. However, it is always important to check.
Next, weigh down the trailing edge of the kite. If you are flying on the beach you can use sand (taking care to avoid stones and shells), if you are flying inland you can use small weighted bags.
Walking backwards upwind, unwrap your lines, checking for any damage as you go. Once you get to the end of the lines, lay the bar on the ground with the red side of the bar on the left, and the safety line running cleanly through the bar. Check the bar and safety line for any damage whilst you do this.
Walk back up the lines towards your kite, separating them as you go by running them between your index and middle fingers. The red (left) steering line will go the left bridle, and the right (black, green or blue) line goes to the right bridle. If your kite has 3 lines, as the Impulse Trainer does, the safety line attaches to a bridle along the trailing edge. On 2 line kites, the safety line is one of the steering lines, so the kite will flag out along this, with your wrist safety leash attaching to the right side of the bar.
If your lines do not come pre-attached, use a larks head knot to connect each line to its corresponding bridle. You can make a larks head knot by passing the loop at the end of the line over the line and pulling the line through to create a new loop, then running the knot at the end of the line you are attaching through this loop and pulling the loop close next to the knot. Check each knot is secure before flying the kite.
Double check that everything is set up properly, that each connection is secure, the bar is the right way, and that there is no damage to the kite, bar or lines.
Launching the Powerkite
The safest way to learn to fly a trainer or powerkite is to take a lesson with a fully qualified instructor. This will ensure you learn the correct techniques and safety procedures. However, there are some basic kite flying techniques you can go through on your own (and even repeat after a lesson) to improve your skills. You can fly the kite on your own or with a friend – it’s good for safety to have someone to help you with setting up and launching / re-launching the kite, but it’s also just great fun to have a friend to fly with!
Before launching, it is important to become familiar with how the kite is controlled; how it steers; how you can reduce the power. You can control the kite in a similar way to a bicycle, if you pull your right arm towards you and extend your left arm away from you, the kite will steer right. Likewise, if you pull your left arm towards you and extend your right arm away from you, the kite will steer left. The wrist leash allows you to remove all of the power in the kite instantly by letting go of the bar. The kite will fall to the ground without any pull.
Once you are familiar with the controls for the kite and are ready to fly it, attach your wrist leash and pick up the control bar. Check the surrounding area again for any hazards – trees, people, rocks etc. Ensure your back is still to the wind, as the direction may have changed slightly whilst you were setting up the kite.
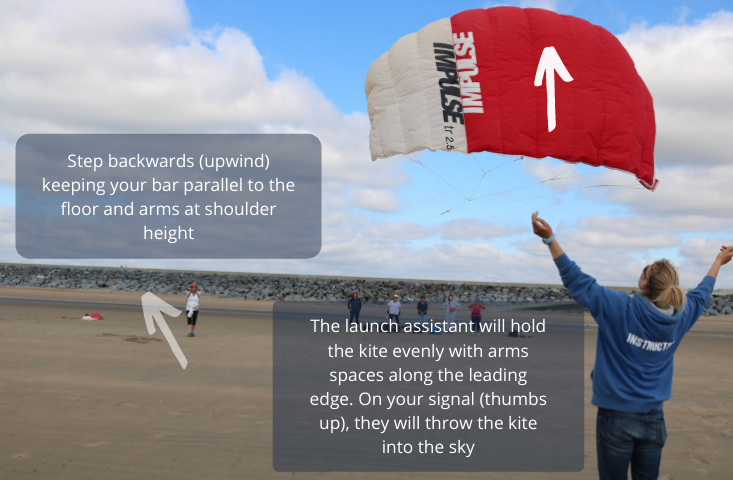
All checked? – you’re ready to fly! Holding the bar in your hands, step backwards away from the kite. This should cause the kite to pick up the wind enough that the sand you have used to weigh down the trailing edge falls off. If it is not enough, try taking another small step backwards and gently pulling the bar towards you. Keep your bar straight so that the kite launches and flies straight overhead, coming to rest at 12 o’clock in the wind window.

Flying the Powerkite
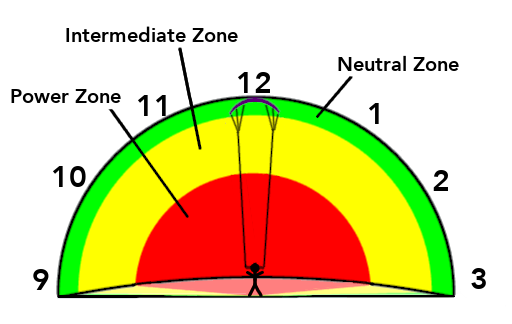
When you are ready, gently steer left and right with small movements of the bar, remembering to keep your back to the wind and steering the bar like a bicycle, rather than like a car steering wheel. Keeping the kite high produces less power, steering the kite lower increases the power. As you become more confident, you can begin to use larger movements and steer the kite through the power zone to generate more power.

Always aim for symmetry in the movement of your kite – using smooth and controlled motions. Imagine the upper half of a clock face in front of you and fly the kite in a figure of 8 motion, first between 12 o’clock and 2 o’clock, and then between 12 o’clock and 10 o’clock.
You can also practise keeping the kite still at each position on the clock; 10 o’clock, 11 o’clock, 12 o’clock, 1 o’clock and 2 o’clock. This will take time, but the more you practise the more natural steering and keeping the kite still will become, and these control skills are directly transferable to flying LEI kites which you use in kitesurfing.
Once you have mastered the basic control of the kite, you can try to control the kite with one hand. This is a skill you will use a lot when kitesurfing, so it’s great to cover it early. You can also practise flying the kite without looking at it, trying to feel where the kite is in the air from the sensations coming through the bar.
Remember, if at any point you feel you are not in control of the kite, simply let go of the bar and all of the power in the kite will dissipate instantly. You can then begin the launch process again, making sure to check for any damage again before you relaunch.
Still not sure? Have a look at this video for some more visual aids
