Leading Edge Inflatable Kite Setup in 7 Simple Steps

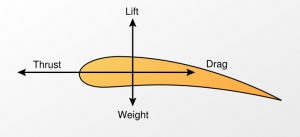
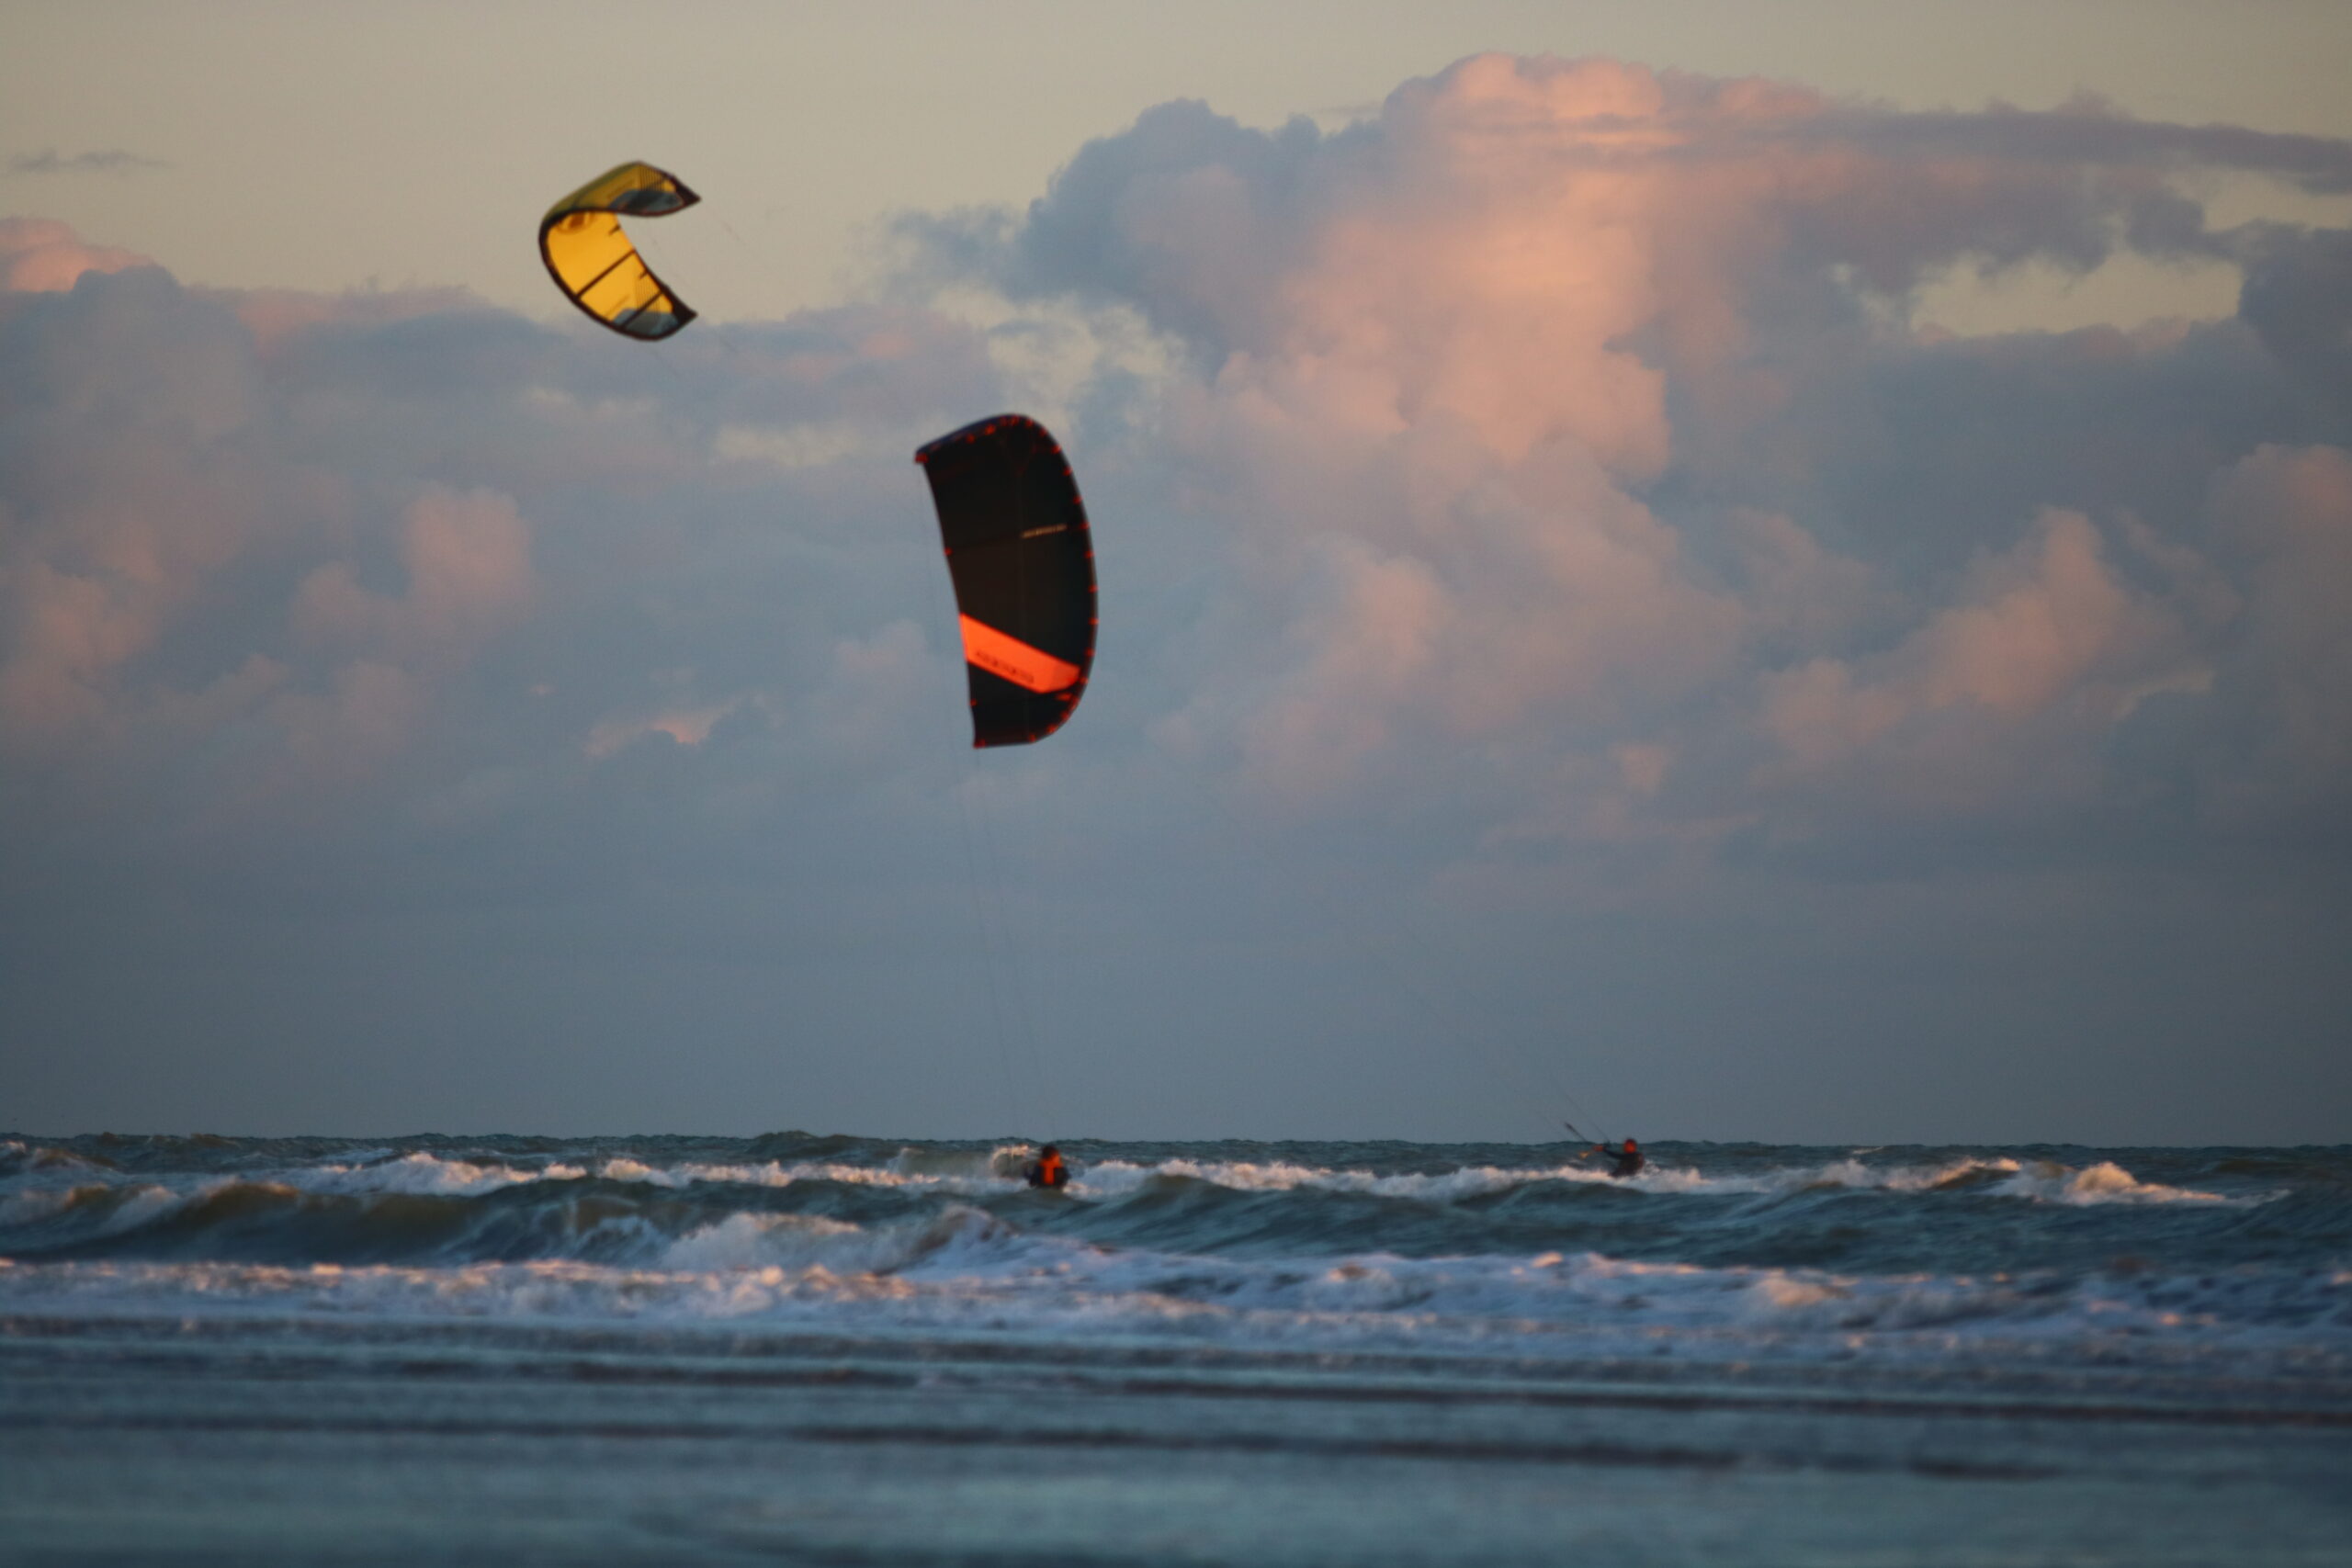
A Leading Edge Inflatable Kite is more commonly known as an LEI kite and is the most common design of kite in the modern kitesurfing world. With these kites you have to inflate the leading edge – thanks to the innovative design of this kite, we can relaunch our kites, continuing our sessions crash after crash, massively aiding the curve of improvement of kiters and the industry entirely.

Where to set up your Leading Edge Inflatable Kite

leading-edge-inflatable-kite-setup

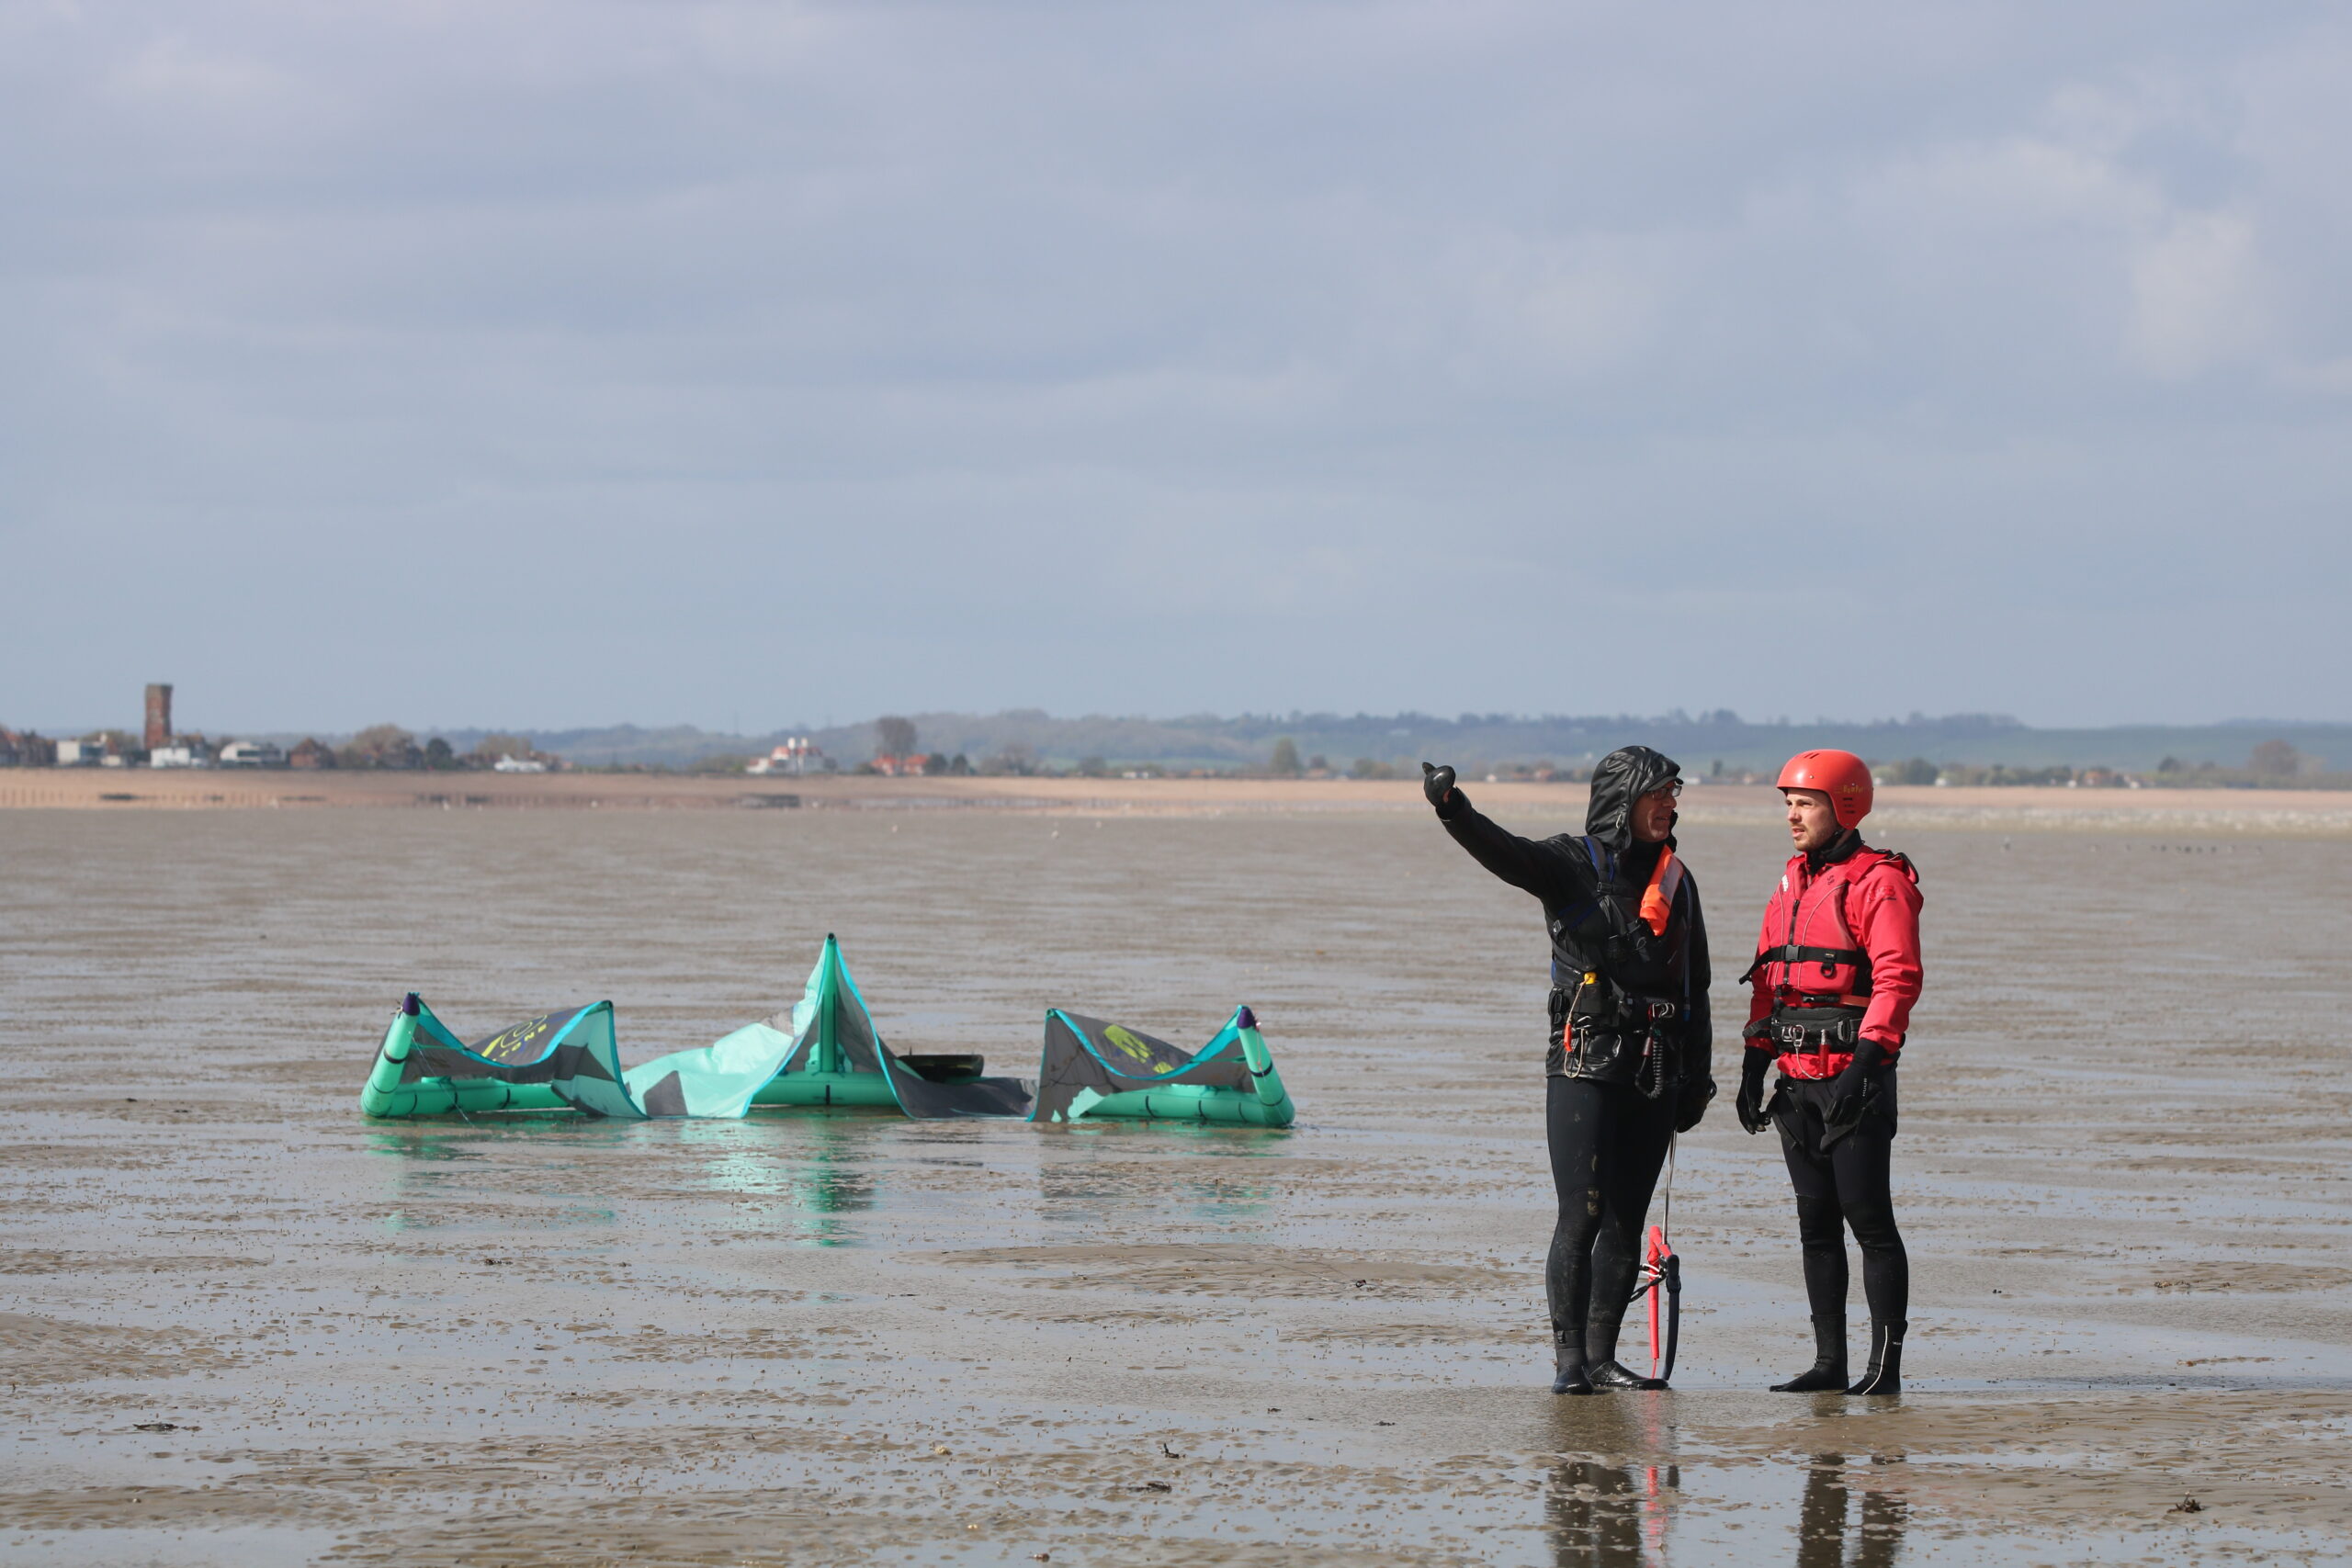
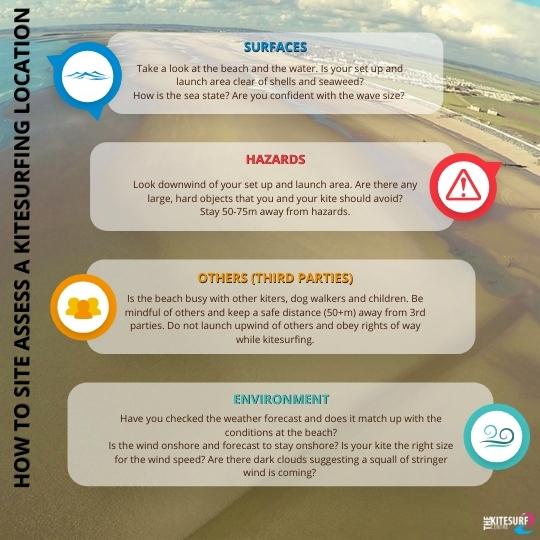
Before you start setting up the Leading Edge Inflatable (LEI) kite, do a site assessment using the mnemonic SHOE to guide you. Are you confident that you’re setting up the correct size kite? You can use this kite size calculation (link) to choose the right kite for your weight and wind speed.
You should set up your LEI kite in an area away from hazards with plenty of space to run your lines.

Setting up your LEI kite

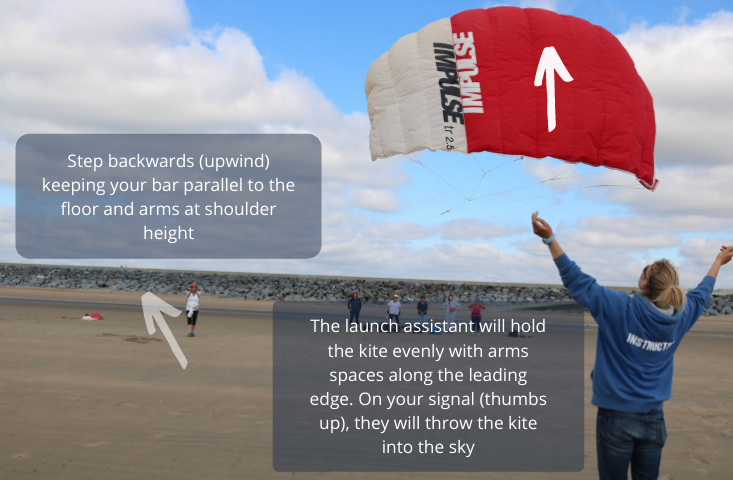
Position yourself to inflate the kite by standing with your back to the wind and the kite downwind of you. Hold the kite by the inflatable leading edge and open up the kite fully before inflating. Connect your harness leash to the kite so that the kite can’t blow away from you with the wind.

Don’t forget to close the deflate valve. Your deflate valve needs to be closed tight so air can’t escape; check for sand before closing. You’ll either have separate inflate and deflate valves or have a single valve that features both inflate and deflate in its design.

Types of LEI kite valves

A standard 11mm deflate valve will require you to push hard to close it. When it’s done properly, you’ll feel it click into place. Put your hand on the other side of the leading edge, underneath the valve, so that you can support it and push hard.

A Boston valve is a 2 layered valve with inflate and deflate separated by a non-return flap. Unscrew the top cap to expose the inflate before you screw in deflate cap.

Some kites use a twist lock mechanism. Duotone and F-one both require their own non-standard pump nozzle to work with their own inflate/deflate systems. Always check that the valve is in the closed position before inflating so the kite doesn’t deflate immediately when you remove the pump nozzle.
Link to duotone pump system
Link to F-One pump system

Pumping up your LEI kite

Your kite will either have multiple points of inflation, or a Single Pump System (SPS). If your kite is multi-pump, start by inflating each strut before inflating the leading edge

Inflate your Leading Edge Inflatable kite with your back to the wind. Keep both feet on the pump at all times, keep your back straight and use your knees so you don’t strain your back while pumping the kite. The kite is inflated properly when it is firm but will bend with mild resistance. Do not inflate over 6PSI while learning. You can then disconnect the pump and close the inflate cap, again making sure it is free from sand.

Weighing down your LEI kite

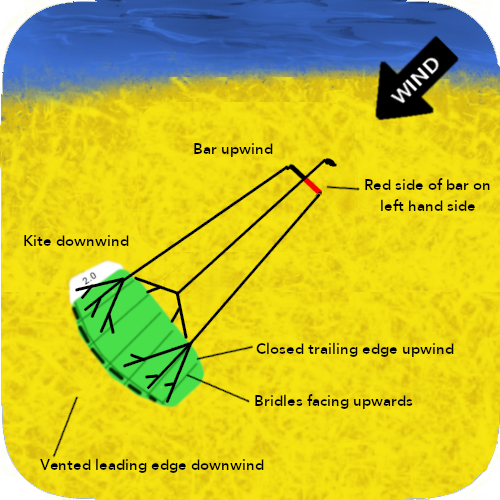
Park the kite by turning it over then weigh it down so it can’t move with the wind. To turn the kite over, keep your back to the wind then walk the kite over by pressing one wingtip into the sand and using that as the pivot point. Your kite will face directly upwind and the wind passing evenly over either side of the centre strut.
To keep the kite secure, throw a few kilograms of sand onto the leading edge and down towards the trailing edge. Never put stones on your Leading Edge Inflatable kite.

Before you move on to your bar, check each bridle is accessible and untangled, and ready for your lines. Your bridles should come towards you without any twists and pulleys able to move freely. Both bridles will be the same length.

Preparing and connecting your kite bar

Unwind your lines walking downwind from the kite. Lay out the bar on the sand so that it is upside down (red on right for setup) and the depower rope runs straight through the bar.

Separating your lines

Separate your lines by keeping the 2 front (inside) lines between your knees and steering lines outside your knees. Walk up the line length removing any twists and making sure each line runs cleanly to each bridle point without passing around another line. If your lines are especially twisted, run the steering lines to the LEI kite first, then run the front lines separately.

Connecting your lines to your LEI kite

Connect your lines to each bridle connection point. Form the larks head loop and place it over the pigtail. The larks head is made by passing the lines loop end over the section of line directly beneath the loop and pulling the line section through. Once you pass the pigtail through the larks head loop the larks head can tighten against it. Pull tight and double check that the larks head loop is snug against the pigtail knot.

Your kite may have multiple connection options. Have a read of this guide to tuning your LEI kitesurfing kite (link) to choose the best setup for the conditions you are riding in.

Repeat this for each connection point. Double check that each connection is pulled tight and that the lines run straight to the bar and are not twisted over each other. DO NOT try to launch the kite if you are not confident that the Leading Edge Inflatable kite is set up properly.

Do your Preflight Checks


There are many more accidents happening around rushed setup and mistakes made during launching than there are with riders out on the water. We can’t emphasise enough how important it is to double check your actions as you set up and launch your Leading Edge Inflatable kite. Get into the habit of doing a series of pre-flight checks before you launch your kite (link).

  • Is every larks head connected properly? Check every connection is secure
  • Is there symmetry in your setup? Every connection should be the same as on the opposite side of the kite. Match up how you connect the steering lines on each side so that your lines are the same length and affect the kite evenly.
  • Are you definitely set up in the right place? Do you need to move away from hazards, and 3rd parties, closer to the water? Don’t launch directly upwind of objects or people. Move into an open space at least 50m away from hazards.
  • Are your safety releases working? Open your quick release and leash release then rebuild at the start of every session so that you know it is working. Check that your safety line pulls through cleanly.

What is The Wind? 4 Top Tips to Become a Big Kitesurf Wind Boffin!

In a sport like Kitesurfing, where we rely on the wind entirely to ride, leap and spin, so when we ask ‘what is the wind?’ it’s important we know the answers! The more knowledge you have, the better equipped you will be assessing wind conditions for your sessions and to speed up your learning journey so you can be a wind whisperer too.

What is the wind?

Wind is the movement of air particles from one place to another, moving from an area of high pressure to an area of low pressure. It is the movement of air that enables our kite to create lift and this allows us the power to move with the kite.

As a beginner kitesurfer, you don’t need to know everything about why wind happens on a global scale, but it is important that you can recognise what it is doing where you are and how you can use it. You need to know how you use your kite to harness the wind, the best directions to kitesurf at your beach and what speeds you should kitesurf with your equipment. Further to this, you should be able to recognise changes and factors that may cause it to increase, decrease or become more turbulent as these can affect your ability to kitesurf safely.

What is the Wind Window Theory?

The radius in which the kite can fly is called the wind-window. The size of the window is determined by the length of your kite lines. You are the centre point; wherever you move while flying the kite, the window moves with you.

wind-window-diagram

The wind-window is the only area that your kite will fly in, it cannot fly beyond. As you stand with your back to the wind, the window reaches crosswind and downwind of you. There are 3 zones of power; neutral, intermediate and power. The closer you fly the kite to the centre of the window, the more power you will get as the kite’s angle is more exposed to the wind.

Around the neutral zone (marked green) the kite has the least power as the surface area of the kite is not angled directly into the wind – a low angle of attack. We can move the kite gently around the neutral zone without generating power making it the safest position for launching, landing and walking.

We refer to the positions on the edge of the wind window as positions on the top half of a clock face. A kite flying directly above us is positioned at 12 o’clock. Steered gently to the left it would move through positions 11, 10 and 9 o’clock. Moved to the right the kite would pass through 1, 2 and 3 o’clock.

The intermediate zone (marked yellow) is further downwind than the neutral zone. As the kite flies through the intermediate zone it has more surface area facing the wind (an increased angle of attack) than before and now generates more lift than in the neutral zone.

Furthest downwind and most central in the window is the power zone. As the kite flies through the power zone its surface area is most exposed to the wind. It is at its highest angle of attack so it generates the most lift.

As we move the kite in and out of the power zone we generate power. You can generate this power on either the left or right side of the wind window and pull you in that direction.

To learn more about forces on the kite and how it flies, read this article (How an LEI Kitesurfing kite flies).

What speeds can I kitesurf in?

As a beginner kiter, it is important to practise within a wind range that is safe and makes it easy for you to practise your skills. Practising independently, we recommend beginners to fly their kites in 10-25mph. Most importantly, it needs to be the correct kite for the wind speed so that you don’t have too much power.

It is the size of the kite and your weight which denotes the strength of the winds you can use. As an example, a 75kg beginner will use a 12m kite in 10-18mph, 9m in 16-22 and a 7m in 22+. Use this useful equation to calculate which size kite you will use (link) based on your weight and the wind speed as you go kiting.

Whenever you go kiting, you should be aware of the forecast and any predictions for the wind to increase, decrease or change direction. If the wind is due to increase, don’t setup too large a kite and be prepared to land and downsize your kite if needed.

Read more about how to read a weather forecast (link).

In addition to the forecast, local effects such as the Seabreeze we often get at Camber Sands can increase wind speed significantly above the forecasted range. If it’s a clear sunny day, a Seabreeze can double the speed, so always bring your smaller kites with you whatever the forecast. Read more about local weather effects (link).

Recognising how windy it is is a skill that you will learn over time and one that is essential to know which kite size you should be flying. This handy wind speed chart shows the visual signs you can spot around you that will indicate roughly what the speed is. If you want to know exactly what the speed is, a wind anemometer will do the job.

The best wind directions to kitesurf?

Along with speed, we want to know what is the wind direction as this will determine which beach we should kitesurf at.

The best directions to kitesurf are when they blow onshore or cross-onshore. These are the safest directions as the wind will return you and your equipment to land. At Camber, our most common direction is a South Westerly which blows cross-onshore. Cross-onshore winds are the ideal direction as they allow the rider to move away from the beach into a safe water depth for riding easily, while also returning the rider to the beach in any event where they cannot ride upwind.

It is also possible to kite in cross-shore wind though riders should be wary of the direction moving to cross-offshore.

Avoid kiting in offshore and cross-offshore winds as even the slightest error or drop in speed, it will drift you out to sea. There are places around the world offering kitesurfing in offshore winds, though these spots tend to offer a paid rescue boat service.

Using resources like Windy or Windfinder, you can find a visual map of your spot and where the wind is blowing from – have a look at camber sands’ wind direction now here to see whether it’s on or offshore.

So Now when someone asks you ‘What is the wind?’ You can tell them all about it!

Next up: How to site assess your kite spot using SHOE

How do Kitesurf Kites Work ? A simple 4 piece puzzle

Learning how a kitesurf kite works can improve your kiting abilities. Understand how your kitesurf kite works and what it needs and you could find yourself reading the environment around you, making for the best sessions of your life. Often a good kiter is a knowledgable kiter!

tony-flying-his-kitesurf-kite

How your bar controls your kitesurf kite.

Most modern Leading Edge Inflatable (LEI) kitesurf kites use a four-line bar with two front lines and two steering lines which connect to your kite’s bridles.

The two front lines of your bar connect to the leading edge attachment points and support the force of the kite, but do not control direction. The steering lines connect to the steering bridle attachment points and affect both direction of the kite and the kite’s angle of attack to the wind.

Your kite may have multiple connection options to adjust it’s performance. Take a look at this guide to tuning your LEI kite (link) to understand how you can use these settings.

As you connect your bars chicken loop to your harness, the force of the kite is not felt in your arms but in your core. You are able to control the angle of the kite to the wind by sheeting the bar in or out along the depower throw.

Forces acting on the kite

forces-acting-on-a-kitesurf-kite

The forces occurring as air passes over and under the kite effect how it flies. Like the wing of an aeroplane, our kite also deals with lift, drag, thrust, and gravity – it also has line tension as an additional force. We’ll quickly introduce these terms before explaining what the effects they have. To keep a kite flying steady the four forces must be in balance.

Lift is the upward force that pushes a kite into the air. Lift is generated by differences in air pressure, which is created by airflow passing above and below the body of the kite. Kites are designed so that air particles moving over the top of the wing, flow faster than the air moving over the bottom. Gravity acts as a downward force on the kite, relative to the weight of the kite. The force of the weight pulls the kite toward the ground.

Thrust is the forward force that propels a kite in the direction of motion. A kite relies on the tension from the lines and moving air created by the wind to generate thrust. Thrust is the reason why the kite will always fly towards the edge of the wind window and won’t stay in the power zone; the kite must fly towards the most upwind point of the wind window.

Drag is the backward force that acts opposite to the direction of motion. Drag is caused by the difference in air pressure between the front and back of the kite and the friction of the air moving over the surface of the kite.

Changing the angle of attack with the bar?

Angle of attack

As the wind reaches the kite, airflow splits at the leading edge of the kite passing over and under it’s surfaces, moving towards the trailing edge, and continuing downwind.

The flow of air going over and beneath the kite reach the trailing edge at the same time. Due to the angle of the kite, the airflow going over the top of the kite must accelerate to reach the trailing edge at the same moment as the airflow passing beneath.

It is this acceleration of airflow over the top of the kite that forms low pressure above the kite and creates lift. The more lift generated, the more it pulls you.

If flying a fixed bridle trainer kite, like the one you use in session one, it’s angle to the wind can only be changed by steering the kite into each zone in the wind window (link). As the kite is flown into the power zone, and the angle of attack is increased, you get the most pull (lift). This is because air is accelerating faster here to reach the trailing edge at the same time as the airflow passing the underside of the kite. You’ll also notice that the kite flies faster through the power zone due to increased thrust.

Sheeting in and sheeting out

If we are flying a depowerable kite, such as the Leading Edge Inflatable (LEI) kite used on the water part of your lessons, the bar can be “sheeted in” and “sheeted out”, pulling the bar closer to us or pushing further away from us along the depower throw. This movement of sheeting on the bar changes the kites angle of attack, giving you additional control over how much lift the kite generates.

Pushing the bar out: (Sheeting out) reduces rear line tension and reduces the kite’s angle of attack so the kite generates less lift. Which in turn pulls the wing tips and the trailing edge of the kite closer to the wind. The result is a tighter turn radius when steering and normally more power, though it is possible to negatively affect the kite by pulling in the bar too much.

Pulling the bar in: (Sheeting in) increases rear line tension and the angle of attack which generates more lift as airflow accelerates over the top of the kite. In this position, the kite generates less power but also has less line tension for controlling direction while steering. With the bar out, the turn radius of the kite will be large and the kite slower to respond to counter steering.

It’s important to remember that this is an additional factor to the amount of lift created by the position of the kite in the wind window. If you steer the kite through the power zone, the kite will still pull you hard, even with the bar sheeted out.

It is possible to “over-sheet” and pull the bar in too far, increasing the angle of attack beyond the kites stable flying range causing unbalanced forces on the kite. When we pull the bar in too far, the airflow over the top of the kite becomes turbulent and can no longer accelerate to the trailing edge to create lift and thrust. This results in an imbalance of pressure above the kite and increased drag. The kite will then “backstall” and fall backwards, instead of flying forwards.

You will be able to recognise when your kite is backstalling as it will feel sluggish, lose power and then fall backwards through its trailing edge. Pushing the bar out will correct this by reducing drag and allowing the kite to fly forwards again.

Our ability to recognise signs of backstalling will enable us to correct our input at the bar and put the kite into a more efficient flying position quickly. A great way to learn this skill is to practice light wind kite flying (link) as you will learn to be more aware of bar position while flying the kite.

Want to know more about the histroy of kitesurf kites? Have a look at this short film about the history of kitesurfing here

NEXT UP: How to launch and land a kitesurf kite

Launching and Landing your Kite Like a #1 Pro

Preflight checks

The moment of launching and landing your kite is the time with the greatest risk and highest chance of an accident occurring. We can’t emphasise enough how important it is to double-check your actions as you set up and are. Doing a thorough kite spot assessment and doing preflight checks will put you on the right track for a successful launch and kitesurfing session.
Here’s what you’ll need to review:

Is every lark’s head connected properly? Check every connection is secure.

Is there symmetry in your setup? Every connection should be the same as on the opposite side of the kite. Match up how you connect the steering lines on each side so that your lines are the same length and affecting the kite evenly before launching and landing your kite.

Are you definitely set up in the right place? Do you need to move away from hazards, third parties, closer to the water? Don’t launch directly upwind of objects or people. Move into an open space at least 50m away from hazards.

Are your safety releases working? Open your quick release and leash release then rebuild at the start of every session so that you know it is working. Check that your safety line pulls through cleanly.

Are you confident you’re on the right sized kite for the conditions? This useful kite size calculation (link) will help you if you’re ever unsure.

Is all of your equipment in good, working condition? Always check throughout your setup for any wear to the kite, bridles, lines and safety line.

here’s a VIDEO for some visual learning

The Role of the Launch Assistant

It is the role of the assistant to launch and land your kite; to hold the kite in the correct position to launch and only to let go of the kite, upon your signal, if they are also confident that the launch will be successful. As the assistant holds the kite, they should check the bridles and lines are straight and the kite is in the correct position in the wind window. The assistant will also be checking for any hazards to ensure that the launch area is safe and at least 50m away from any downwind person or object.

As the assistant, if you are ever doubtful that a launch will be successful, DO NOT let go of the kite. Signal to the rider to stop and correct the issue you have spotted.

The assistant will lift and hold the kite in a C shape with one wingtip resting gently on the ground. The leading edge will face upwind, the centre strut will be parallel to the ground. The assistant should have 2 hands on the kite unless using hand signals to communicate with the rider.

Communication signals between rider and assistant

The following hand signals can be used between rider and assistant during launching and landing a kite:

Thumbs up – OK to launch

Show palm – Wait (show this then put the kite back into the parked position on the ground if something is wrong)

Tap on the head – Land kite

Cup hands together and push forward motion from hips – Use bars quick release to flag the kite out on safety line

Positioning to Launch the Kite

Your assistant is ready to lift the kite and hold it in a C-shape launching position for you, but first you need to connect your safety leash to the safety line and chicken loop to your harness with the locking stick in place to make sure it doesn’t drop off your harness. Always connect your safety leash to the safety ring before anything else. Next you need to move into position to launch.

From setup, the kite is upwind of the bar. You now need to move to a cross wind position so that the assistant can hold the kite launch position for you. Walk the circumference of the lines reach to keep lines under tension as you move to the cross wind position. Whenever you launch, you should have the kite closest to the water away from hazards. In the water is the safest place to be, so if you and the rider can be in the water for launch, do it… we call this the ‘wet feet rule’.

Once the assistant lifts the kite into the launch position, you will need to observe the canopy of the kite to see if the angle of the kite to the wind is sufficient that it can fly.

Push your bar away from you. You should never launch the kite with the bar pulled in. Instead, with only one hand, use the widest part of the bar or the float for more leverage while flying with minimal power. This is the top hand as we’re steering the kite up. If the kite is positioned to your right, you’re steering with your left hand (and vice versa for the opposite side).

Is the canopy flapping? If yes, you need to step upwind until the canopy goes tight and you feel gentle feedback from the wind in the kite. Be careful not to step too far upwind. As you step further upwind, you are positioning the kite closer to the power zone. We should be launching our kite in the neutral zone. You can tell if you’re stepping too far into the wind as the pull into your harness will increase and the assistant will be struggling to hold the kite in place as it tries to surge forward to the edge of the wind window.


Never try to launch with too much power. Stop and trim the kite (link) or choose a smaller kite (link).

Are you and your kite in a good position to launch? Have you got your bar out still? Ok, great – communicate this to the assistant with a thumbs up and wait for the assistant to confirm by also showing a thumbs up. Move your signal hand to your quick release so you can act as fast as possible if something goes wrong. Steer gently with your top hand and guide the kite slowly around the edge of the wind window. Don’t steer quickly or cut corners.  If anything looks or feels wrong, signal to wait and sort the problem before launching.

You only need to bring your kite up to 45º (around 10 or 2 o’clock). You don’t need to bring the kite up to 12 as the kite is already on the waterside. You also don’t need to do ‘test jumps’ at 12, you just need to grab your board and get out into deeper water where you’re safest.

How to Land a Kite

Just like launching your kite, landing should also be done as close to the water as possible. Signal to your assistant with a tap on your head then allow the kite to lower slowly around the edge of the window while you control the kite with the bar out. Again, use the widest part of the bar or even the float as the kite gets closer the ground and you need more leverage for steering. Gravity does all the work of lowering the kite around the edge of the wind window, you’re just controlling the pace of the kites descent.

As you slowly lower the kite the assistant will be able to hold the kite by the leading edge. Once in 2 hands, you can walk towards them to get rid of line tension, then walk downwind of the kite.

As the assistant, once you have caught the kite and have it in 2 hands; you can take a step upwind and towards the rider. This will slacken the lines so that you can hold the kite in a U-Shape carrying position.

You can now move away from the water, put the kite down in the parked ‘setup’ position and weigh it down again with sand.

NEXT UP: How to water relaunch an LEI kitesurfing kite

No sliders selected. Edit this page and select a slider in the Crelly Slider editor block.No sliders selected. Edit this page and select a slider in the Crelly Slider editor block.

The 4 Essential Beach Assessments for Kitesurfing that Could Save Your Life

Beach-Assessments-for-Kitesurfing
Be thorough when performing beach assessments for kitesurfing, especially for the first time at a new spot.

Why We Do Beach Assessments for Kitesurfing?

Beach assessments are one of the most important things to learn during your kitesurfing tuition, which is why we teach it both at the beginning of Session 1, and refresh it at the start of any lessons we teach after that. Performing beach assessments for kitesurfing at the beginning of a session and re-assessing throughout is the first step to being a safe kitesurfer. Recognising hazards allows you to make decisions that maintain the safety of you and others around you.

We use the mnemonic ‘SHOE’ when performing a beach assessment, to help us remember each step:

S – Surface

H – Hazards

O – Others

E – Environment

beach-assessments-for-kitesurfing

S is for ‘Surface’

Before setting up, you should already be doing beach assessments for kitesurfing and this will start with the surface upon which you are setting up your kite and the area on which you intend to launch your kite. While we’re focussing on the letter “S for Surface”, let’s also remember Sharp and Slippy as the two land surfaces that you’ll want to avoid. Aim to find a good open sandy area that is free of seaweed and shells.

Next, take a look at the water for movement and variation. When doing beach assessments for kitesurfing, you can use these to judge things like wind speed and water depth, which will help you decide both where to kite and what equipment to use.

The surface of the water can also give us clues about where to kitesurf and what equipment to use. Shallow water is created by sandbanks, so the waves will be higher in shallow water than they are in the surrounding area. Very shallow water can be spotted easily by either seeing through to the ocean floor or by very small ripples. On a flat or very slightly sloping beach, the very edge of the shoreline and for a few metres, the water is only a couple of inches deep and is normally flat. Whilst there is a temptation to try and kite on shallow, flat water, avoid it. The risk of crash injury is much greater.

H is for ‘Hazards’

It’s always important to check for hazards around you, both during the beach assessment before your session and throughout the session itself. The usual rule when setting up your kite is to make sure you are at least two line lengths (approximately 50 metres) away from any hazards. This way, if there is a problem during launch you have more time to correct it, and or release your kite, before coming too close to a hazard.

Different hazards can appear at different tide states, so it is important to know at which times you cannot kite safely at a beach due to these hazards. For example, at high tide there may not be enough beach space for you to launch keeping at least two line lengths away from hazards such as sea walls and buildings. At low tide, hazards on the sea floor such as shipwrecks and trash may appear.

O is for ‘Others’

When you’re kiting, it’s highly unlikely that there will be no one else around. In fact, if there is no one around then it is important to check why – are the conditions not suitable for kitesurfing? Is there a hazard (that perhaps you are unable to see) at the beach, which makes it too dangerous to kite there? Be especially thorough with your beach assessments for kitesurfing. As kitesurfing becomes more and more popular it is likely that if there is no one else kitesurfing there is a very good reason that you shouldn’t either. The safest way to launch is also to have someone with you to assist you, and self-launching is only recommended for advanced level kiters.

Keep in mind that other people at the beach may not be kitesurfers, so they may not know that it is unsafe to walk underneath your lines or to swim out in an area where people are kitesurfing. If someone gets too close or is putting themselves in a position of danger politely ask them to move, explaining why. At some beaches there are designated kiting zones, so ensure you keep to them.

E is for ‘Environment’

As with hazards, it is important to check the environment in your beach assessment for kitesurfing. When planning to go kitesurfing at a particular beach, you should always check the weather forecast before leaving to avoid driving for hours to find a completely windless beach! However, it is important to remember that it is only a forecast, and you should base your kite size decisions on what is actually happening at the beach, not just the forecast.

In order to roughly determine the wind speed, you can look for certain things:

  • White caps start to form at around 8 – 10 knots, and become more frequent and prominent as the wind increases (take care to remember that things like land masses or harbours may mean that the water remains flat despite there being strong wind)
  • Seagulls are able to hover at around 20 knots
  • Sand starts to blow across the beach at approximately 25 knots

Windsocks allow you to gauge the wind more precisely. Each stripe on the windsock, starting from the one closest to the flagpole, indicates a speed of 3 knots. You can count how many stripes are flying horizontally (rather than appearing to hang down) and calculate the speed, up to 15 knots (the entire sock flying horizontally). If you’re looking to practise light wind flying, this is perfect!

You can use clues like this to determine which kite size to use, whether or not to take a larger or smaller board, and if you will adjust your line length.

Beaches like Camber Sands experience thermal winds which can add an extra 30% onto the forecast, so a 25mph forecast could mean a 33mph wind. This is one reason why we advise kitersurfers to bring all of their kites in the car with them, as it can be the case that the one kite you leave at home is the one you end up needing! If you are stuck in this position, you should never go out on the wrong sized kite as it can be very dangerous. Either rent a kite or do not go out.

How Tides Affect Kitesurfers or – Tides and Kites: A Love Story

Since kitesurfing is (often!) done on the sea, tides affect the sport a lot. Understanding how they work and what that means for kitesurfing is an important element of staying safe. Tides affect different beaches in different ways, so it’s important not just to have a general understanding, but also to know how they affect kiting at the spot you’re visiting.

Why do we have tides?

Every beach on Earth is tidal, though the effects are so small at some locations that we don’t notice them at all, or they don’t affect when we can kitesurf. Tides are created by the gravitational pull on the Earth from the moon, and by the centrifugal force of the Earth spinning on it’s axis. Because one side of the Earth faces the Moon, the sea on this side is closer to it, so the Moon’s gravitational pull causes a tidal bulge – the first high tide.

The second high tide is caused by Earth spinning on it’s axis. This centrifugal force, the same force that throws you off a roundabout as a child (or an adult – we won’t judge!), creates a tidal bulge on the opposite side of the Earth to the first tide.       

The Earth’s land masses affect the tidal pattern also. In most places, the tide is semi-diurnal, which means there are two highs and two lows each day, with each being roughly the same height. However, there are some places where the land masses create a mixed semi-diurnal tide, where they are of varying heights, or a diurnal tide, where there is only one high and one low each day.

What Happens During the Tides?

There are roughly 6 hours between each high and low tide, and the times of each moves each day. The rule of twelfths shows us how much water is moving in each hour between high and low. If you sit on the beach and watch, you can see that in the first hour before and after a tide shift, the water does not rise or fall much. This is why (much to the frustration of kitesurfers!), the water is at a similar level to high tide for a long time.

tide-rule-of-tweflths

Image taken from activeanglingnz.com

As you can see from the diagram, the largest volume of water moves during mid tide. This is when currents are strongest and the beach appears or disappears fastest, so it is important to stay aware at all times. At some locations, high tide may mean there is not enough space to safely launch or land your kite, or that there is a shore dump. It is important to ensure you know how the tide effects the spot you are kiting at.

Spring’s and Neap’s

During new and full moons, the sun, Earth and moon are in a straight line. During this time, the tidal forces of the sun and moon act together, meaning tides on Earth are both higher than the average at high tide and lower than the average at low tide. During the first and last quarter moon phases the sun and moon are at right angles to each other, so their tidal forces counteract each other, and tides on Earth are lower than average at high tide and higher than average at low tide.

tidal-moon-phases

Since we know the movements of the sun, Earth and moon, we can create tide charts years in advance. Three or four times a year, the spring tide occurs whilst the moon is in perigee (the closest it comes to Earth during it’s orbit). At this point, we get what is known as a perigean spring tide or ‘King Tide’, as the moon’s pull on the Earth’s seas is at its strongest.

Weather

The weather can also affect the tides; strong winds can push water on or offshore and slightly increase or decrease the tidal movements outside the predictions. High and low pressure systems can also affect it. For every millibar over standard pressure (1013mb) a system is, the tidal height is reduced by 1cm. Conversely, for every millibar lower than standard pressure a system is, the tidal height is increased by 1cm.

How Tides Affect Kitesurfing

Knowing how the tide affects kitesurfing at any spot you visit is vital. The first thing to make sure you know is the differences at each state. Whilst at some beaches it is possible to kite at high tide, at others there may be no space to safely launch and land without being too close too hazards. Because of the rule of twelfths that we discussed earlier; this may be the case for several hours of the day.

Camber Sands, our home beach, is not safe for kitesurfing from 5 hours around high tide. As the times of the tides moves each day, this can mean that high tide happens early morning and late night, so you can kite almost all day, but it can also mean that the high happens in the middle of the day, so you can only kite in the early morning or evening. There’s nothing more frustrating than turning up to a spot to realise you can’t get out for another four hours, so it’s important to check the tidal chart before setting out.

As well as meaning that it’s not possible to kite at all, different tidal states can bring new hazards or challenging conditions which may not be suited to lower level riders. It’s not just high tide that can be hazardous; shore dumps may be present at any point, making it necessary to upwind body drag until in a safer and easier place to board start. At low tide, it is possible that there may be hazards such as shipwrecks that are now above the water line, so it is necessary to stay well away from these at all times.

Different states may also create different conditions on the water, which can be both helpful and a hindrance. Sandbanks may create lagoons of flat water perfect for both beginners learning to board start and advanced riders trying wakestyle tricks. High tide may create waves perfect for boosting from or riding a surfboard.

Again due to the rule of twelfths, tidal state can change rapidly. Whilst it may seem that there is plenty of beach left, if it’s mid tide, it can disappear pretty quickly if it is on its way out and can also mean areas of shallow water on sandbanks appearing very quickly if the tide is on it’s way down. What was waist deep water 20 minutes ago can very quickly be ankle deep. It’s important to be able to check for areas of shallow water by noticing where the waves are bigger than they are in the surrounding area (part of your SHOE site assessment) to ensure you remain in at least waist deep water.

How to Read a Tide Chart

When looking at a tide chart in terms of kitesurfing, we need to take note of when each high and low tide is, and the size.

As we’ve discussed, it’s important to know what tidal states are safe for the beach you’re going to, so you’ll need to know how to tell at what time those will be. On a tide chart, they are normally shown in a wave pattern, with the peak being high and the trough being low. Most online charts will show a table next to the chart with the time of each high and low tide, but if not, simply check along the x-axis to see what time corresponds with the peak of the wave.

As you can see in the image above, the table on the left shows that high tides are at 2:52am and 3:14pm, which corresponds with the peak of the waves in the chart on the right. The y-axis shows the height from the datum (usually the lowest astronomical tidal point). In this example, the high in the afternoon is 7.2m, meaning the water will be 7.2 metres above datum. For kitesurfing purposes, it is important to know the height so you can see whether the water will be ‘up’ for longer. In some cases, if there is a large high tide and strong winds, those high tidal conditions can last for up to an hour longer than predicted.

4 Steps to Powerkite better than ever

Learning to fly a powerkite is the first step to learning to kitesurf and is something you can continue to do to further improve your kite flying skills. Since 80% of kitesurfing is kite control, it is the best way to speed up the learning process. Powerkite flying is also useful for students who want to learn either kite buggying or kite landboarding, rather than heading into the water. Powerkite flying is taught on Day 1 of all of our group kitesurfing courses, at the beginning of the kite buggying and kite landboarding courses, and we also teach a standalone powerkite flying lesson.

Site Assessment

As with any kiting, the first stage of setting up and flying your powerkite is to perform a full site assessment of the location you have chosen. The site assessment is important to ensure the safety of you and others around you, as well as reducing the risk of damaging your kite.

Once you have performed a site assessment and decided it is safe to fly where you are, it is time to set up the kite. The instructions below are for a Peter Lynn Impulse Trainer, which we use in our school, but they will work for other 3 line trainer kites. We use the Impulse Trainer because it is incredibly easy to use, super fun to fly and pretty indestructible – you’re bound to crash the kite a few times as you learn so this is important! The Peter Lynn Impulse Trainer comes with pre-attached flying lines, making it very easy to set up.

Setting Up

During the site assessment you will have determined which way the wind is blowing, so you know which direction downwind is. You will also have noted how strong the wind is, which will affect your choice in kite size. The Impulse Trainer comes in 3 sizes; 1.5m, 2m and 3m. At The Kitesurf Centre use these on the majority of our lessons, though if the wind is particularly strong we may also use a Flexifoil Buzz 0.6m.

powerkite-wind-window-theory

First, take the kite out of the bag and roll it out gently on the floor downwind of where you will be standing to fly it, with the lines on top of the kite and the open, vented edge (known as the Leading Edge) furthest away from you. Check the bridles are not tangled – if you have packed the kite away neatly (which you’ll learn later in this tutorial), this should not be a problem. However, it is always important to check.

Next, weigh down the trailing edge of the kite. If you are flying on the beach you can use sand (taking care to avoid stones and shells), if you are flying inland you can use small weighted bags.

Walking backwards upwind, unwrap your lines, checking for any damage as you go. Once you get to the end of the lines, lay the bar on the ground with the red side of the bar on the left, and the safety line running cleanly through the bar. Check the bar and safety line for any damage whilst you do this.

Walk back up the lines towards your kite, separating them as you go by running them between your index and middle fingers. The red (left) steering line will go the left bridle, and the right (black, green or blue) line goes to the right bridle. If your kite has 3 lines, as the Impulse Trainer does, the safety line attaches to a bridle along the trailing edge. On 2 line kites, the safety line is one of the steering lines, so the kite will flag out along this, with your wrist safety leash attaching to the right side of the bar.

If your lines do not come pre-attached, use a larks head knot to connect each line to its corresponding bridle. You can make a larks head knot by passing the loop at the end of the line over the line and pulling the line through to create a new loop, then running the knot at the end of the line you are attaching through this loop and pulling the loop close next to the knot. Check each knot is secure before flying the kite.

Double check that everything is set up properly, that each connection is secure, the bar is the right way, and that there is no damage to the kite, bar or lines.

Launching the Powerkite

The safest way to learn to fly a trainer or powerkite is to take a lesson with a fully qualified instructor. This will ensure you learn the correct techniques and safety procedures. However, there are some basic kite flying techniques you can go through on your own (and even repeat after a lesson) to improve your skills. You can fly the kite on your own or with a friend – it’s good for safety to have someone to help you with setting up and launching / re-launching the kite, but it’s also just great fun to have a friend to fly with!

Before launching, it is important to become familiar with how the kite is controlled; how it steers; how you can reduce the power. You can control the kite in a similar way to a bicycle, if you pull your right arm towards you and extend your left arm away from you, the kite will steer right. Likewise, if you pull your left arm towards you and extend your right arm away from you, the kite will steer left. The wrist leash allows you to remove all of the power in the kite instantly by letting go of the bar. The kite will fall to the ground without any pull.

Once you are familiar with the controls for the kite and are ready to fly it, attach your wrist leash and pick up the control bar. Check the surrounding area again for any hazards – trees, people, rocks etc. Ensure your back is still to the wind, as the direction may have changed slightly whilst you were setting up the kite.

All checked? – you’re ready to fly! Holding the bar in your hands, step backwards away from the kite. This should cause the kite to pick up the wind enough that the sand you have used to weigh down the trailing edge falls off. If it is not enough, try taking another small step backwards and gently pulling the bar towards you. Keep your bar straight so that the kite launches and flies straight overhead, coming to rest at 12 o’clock in the wind window.

powerkite-launching

Flying the Powerkite

When you are ready, gently steer left and right with small movements of the bar, remembering to keep your back to the wind and steering the bar like a bicycle, rather than like a car steering wheel. Keeping the kite high produces less power, steering the kite lower increases the power. As you become more confident, you can begin to use larger movements and steer the kite through the power zone to generate more power.

Always aim for symmetry in the movement of your kite – using smooth and controlled motions. Imagine the upper half of a clock face in front of you and fly the kite in a figure of 8 motion, first between 12 o’clock and 2 o’clock, and then between 12 o’clock and 10 o’clock.

You can also practise keeping the kite still at each position on the clock; 10 o’clock, 11 o’clock, 12 o’clock, 1 o’clock and 2 o’clock. This will take time, but the more you practise the more natural steering and keeping the kite still will become, and these control skills are directly transferable to flying LEI kites which you use in kitesurfing.

Once you have mastered the basic control of the kite, you can try to control the kite with one hand. This is a skill you will use a lot when kitesurfing, so it’s great to cover it early. You can also practise flying the kite without looking at it, trying to feel where the kite is in the air from the sensations coming through the bar.

Remember, if at any point you feel you are not in control of the kite, simply let go of the bar and all of the power in the kite will dissipate instantly. You can then begin the launch process again, making sure to check for any damage again before you relaunch.

Still not sure? Have a look at this video for some more visual aids