A Leading Edge Inflatable Kite is more commonly known as an LEI kite and is the most common design of kite in the modern kitesurfing world. With these kites you have to inflate the leading edge – thanks to the innovative design of this kite, we can relaunch our kites, continuing our sessions crash after crash, massively aiding the curve of improvement of kiters and the industry entirely.
Where to set up your Leading Edge Inflatable Kite

Before you start setting up the Leading Edge Inflatable (LEI) kite, do a site assessment using the mnemonic SHOE to guide you. Are you confident that you’re setting up the correct size kite? You can use this kite size calculation (link) to choose the right kite for your weight and wind speed.
You should set up your LEI kite in an area away from hazards with plenty of space to run your lines.
Setting up your LEI kite
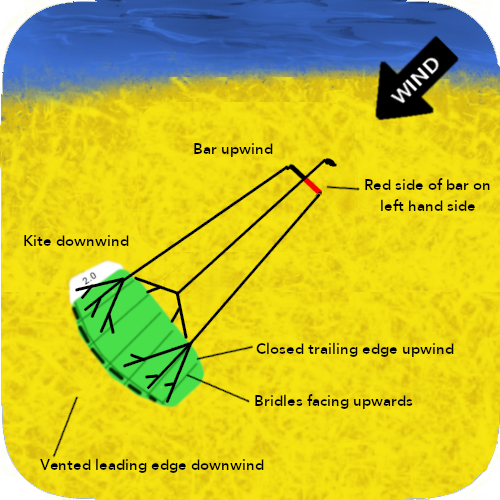
Position yourself to inflate the kite by standing with your back to the wind and the kite downwind of you. Hold the kite by the inflatable leading edge and open up the kite fully before inflating. Connect your harness leash to the kite so that the kite can’t blow away from you with the wind.
Don’t forget to close the deflate valve. Your deflate valve needs to be closed tight so air can’t escape; check for sand before closing. You’ll either have separate inflate and deflate valves or have a single valve that features both inflate and deflate in its design.
Types of LEI kite valves
A standard 11mm deflate valve will require you to push hard to close it. When it’s done properly, you’ll feel it click into place. Put your hand on the other side of the leading edge, underneath the valve, so that you can support it and push hard.
A Boston valve is a 2 layered valve with inflate and deflate separated by a non-return flap. Unscrew the top cap to expose the inflate before you screw in deflate cap.
Some kites use a twist lock mechanism. Duotone and F-one both require their own non-standard pump nozzle to work with their own inflate/deflate systems. Always check that the valve is in the closed position before inflating so the kite doesn’t deflate immediately when you remove the pump nozzle.
Link to duotone pump system
Link to F-One pump system
Pumping up your LEI kite
Your kite will either have multiple points of inflation, or a Single Pump System (SPS). If your kite is multi-pump, start by inflating each strut before inflating the leading edge
Inflate your Leading Edge Inflatable kite with your back to the wind. Keep both feet on the pump at all times, keep your back straight and use your knees so you don’t strain your back while pumping the kite. The kite is inflated properly when it is firm but will bend with mild resistance. Do not inflate over 6PSI while learning. You can then disconnect the pump and close the inflate cap, again making sure it is free from sand.
Weighing down your LEI kite
Park the kite by turning it over then weigh it down so it can’t move with the wind. To turn the kite over, keep your back to the wind then walk the kite over by pressing one wingtip into the sand and using that as the pivot point. Your kite will face directly upwind and the wind passing evenly over either side of the centre strut.
To keep the kite secure, throw a few kilograms of sand onto the leading edge and down towards the trailing edge. Never put stones on your Leading Edge Inflatable kite.
Before you move on to your bar, check each bridle is accessible and untangled, and ready for your lines. Your bridles should come towards you without any twists and pulleys able to move freely. Both bridles will be the same length.
Preparing and connecting your kite bar
Unwind your lines walking downwind from the kite. Lay out the bar on the sand so that it is upside down (red on right for setup) and the depower rope runs straight through the bar.
Separating your lines
Separate your lines by keeping the 2 front (inside) lines between your knees and steering lines outside your knees. Walk up the line length removing any twists and making sure each line runs cleanly to each bridle point without passing around another line. If your lines are especially twisted, run the steering lines to the LEI kite first, then run the front lines separately.
Connecting your lines to your LEI kite
Connect your lines to each bridle connection point. Form the larks head loop and place it over the pigtail. The larks head is made by passing the lines loop end over the section of line directly beneath the loop and pulling the line section through. Once you pass the pigtail through the larks head loop the larks head can tighten against it. Pull tight and double check that the larks head loop is snug against the pigtail knot.
Your kite may have multiple connection options. Have a read of this guide to tuning your LEI kitesurfing kite (link) to choose the best setup for the conditions you are riding in.
Repeat this for each connection point. Double check that each connection is pulled tight and that the lines run straight to the bar and are not twisted over each other. DO NOT try to launch the kite if you are not confident that the Leading Edge Inflatable kite is set up properly.
Do your Preflight Checks
There are many more accidents happening around rushed setup and mistakes made during launching than there are with riders out on the water. We can’t emphasise enough how important it is to double check your actions as you set up and launch your Leading Edge Inflatable kite. Get into the habit of doing a series of pre-flight checks before you launch your kite (link).
- Is every larks head connected properly? Check every connection is secure
- Is there symmetry in your setup? Every connection should be the same as on the opposite side of the kite. Match up how you connect the steering lines on each side so that your lines are the same length and affect the kite evenly.
- Are you definitely set up in the right place? Do you need to move away from hazards, and 3rd parties, closer to the water? Don’t launch directly upwind of objects or people. Move into an open space at least 50m away from hazards.
- Are your safety releases working? Open your quick release and leash release then rebuild at the start of every session so that you know it is working. Check that your safety line pulls through cleanly.

