How do Kitesurf Kites Fly ? A simple 4 piece puzzle

Learning how a kitesurf kite works can improve your kiting abilities. Understand how your kitesurf kite works and what it needs and you could find yourself reading the environment around you, making for the best sessions of your life. Often a good kiter is a knowledgable kiter!

tony-flying-his-kitesurf-kite

How your bar controls your kitesurf kite.

Most modern Leading Edge Inflatable (LEI) kitesurf kites use a four-line bar with two front lines and two steering lines which connect to your kite’s bridles.

The two front lines of your bar connect to the leading edge attachment points and support the force of the kite, but do not control direction. The steering lines connect to the steering bridle attachment points and affect both direction of the kite and the kite’s angle of attack to the wind.

Your kite may have multiple connection options to adjust it’s performance. Take a look at this guide to tuning your LEI kite (link) to understand how you can use these settings.

As you connect your bars chicken loop to your harness, the force of the kite is not felt in your arms but in your core. You are able to control the angle of the kite to the wind by sheeting the bar in or out along the depower throw.

Forces acting on the kite

forces-acting-on-a-kitesurf-kite

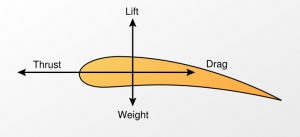
The forces occurring as air passes over and under the kite effect how it flies. Like the wing of an aeroplane, our kite also deals with lift, drag, thrust, and gravity – it also has line tension as an additional force. We’ll quickly introduce these terms before explaining what the effects they have. To keep a kite flying steady the four forces must be in balance.

Lift is the upward force that pushes a kite into the air. Lift is generated by differences in air pressure, which is created by airflow passing above and below the body of the kite. Kites are designed so that air particles moving over the top of the wing, flow faster than the air moving over the bottom. Gravity acts as a downward force on the kite, relative to the weight of the kite. The force of the weight pulls the kite toward the ground.

Thrust is the forward force that propels a kite in the direction of motion. A kite relies on the tension from the lines and moving air created by the wind to generate thrust. Thrust is the reason why the kite will always fly towards the edge of the wind window and won’t stay in the power zone; the kite must fly towards the most upwind point of the wind window.

Drag is the backward force that acts opposite to the direction of motion. Drag is caused by the difference in air pressure between the front and back of the kite and the friction of the air moving over the surface of the kite.

Changing the angle of attack with the bar?

Angle of attack

As the wind reaches the kite, airflow splits at the leading edge of the kite passing over and under it’s surfaces, moving towards the trailing edge, and continuing downwind.

The flow of air going over and beneath the kite reach the trailing edge at the same time. Due to the angle of the kite, the airflow going over the top of the kite must accelerate to reach the trailing edge at the same moment as the airflow passing beneath.

It is this acceleration of airflow over the top of the kite that forms low pressure above the kite and creates lift. The more lift generated, the more it pulls you.

If flying a fixed bridle trainer kite, like the one you use in session one, it’s angle to the wind can only be changed by steering the kite into each zone in the wind window (link). As the kite is flown into the power zone, and the angle of attack is increased, you get the most pull (lift). This is because air is accelerating faster here to reach the trailing edge at the same time as the airflow passing the underside of the kite. You’ll also notice that the kite flies faster through the power zone due to increased thrust.

Sheeting in and sheeting out

If we are flying a depowerable kite, such as the Leading Edge Inflatable (LEI) kite used on the water part of your lessons, the bar can be “sheeted in” and “sheeted out”, pulling the bar closer to us or pushing further away from us along the depower throw. This movement of sheeting on the bar changes the kites angle of attack, giving you additional control over how much lift the kite generates.

Pushing the bar out: (Sheeting out) reduces rear line tension and reduces the kite’s angle of attack so the kite generates less lift. Which in turn pulls the wing tips and the trailing edge of the kite closer to the wind. The result is a tighter turn radius when steering and normally more power, though it is possible to negatively affect the kite by pulling in the bar too much.

Pulling the bar in: (Sheeting in) increases rear line tension and the angle of attack which generates more lift as airflow accelerates over the top of the kite. In this position, the kite generates less power but also has less line tension for controlling direction while steering. With the bar out, the turn radius of the kite will be large and the kite slower to respond to counter steering.

It’s important to remember that this is an additional factor to the amount of lift created by the position of the kite in the wind window. If you steer the kite through the power zone, the kite will still pull you hard, even with the bar sheeted out.

It is possible to “over-sheet” and pull the bar in too far, increasing the angle of attack beyond the kites stable flying range causing unbalanced forces on the kite. When we pull the bar in too far, the airflow over the top of the kite becomes turbulent and can no longer accelerate to the trailing edge to create lift and thrust. This results in an imbalance of pressure above the kite and increased drag. The kite will then “backstall” and fall backwards, instead of flying forwards.

You will be able to recognise when your kite is backstalling as it will feel sluggish, lose power and then fall backwards through its trailing edge. Pushing the bar out will correct this by reducing drag and allowing the kite to fly forwards again.

Our ability to recognise signs of backstalling will enable us to correct our input at the bar and put the kite into a more efficient flying position quickly. A great way to learn this skill is to practice light wind kite flying (link) as you will learn to be more aware of bar position while flying the kite.

Want to know more about the histroy of kitesurf kites? Have a look at this short film about the history of kitesurfing here

NEXT UP: How to launch and land a kitesurf kite

Launching and Landing your Kite Like a #1 Pro

Preflight checks

The moment of launching and landing your kite is the time with the greatest risk and highest chance of an accident occurring. We can’t emphasise enough how important it is to double-check your actions as you set up and are. Doing a thorough kite spot assessment and doing preflight checks will put you on the right track for a successful launch and kitesurfing session.
Here’s what you’ll need to review:

Is every lark’s head connected properly? Check every connection is secure.

Is there symmetry in your setup? Every connection should be the same as on the opposite side of the kite. Match up how you connect the steering lines on each side so that your lines are the same length and affecting the kite evenly before launching and landing your kite.

Are you definitely set up in the right place? Do you need to move away from hazards, third parties, closer to the water? Don’t launch directly upwind of objects or people. Move into an open space at least 50m away from hazards.

Are your safety releases working? Open your quick release and leash release then rebuild at the start of every session so that you know it is working. Check that your safety line pulls through cleanly.

Are you confident you’re on the right sized kite for the conditions? This useful kite size calculation (link) will help you if you’re ever unsure.

Is all of your equipment in good, working condition? Always check throughout your setup for any wear to the kite, bridles, lines and safety line.

here’s a VIDEO for some visual learning

The Role of the Launch Assistant

It is the role of the assistant to launch and land your kite; to hold the kite in the correct position to launch and only to let go of the kite, upon your signal, if they are also confident that the launch will be successful. As the assistant holds the kite, they should check the bridles and lines are straight and the kite is in the correct position in the wind window. The assistant will also be checking for any hazards to ensure that the launch area is safe and at least 50m away from any downwind person or object.

As the assistant, if you are ever doubtful that a launch will be successful, DO NOT let go of the kite. Signal to the rider to stop and correct the issue you have spotted.

The assistant will lift and hold the kite in a C shape with one wingtip resting gently on the ground. The leading edge will face upwind, the centre strut will be parallel to the ground. The assistant should have 2 hands on the kite unless using hand signals to communicate with the rider.

Communication signals between rider and assistant

The following hand signals can be used between rider and assistant during launching and landing a kite:

Thumbs up – OK to launch

Show palm – Wait (show this then put the kite back into the parked position on the ground if something is wrong)

Tap on the head – Land kite

Cup hands together and push forward motion from hips – Use bars quick release to flag the kite out on safety line

Positioning to Launch the Kite

Your assistant is ready to lift the kite and hold it in a C-shape launching position for you, but first you need to connect your safety leash to the safety line and chicken loop to your harness with the locking stick in place to make sure it doesn’t drop off your harness. Always connect your safety leash to the safety ring before anything else. Next you need to move into position to launch.

From setup, the kite is upwind of the bar. You now need to move to a cross wind position so that the assistant can hold the kite launch position for you. Walk the circumference of the lines reach to keep lines under tension as you move to the cross wind position. Whenever you launch, you should have the kite closest to the water away from hazards. In the water is the safest place to be, so if you and the rider can be in the water for launch, do it… we call this the ‘wet feet rule’.

Once the assistant lifts the kite into the launch position, you will need to observe the canopy of the kite to see if the angle of the kite to the wind is sufficient that it can fly.

Push your bar away from you. You should never launch the kite with the bar pulled in. Instead, with only one hand, use the widest part of the bar or the float for more leverage while flying with minimal power. This is the top hand as we’re steering the kite up. If the kite is positioned to your right, you’re steering with your left hand (and vice versa for the opposite side).

Is the canopy flapping? If yes, you need to step upwind until the canopy goes tight and you feel gentle feedback from the wind in the kite. Be careful not to step too far upwind. As you step further upwind, you are positioning the kite closer to the power zone. We should be launching our kite in the neutral zone. You can tell if you’re stepping too far into the wind as the pull into your harness will increase and the assistant will be struggling to hold the kite in place as it tries to surge forward to the edge of the wind window.


Never try to launch with too much power. Stop and trim the kite (link) or choose a smaller kite (link).

Are you and your kite in a good position to launch? Have you got your bar out still? Ok, great – communicate this to the assistant with a thumbs up and wait for the assistant to confirm by also showing a thumbs up. Move your signal hand to your quick release so you can act as fast as possible if something goes wrong. Steer gently with your top hand and guide the kite slowly around the edge of the wind window. Don’t steer quickly or cut corners.  If anything looks or feels wrong, signal to wait and sort the problem before launching.

You only need to bring your kite up to 45º (around 10 or 2 o’clock). You don’t need to bring the kite up to 12 as the kite is already on the waterside. You also don’t need to do ‘test jumps’ at 12, you just need to grab your board and get out into deeper water where you’re safest.

How to Land a Kite

Just like launching your kite, landing should also be done as close to the water as possible. Signal to your assistant with a tap on your head then allow the kite to lower slowly around the edge of the window while you control the kite with the bar out. Again, use the widest part of the bar or even the float as the kite gets closer the ground and you need more leverage for steering. Gravity does all the work of lowering the kite around the edge of the wind window, you’re just controlling the pace of the kites descent.

As you slowly lower the kite the assistant will be able to hold the kite by the leading edge. Once in 2 hands, you can walk towards them to get rid of line tension, then walk downwind of the kite.

As the assistant, once you have caught the kite and have it in 2 hands; you can take a step upwind and towards the rider. This will slacken the lines so that you can hold the kite in a U-Shape carrying position.

You can now move away from the water, put the kite down in the parked ‘setup’ position and weigh it down again with sand.

NEXT UP: How to water relaunch an LEI kitesurfing kite

No sliders selected. Edit this page and select a slider in the Crelly Slider editor block.No sliders selected. Edit this page and select a slider in the Crelly Slider editor block.