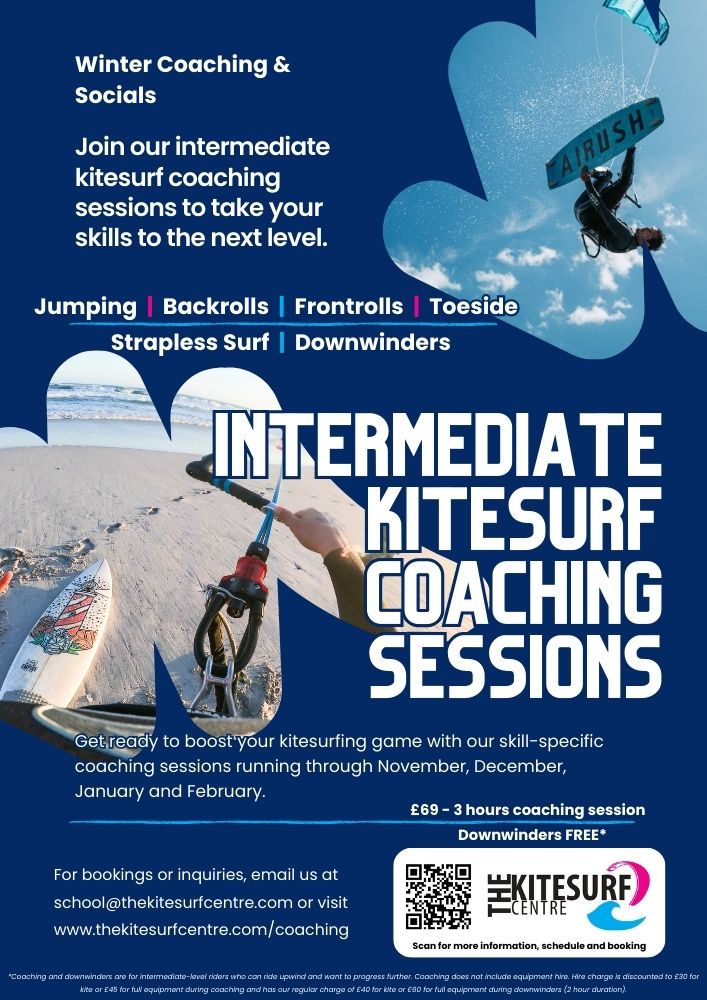
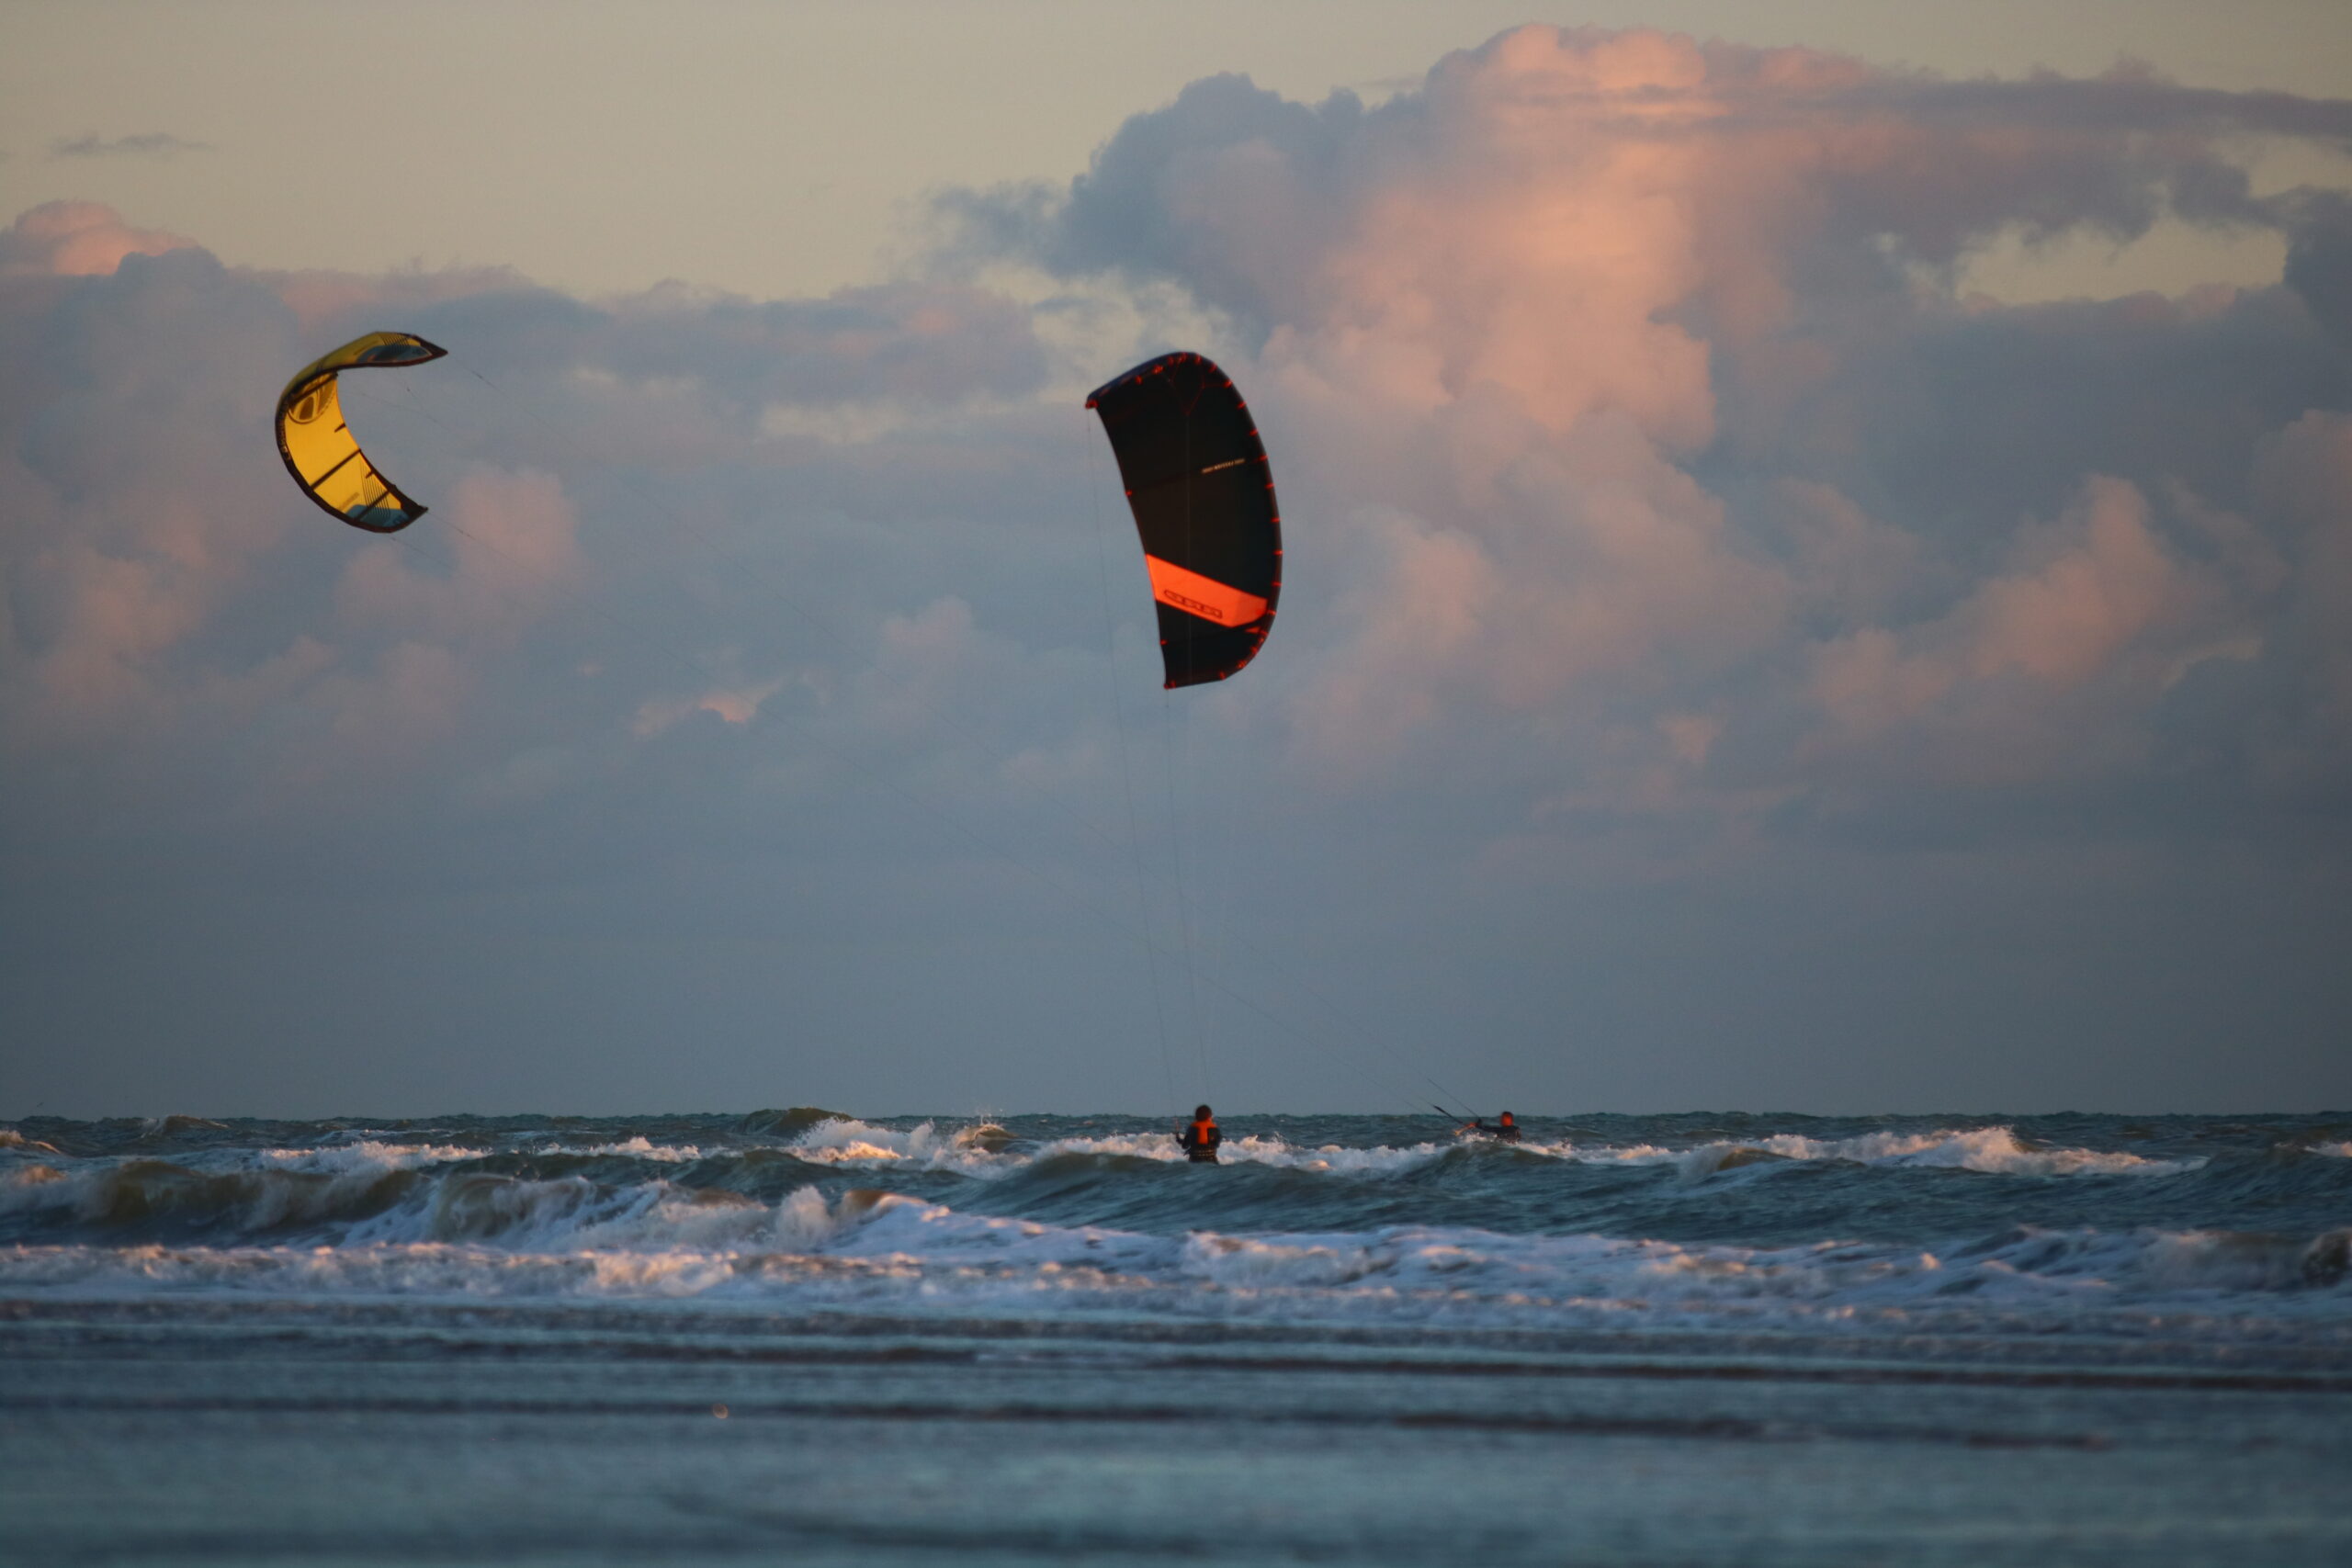
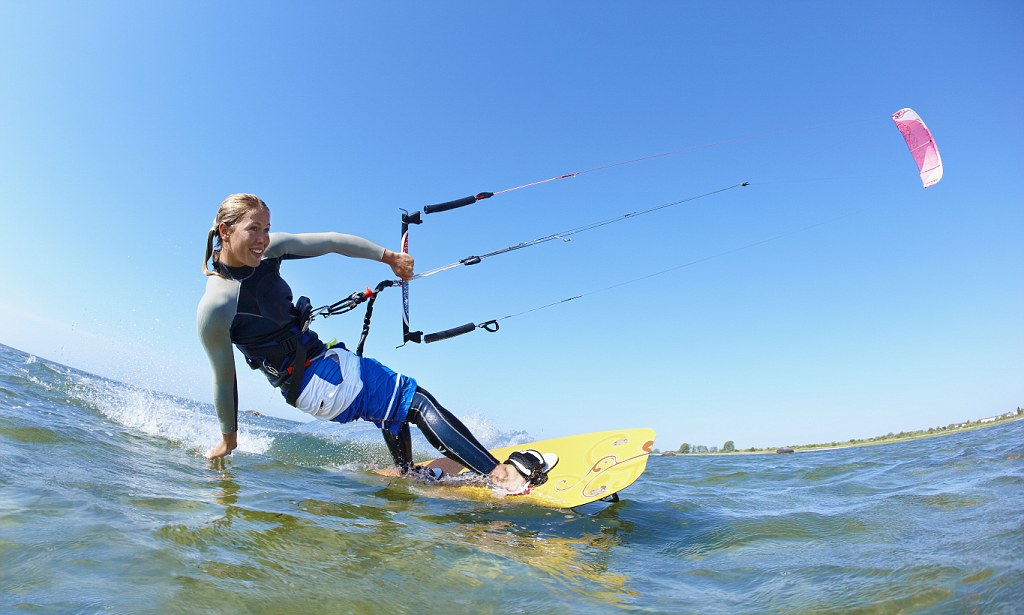
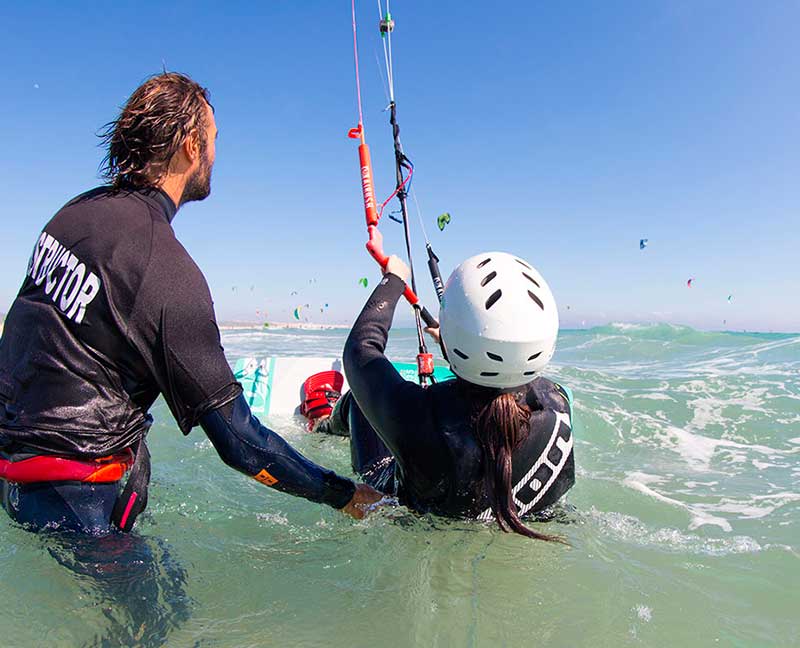
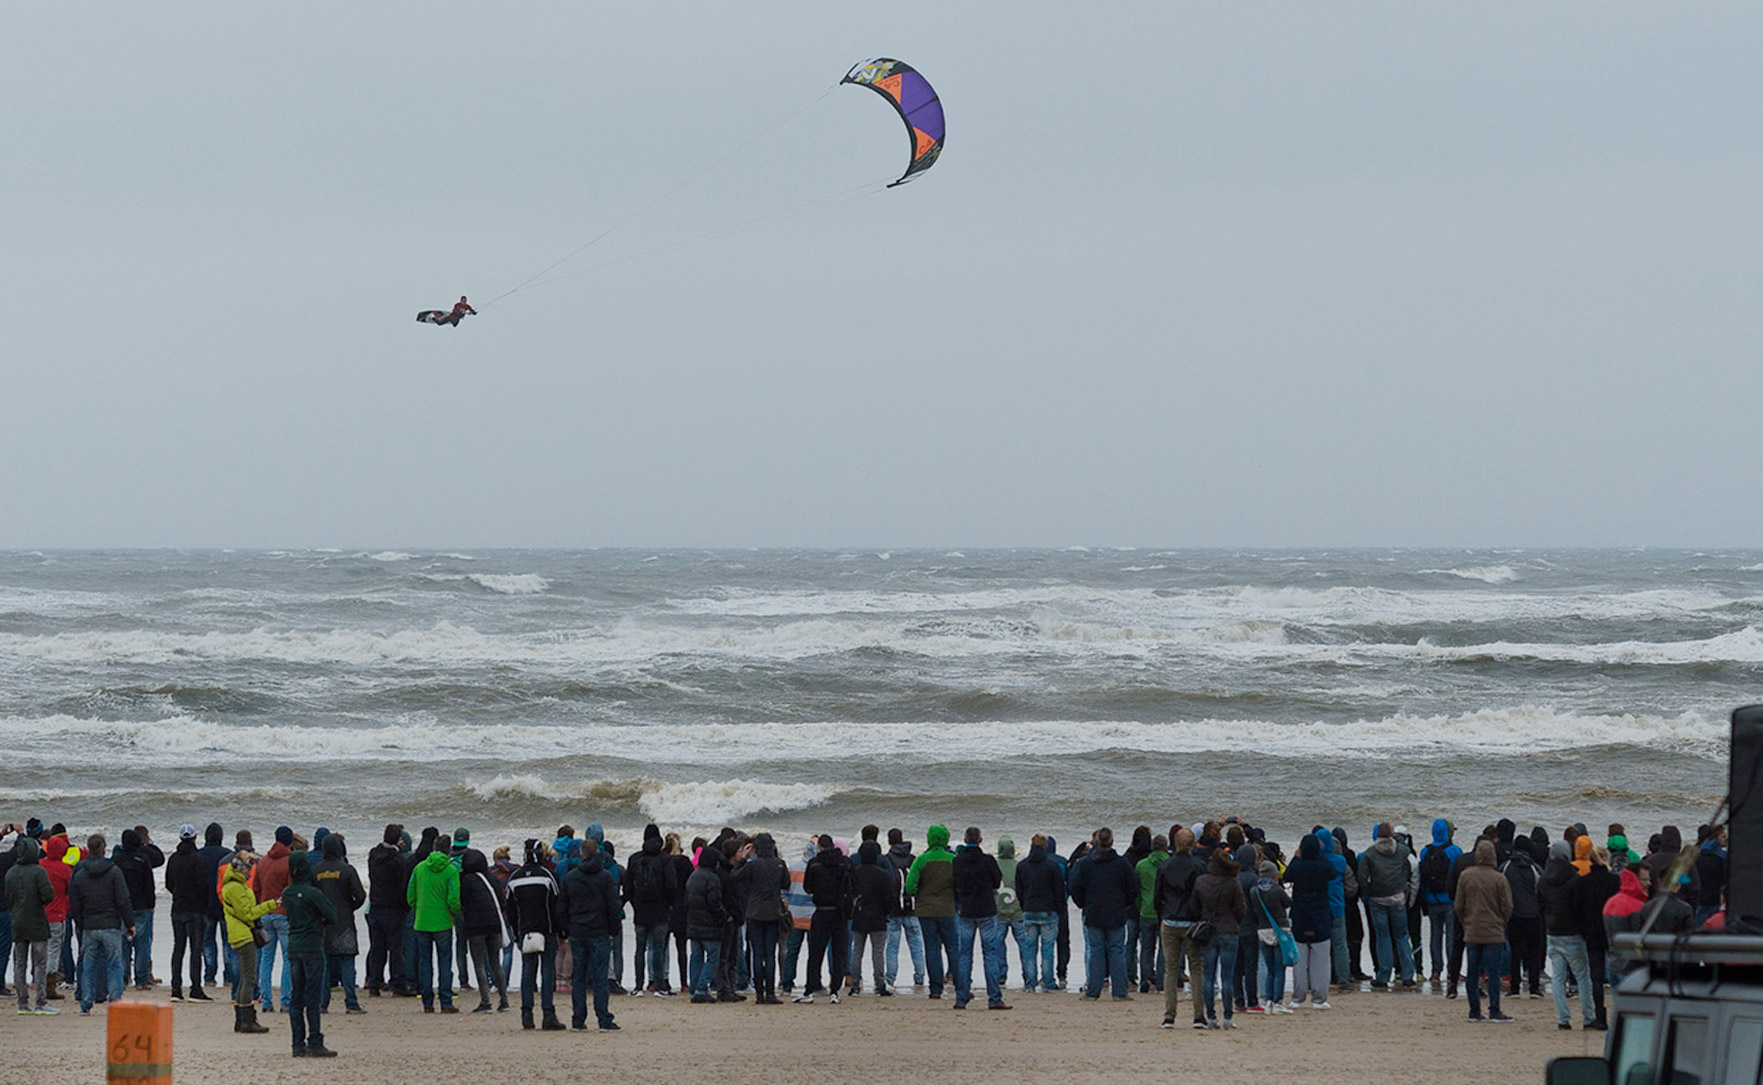
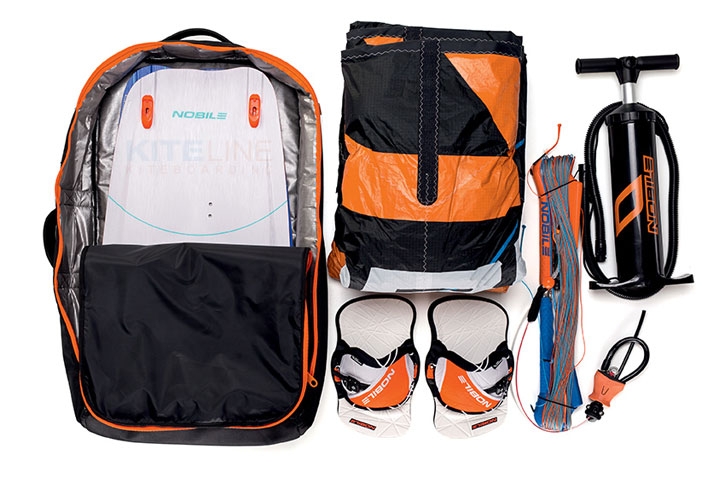
Are you an intermediate kitesurfer looking to improve your skills and take your kiting to new heights? We have the perfect opportunity for you! We are thrilled to announce our upcoming Winter Kitesurfing Coaching Sessions. Whether you’re an experienced rider looking to refine your abilities or a passionate amateur eager to take your skills to the next level, our range of intermediate kitesurf coaching sessions are designed with your needs in mind. It’s time for you to embrace the thrill of gliding over the waves, the rush of adrenaline as you catch the wind and soar above the water and the satisfaction of mastering a challenging new skill.
Join us this winter for a series of skill-specific coaching sessions that will help you unlock your full potential and transform your kitesurfing experience. With a focus on key techniques such as jumping, backrolls, frontrolls, toeside, strapless surf, and downwinders, these sessions will provide you with a comprehensive understanding of the sport and equip you with the tools you need to excel.
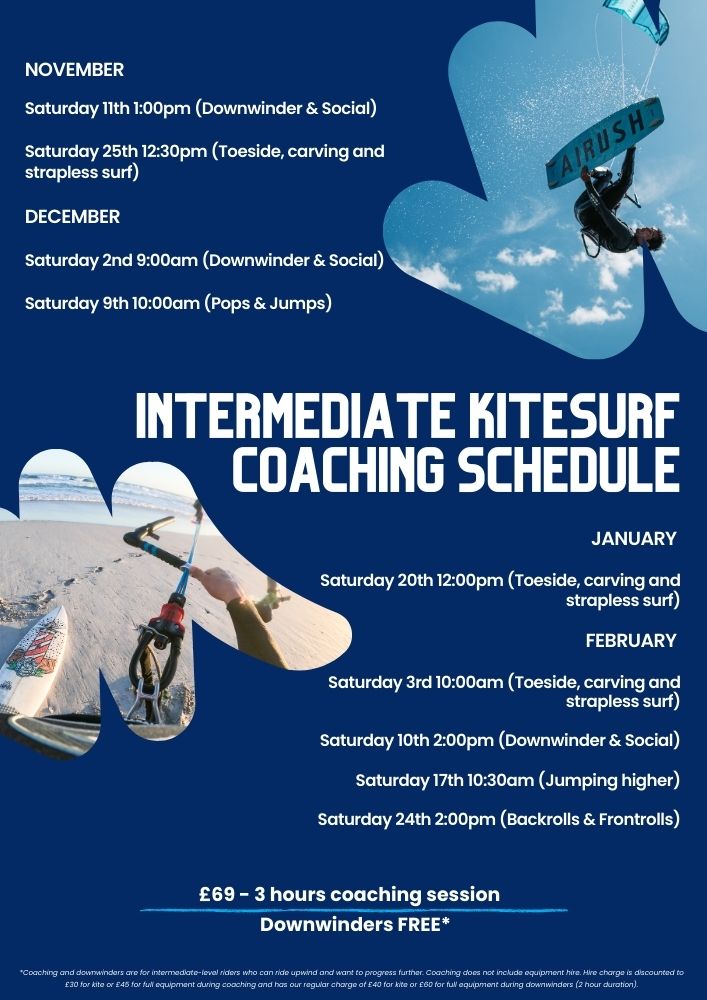
Our coaching sessions are scheduled to run through November, December, January, and February, offering you a perfect opportunity to enhance your skills during the winter months. The cost of each 3-hour coaching session is £69 per person. We’re also offering downwinders for free, giving you a chance to practice and perfect your skills in a dynamic, real-world setting.
It’s important to note that our coaching sessions and downwinders are designed for intermediate-level riders who can ride upwind and are keen to progress further. If you’re confident in your basic skills and ready to take on the challenge, we’re here to help you make that leap and take your kitesurfing experience to new heights.
Please be aware that the coaching fee does not include equipment hire. The hire charge is discounted to £30 for a kite or £45 for full equipment during coaching sessions and our regular charge of £40 for a kite or £60 for full equipment applies during downwinders (2 hours duration). While we strive to provide the best possible training, it’s essential that you have access to the right gear to ensure your safety and maximize your learning experience. Riders must hold a valid BKSA membership (with included insurance) to be able to participate in the sessions.
So, are you ready to elevate your kitesurfing game? Are you excited to take on the waves and learn from experienced coaches passionate about the sport and dedicated to helping you improve? Then don’t wait any longer! Get in touch with us today to book yourself into our intermediate kitesurf coaching sessions.
Spaces are limited to 6 riders per coach, so jump in quickly and secure your spot. We look forward to welcoming you to our community and helping you take your kitesurfing to the next level!
For bookings and more information, you can email us at [email protected] or visit our coaching page for detailed schedule and booking information.
Join us this winter and transform your kitesurfing experience with our intermediate kitesurf coaching sessions. We can’t wait to see you on the water!
Kitesurf Coaching & Downwinders Schedule
NOVEMBER
Saturday 11th 1:00pm (Downwinder & Social)
Saturday 25th 12:30pm (Toeside, carving and strapless surf)
DECEMBER
Saturday 2nd 9:00am (Downwinder & Social)
Saturday 9th 10:00am (Pops & Jumps)
JANUARY
Saturday 20th 12:00pm (Toeside, carving and strapless surf)
FEBRUARY
Saturday 3rd 10:00am (Toeside, carving and strapless surf)
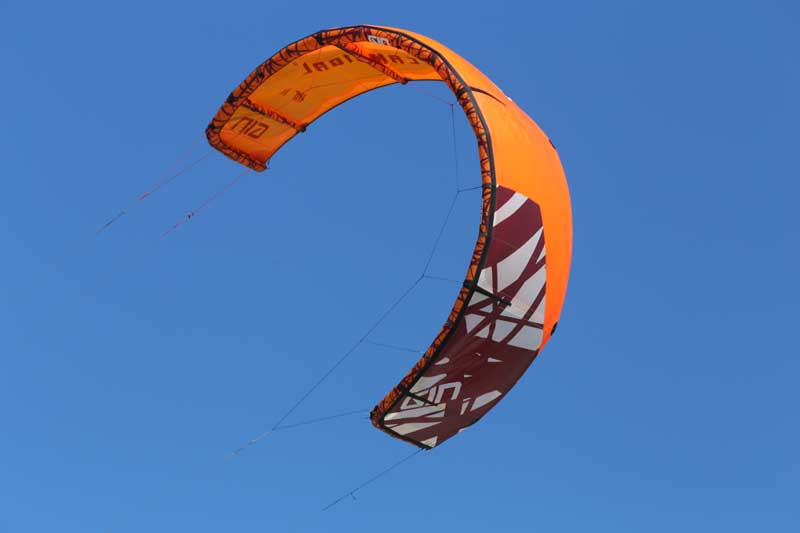
A Leading Edge Inflatable Kite is more commonly known as an LEI kite and is the most common design of kite in the modern kitesurfing world. With these kites you have to inflate the leading edge – thanks to the innovative design of this kite, we can relaunch our kites, continuing our sessions crash after crash, massively aiding the curve of improvement of kiters and the industry entirely.
Where to set up your Leading Edge Inflatable Kite
Before you start setting up the Leading Edge Inflatable (LEI) kite, do asite assessmentusing the mnemonic SHOE to guide you. Are you confident that you’re setting up the correct size kite? You can use this kite size calculation (link) to choose the right kite for your weight and wind speed. You should set up your LEI kite in an area away from hazards with plenty of space to run your lines.
Setting up your LEI kite
Position yourself to inflate the kite by standing with your back to the wind and the kite downwind of you. Hold the kite by the inflatable leading edge and open up the kite fully before inflating. Connect your harness leash to the kite so that the kite can’t blow away from you with the wind.
Don’t forget to close the deflate valve. Your deflate valve needs to be closed tight so air can’t escape; check for sand before closing. You’ll either have separate inflate and deflate valves or have a single valve that features both inflate and deflate in its design.
Types of LEI kite valves
A standard 11mm deflate valve will require you to push hard to close it. When it’s done properly, you’ll feel it click into place. Put your hand on the other side of the leading edge, underneath the valve, so that you can support it and push hard.
A Boston valve is a 2 layered valve with inflate and deflate separated by a non-return flap. Unscrew the top cap to expose the inflate before you screw in deflate cap.
Some kites use a twist lock mechanism. Duotone and F-one both require their own non-standard pump nozzle to work with their own inflate/deflate systems. Always check that the valve is in the closed position before inflating so the kite doesn’t deflate immediately when you remove the pump nozzle. Link to duotone pump system Link to F-One pump system
Pumping up your LEI kite
Your kite will either have multiple points of inflation, or a Single Pump System (SPS). If your kite is multi-pump, start by inflating each strut before inflating the leading edge
Inflate your Leading Edge Inflatable kite with your back to the wind. Keep both feet on the pump at all times, keep your back straight and use your knees so you don’t strain your back while pumping the kite. The kite is inflated properly when it is firm but will bend with mild resistance. Do not inflate over 6PSI while learning. You can then disconnect the pump and close the inflate cap, again making sure it is free from sand.
Weighing down your LEI kite
Park the kite by turning it over then weigh it down so it can’t move with the wind. To turn the kite over, keep your back to the wind then walk the kite over by pressing one wingtip into the sand and using that as the pivot point. Your kite will face directly upwind and the wind passing evenly over either side of the centre strut. To keep the kite secure, throw a few kilograms of sand onto the leading edge and down towards the trailing edge. Never put stones on your Leading Edge Inflatable kite.
Before you move on to your bar, check each bridle is accessible and untangled, and ready for your lines. Your bridles should come towards you without any twists and pulleys able to move freely. Both bridles will be the same length.
Preparing and connecting your kite bar
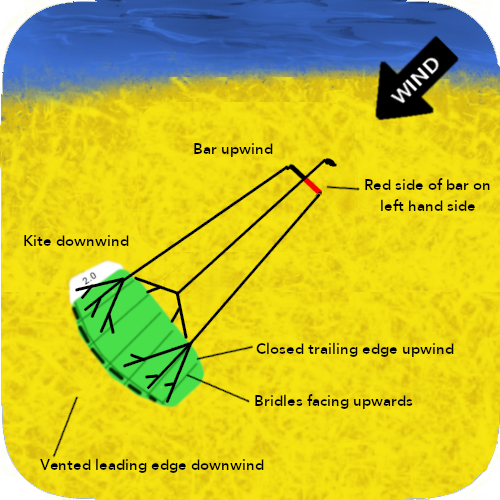
Unwind your lines walking downwind from the kite. Lay out the bar on the sand so that it is upside down (red on right for setup) and the depower rope runs straight through the bar.
Separating your lines
Separate your lines by keeping the 2 front (inside) lines between your knees and steering lines outside your knees. Walk up the line length removing any twists and making sure each line runs cleanly to each bridle point without passing around another line. If your lines are especially twisted, run the steering lines to the LEI kite first, then run the front lines separately.
Connecting your lines to your LEI kite
Connect your lines to each bridle connection point. Form the larks head loop and place it over the pigtail. The larks head is made by passing the lines loop end over the section of line directly beneath the loop and pulling the line section through. Once you pass the pigtail through the larks head loop the larks head can tighten against it. Pull tight and double check that the larks head loop is snug against the pigtail knot.
Your kite may have multiple connection options. Have a read of this guide to tuning your LEI kitesurfing kite (link) to choose the best setup for the conditions you are riding in.
Repeat this for each connection point. Double check that each connection is pulled tight and that the lines run straight to the bar and are not twisted over each other. DO NOT try to launch the kite if you are not confident that the Leading Edge Inflatable kite is set up properly.
Do your Preflight Checks
There are many more accidents happening around rushed setup and mistakes made during launching than there are with riders out on the water. We can’t emphasise enough how important it is to double check your actions as you set up and launch your Leading Edge Inflatable kite. Get into the habit of doing a series of pre-flight checks before you launch your kite (link).
Is every larks head connected properly? Check every connection is secure
Is there symmetry in your setup? Every connection should be the same as on the opposite side of the kite. Match up how you connect the steering lines on each side so that your lines are the same length and affect the kite evenly.
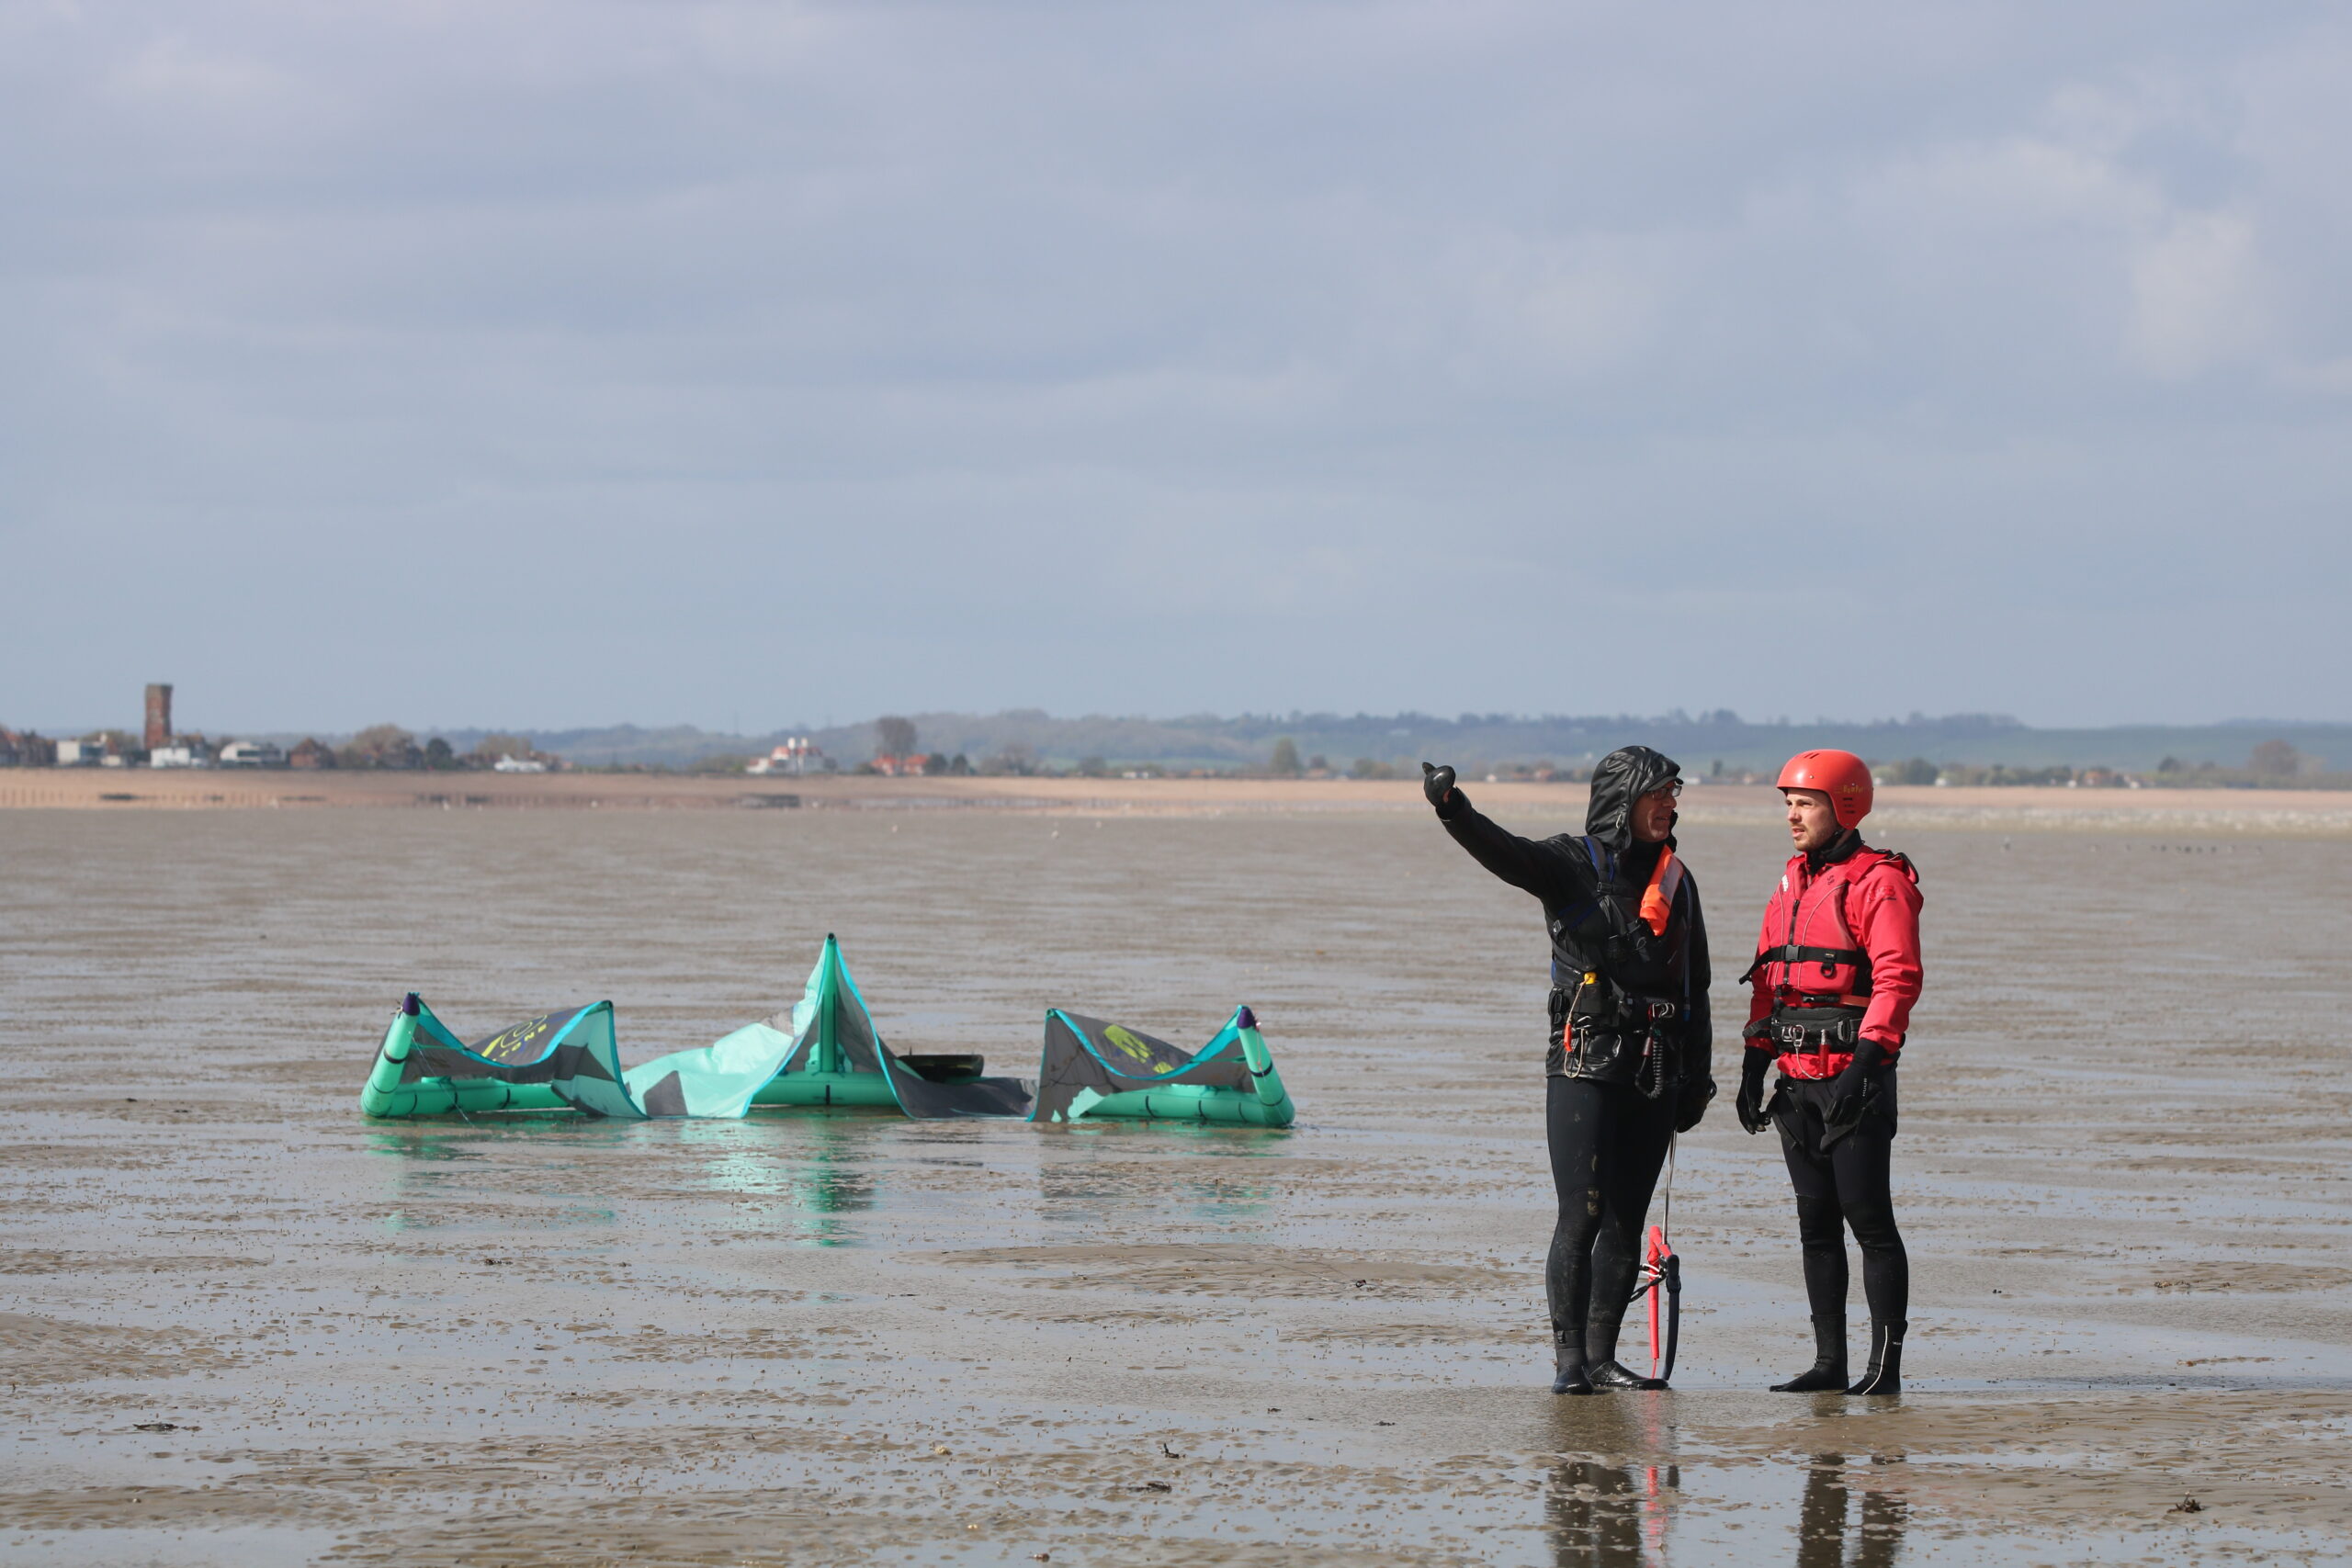
Are you definitely set up in the right place? Do you need to move away from hazards, and 3rd parties, closer to the water? Don’t launch directly upwind of objects or people. Move into an open space at least 50m away from hazards.
Are your safety releases working? Open your quick release and leash release then rebuild at the start of every session so that you know it is working. Check that your safety line pulls through cleanly.
In a sport like Kitesurfing, where we rely on the wind entirely to ride, leap and spin, so when we ask ‘what is the wind?’ it’s important we know the answers! The more knowledge you have, the better equipped you will be assessing wind conditions for your sessions and to speed up your learning journey so you can be a wind whisperer too.
Table of Contents
What is the wind?
Wind is the movement of air particles from one place to another, moving from an area of high pressure to an area of low pressure. It is the movement of air that enables our kite to create lift and this allows us the power to move with the kite.
As a beginner kitesurfer, you don’t need to know everything about why wind happens on a global scale, but it is important that you can recognise what it is doing where you are and how you can use it. You need to know how you use your kite to harness the wind, the best directions to kitesurf at your beach and what speeds you should kitesurf with your equipment. Further to this, you should be able to recognise changes and factors that may cause it to increase, decrease or become more turbulent as these can affect your ability to kitesurf safely.
What is the Wind Window Theory?
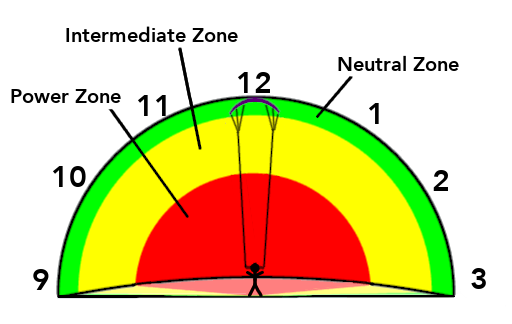
The radius in which the kite can fly is called the wind-window. The size of the window is determined by the length of your kite lines. You are the centre point; wherever you move while flying the kite, the window moves with you.
The wind-window is the only area that your kite will fly in, it cannot fly beyond. As you stand with your back to the wind, the window reaches crosswind and downwind of you. There are 3 zones of power; neutral, intermediate and power. The closer you fly the kite to the centre of the window, the more power you will get as the kite’s angle is more exposed to the wind.
Around the neutral zone (marked green) the kite has the least power as the surface area of the kite is not angled directly into the wind – a low angle of attack. We can move the kite gently around the neutral zone without generating power making it the safest position for launching, landing and walking.
We refer to the positions on the edge of the wind window as positions on the top half of a clock face. A kite flying directly above us is positioned at 12 o’clock. Steered gently to the left it would move through positions 11, 10 and 9 o’clock. Moved to the right the kite would pass through 1, 2 and 3 o’clock.
The intermediate zone (marked yellow) is further downwind than the neutral zone. As the kite flies through the intermediate zone it has more surface area facing the wind (an increased angle of attack) than before and now generates more lift than in the neutral zone.
Furthest downwind and most central in the window is the power zone. As the kite flies through the power zone its surface area is most exposed to the wind. It is at its highest angle of attack so it generates the most lift.
As we move the kite in and out of the power zone we generate power. You can generate this power on either the left or right side of the wind window and pull you in that direction.
To learn more about forces on the kite and how it flies, read this article (How an LEI Kitesurfing kite flies).
What speeds can I kitesurf in?
As a beginner kiter, it is important to practise within a wind range that is safe and makes it easy for you to practise your skills. Practising independently, we recommend beginners to fly their kites in 10-25mph. Most importantly, it needs to be the correct kite for the wind speed so that you don’t have too much power.
It is the size of the kite and your weight which denotes the strength of the winds you can use. As an example, a 75kg beginner will use a 12m kite in 10-18mph, 9m in 16-22 and a 7m in 22+. Use this useful equation to calculate which size kite you will use (link) based on your weight and the wind speed as you go kiting.
Whenever you go kiting, you should be aware of the forecast and any predictions for the wind to increase, decrease or change direction. If the wind is due to increase, don’t setup too large a kite and be prepared to land and downsize your kite if needed.
Read more about how to read a weather forecast (link).
In addition to the forecast, local effects such as the Seabreeze we often get at Camber Sands can increase wind speed significantly above the forecasted range. If it’s a clear sunny day, a Seabreeze can double the speed, so always bring your smaller kites with you whatever the forecast. Read more about local weather effects (link).
Recognising how windy it is is a skill that you will learn over time and one that is essential to know which kite size you should be flying. This handy wind speed chart shows the visual signs you can spot around you that will indicate roughly what the speed is. If you want to know exactly what the speed is, a wind anemometer will do the job.
The best wind directions to kitesurf?
Along with speed, we want to know what is the wind direction as this will determine which beach we should kitesurf at.
The best directions to kitesurf are when they blow onshore or cross-onshore. These are the safest directions as the wind will return you and your equipment to land. At Camber, our most common direction is a South Westerly which blows cross-onshore. Cross-onshore winds are the ideal direction as they allow the rider to move away from the beach into a safe water depth for riding easily, while also returning the rider to the beach in any event where they cannot ride upwind.
It is also possible to kite in cross-shore wind though riders should be wary of the direction moving to cross-offshore.
Avoid kiting in offshore and cross-offshore winds as even the slightest error or drop in speed, it will drift you out to sea. There are places around the world offering kitesurfing in offshore winds, though these spots tend to offer a paid rescue boat service.
Using resources like Windy or Windfinder, you can find a visual map of your spot and where the wind is blowing from – have a look at camber sands’ wind direction now here to see whether it’s on or offshore.
So Now when someone asks you ‘What is the wind?’ You can tell them all about it!
Next up: How to site assess your kite spot using SHOE
Learning how a kitesurf kite works can improve your kiting abilities. Understand how your kitesurf kite works and what it needs and you could find yourself reading the environment around you, making for the best sessions of your life. Often a good kiter is a knowledgable kiter!
Table of Contents
How your bar controls your kitesurf kite.
Most modern Leading Edge Inflatable (LEI) kitesurf kites use a four-line bar with two front lines and two steering lines which connect to your kite’s bridles.
The two front lines of your bar connect to the leading edge attachment points and support the force of the kite, but do not control direction. The steering lines connect to the steering bridle attachment points and affect both direction of the kite and the kite’s angle of attack to the wind.
Your kite may have multiple connection options to adjust it’s performance. Take a look at this guide to tuning your LEI kite (link) to understand how you can use these settings.
As you connect your bars chicken loop to your harness, the force of the kite is not felt in your arms but in your core. You are able to control the angle of the kite to the wind by sheeting the bar in or out along the depower throw.
Forces acting on the kite
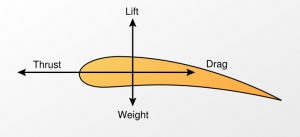
The forces occurring as air passes over and under the kite effect how it flies. Like the wing of an aeroplane, our kite also deals with lift, drag, thrust, and gravity – it also has line tension as an additional force. We’ll quickly introduce these terms before explaining what the effects they have. To keep a kite flying steady the four forces must be in balance.
Lift is the upward force that pushes a kite into the air. Lift is generated by differences in air pressure, which is created by airflow passing above and below the body of the kite. Kites are designed so that air particles moving over the top of the wing, flow faster than the air moving over the bottom. Gravity acts as a downward force on the kite, relative to the weight of the kite. The force of the weight pulls the kite toward the ground.
Thrust is the forward force that propels a kite in the direction of motion. A kite relies on the tension from the lines and moving air created by the wind to generate thrust. Thrust is the reason why the kite will always fly towards the edge of the wind window and won’t stay in the power zone; the kite must fly towards the most upwind point of the wind window.
Drag is the backward force that acts opposite to the direction of motion. Drag is caused by the difference in air pressure between the front and back of the kite and the friction of the air moving over the surface of the kite.
Changing the angle of attack with the bar?
Angle of attack
As the wind reaches the kite, airflow splits at the leading edge of the kite passing over and under it’s surfaces, moving towards the trailing edge, and continuing downwind.
The flow of air going over and beneath the kite reach the trailing edge at the same time. Due to the angle of the kite, the airflow going over the top of the kite must accelerate to reach the trailing edge at the same moment as the airflow passing beneath.
It is this acceleration of airflow over the top of the kite that forms low pressure above the kite and creates lift. The more lift generated, the more it pulls you.
If flying a fixed bridle trainer kite, like the one you use in session one, it’s angle to the wind can only be changed by steering the kite into each zone in the wind window (link). As the kite is flown into the power zone, and the angle of attack is increased, you get the most pull (lift). This is because air is accelerating faster here to reach the trailing edge at the same time as the airflow passing the underside of the kite. You’ll also notice that the kite flies faster through the power zone due to increased thrust.
Sheeting in and sheeting out
If we are flying a depowerable kite, such as the Leading Edge Inflatable (LEI) kite used on the water part of your lessons, the bar can be “sheeted in” and “sheeted out”, pulling the bar closer to us or pushing further away from us along the depower throw. This movement of sheeting on the bar changes the kites angle of attack, giving you additional control over how much lift the kite generates.
Pushing the bar out: (Sheeting out) reduces rear line tension and reduces the kite’s angle of attack so the kite generates less lift. Which in turn pulls the wing tips and the trailing edge of the kite closer to the wind. The result is a tighter turn radius when steering and normally more power, though it is possible to negatively affect the kite by pulling in the bar too much.
Pulling the bar in: (Sheeting in) increases rear line tension and the angle of attack which generates more lift as airflow accelerates over the top of the kite. In this position, the kite generates less power but also has less line tension for controlling direction while steering. With the bar out, the turn radius of the kite will be large and the kite slower to respond to counter steering.
It’s important to remember that this is an additional factor to the amount of lift created by the position of the kite in the wind window. If you steer the kite through the power zone, the kite will still pull you hard, even with the bar sheeted out.
It is possible to “over-sheet” and pull the bar in too far, increasing the angle of attack beyond the kites stable flying range causing unbalanced forces on the kite. When we pull the bar in too far, the airflow over the top of the kite becomes turbulent and can no longer accelerate to the trailing edge to create lift and thrust. This results in an imbalance of pressure above the kite and increased drag. The kite will then “backstall” and fall backwards, instead of flying forwards.
You will be able to recognise when your kite is backstalling as it will feel sluggish, lose power and then fall backwards through its trailing edge. Pushing the bar out will correct this by reducing drag and allowing the kite to fly forwards again.
Our ability to recognise signs of backstalling will enable us to correct our input at the bar and put the kite into a more efficient flying position quickly. A great way to learn this skill is to practice light wind kite flying (link) as you will learn to be more aware of bar position while flying the kite.
Want to know more about the histroy of kitesurf kites? Have a look at this short film about the history of kitesurfing here
The moment of launching and landing your kite is the time with the greatest risk and highest chance of an accident occurring. We can’t emphasise enough how important it is to double-check your actions as you set up and are. Doing a thorough kite spot assessment and doing preflight checks will put you on the right track for a successful launch and kitesurfing session. Here’s what you’ll need to review:
Is every lark’s head connected properly? Check every connection is secure.
Is there symmetry in your setup? Every connection should be the same as on the opposite side of the kite. Match up how you connect the steering lines on each side so that your lines are the same length and affecting the kite evenly before launching and landing your kite.
Are you definitely set up in the right place? Do you need to move away from hazards, third parties, closer to the water? Don’t launch directly upwind of objects or people. Move into an open space at least 50m away from hazards.
Are your safety releases working? Open your quick release and leash release then rebuild at the start of every session so that you know it is working. Check that your safety line pulls through cleanly.
Are you confident you’re on the right sized kite for the conditions? This useful kite size calculation (link) will help you if you’re ever unsure.
Is all of your equipment in good, working condition? Always check throughout your setup for any wear to the kite, bridles, lines and safety line.
It is the role of the assistant to launch and land your kite; to hold the kite in the correct position to launch and only to let go of the kite, upon your signal, if they are also confident that the launch will be successful. As the assistant holds the kite, they should check the bridles and lines are straight and the kite is in the correct position in the wind window. The assistant will also be checking for any hazards to ensure that the launch area is safe and at least 50m away from any downwind person or object.
As the assistant, if you are ever doubtful that a launch will be successful, DO NOT let go of the kite. Signal to the rider to stop and correct the issue you have spotted.
The assistant will lift and hold the kite in a C shape with one wingtip resting gently on the ground. The leading edge will face upwind, the centre strut will be parallel to the ground. The assistant should have 2 hands on the kite unless using hand signals to communicate with the rider.
Communication signals between rider and assistant
The following hand signals can be used between rider and assistant during launching and landing a kite:
Thumbs up – OK to launch
Show palm – Wait (show this then put the kite back into the parked position on the ground if something is wrong)
Tap on the head – Land kite
Cup hands together and push forward motion from hips – Use bars quick release to flag the kite out on safety line
Positioning to Launch the Kite
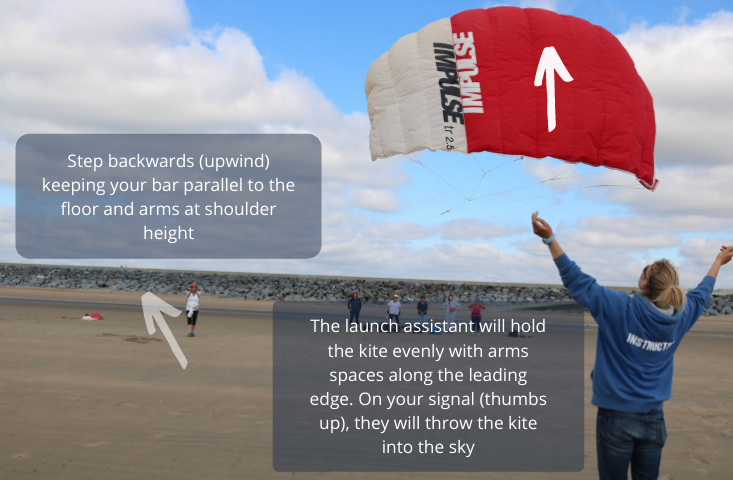
Your assistant is ready to lift the kite and hold it in a C-shape launching position for you, but first you need to connect your safety leash to the safety line and chicken loop to your harness with the locking stick in place to make sure it doesn’t drop off your harness. Always connect your safety leash to the safety ring before anything else. Next you need to move into position to launch.
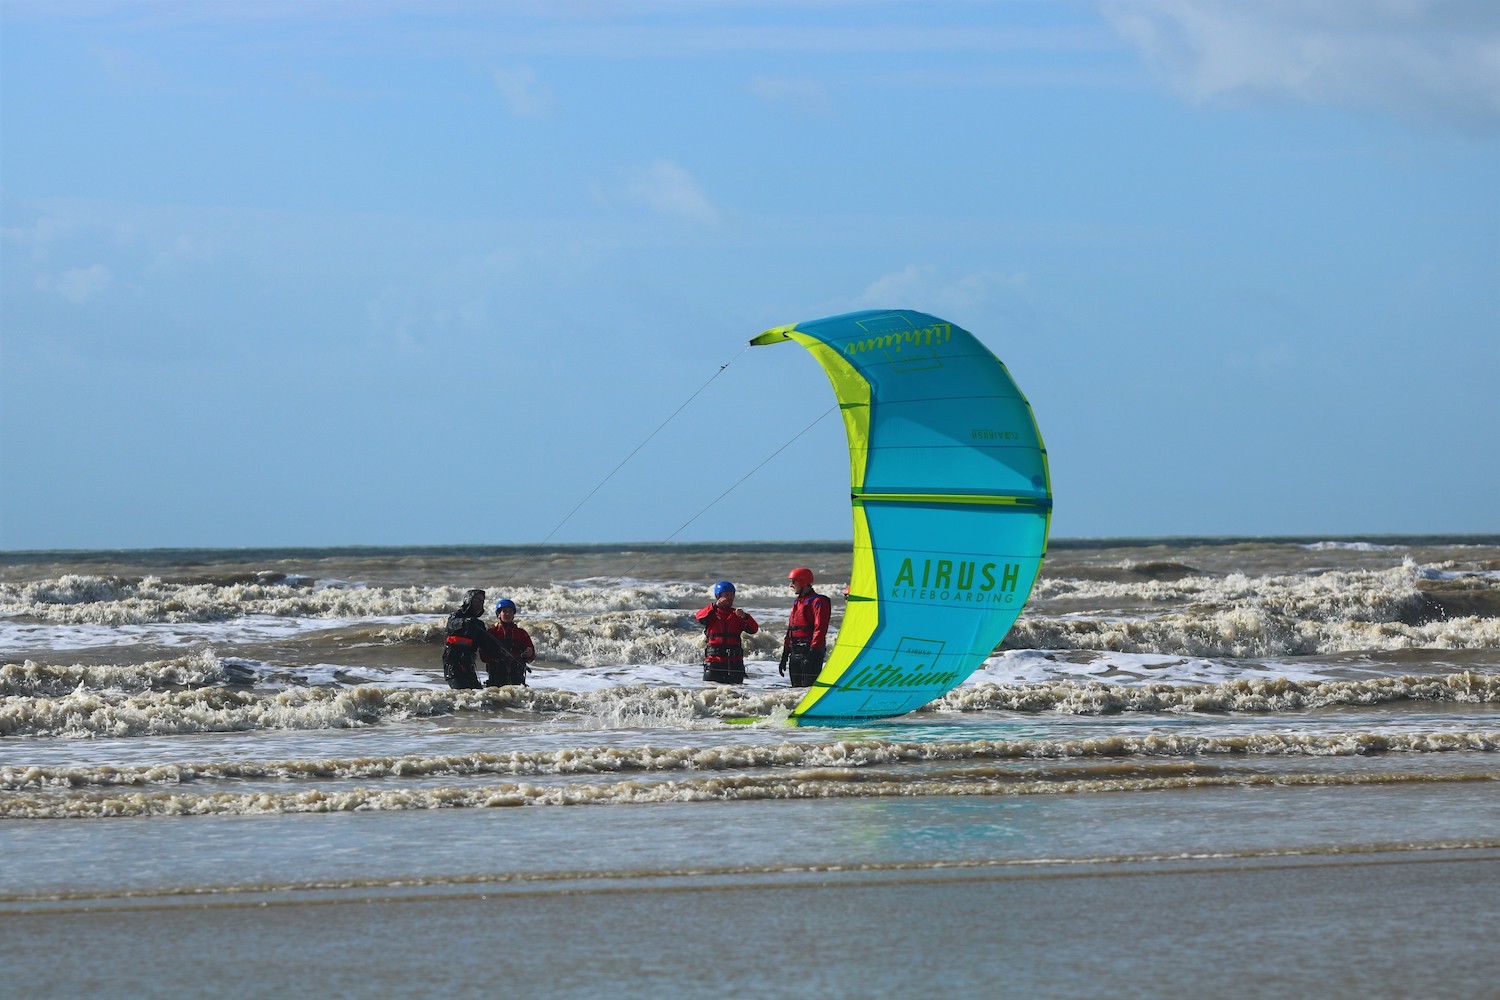
From setup, the kite is upwind of the bar. You now need to move to a cross wind position so that the assistant can hold the kite launch position for you. Walk the circumference of the lines reach to keep lines under tension as you move to the cross wind position. Whenever you launch, you should have the kite closest to the water away from hazards. In the water is the safest place to be, so if you and the rider can be in the water for launch, do it… we call this the ‘wet feet rule’.
Once the assistant lifts the kite into the launch position, you will need to observe the canopy of the kite to see if the angle of the kite to the wind is sufficient that it can fly.
Push your bar away from you. You should never launch the kite with the bar pulled in. Instead, with only one hand, use the widest part of the bar or the float for more leverage while flying with minimal power. This is the top hand as we’re steering the kite up. If the kite is positioned to your right, you’re steering with your left hand (and vice versa for the opposite side).
Is the canopy flapping? If yes, you need to step upwind until the canopy goes tight and you feel gentle feedback from the wind in the kite. Be careful not to step too far upwind. As you step further upwind, you are positioning the kite closer to the power zone. We should be launching our kite in the neutral zone. You can tell if you’re stepping too far into the wind as the pull into your harness will increase and the assistant will be struggling to hold the kite in place as it tries to surge forward to the edge of the wind window.
Never try to launch with too much power. Stop and trim the kite (link) or choose a smaller kite (link).
Are you and your kite in a good position to launch? Have you got your bar out still? Ok, great – communicate this to the assistant with a thumbs up and wait for the assistant to confirm by also showing a thumbs up. Move your signal hand to your quick release so you can act as fast as possible if something goes wrong. Steer gently with your top hand and guide the kite slowly around the edge of the wind window. Don’t steer quickly or cut corners. If anything looks or feels wrong, signal to wait and sort the problem before launching.
You only need to bring your kite up to 45º (around 10 or 2 o’clock). You don’t need to bring the kite up to 12 as the kite is already on the waterside. You also don’t need to do ‘test jumps’ at 12, you just need to grab your board and get out into deeper water where you’re safest.
How to Land a Kite
Just like launching your kite, landing should also be done as close to the water as possible. Signal to your assistant with a tap on your head then allow the kite to lower slowly around the edge of the window while you control the kite with the bar out. Again, use the widest part of the bar or even the float as the kite gets closer the ground and you need more leverage for steering. Gravity does all the work of lowering the kite around the edge of the wind window, you’re just controlling the pace of the kites descent.
As you slowly lower the kite the assistant will be able to hold the kite by the leading edge. Once in 2 hands, you can walk towards them to get rid of line tension, then walk downwind of the kite.
As the assistant, once you have caught the kite and have it in 2 hands; you can take a step upwind and towards the rider. This will slacken the lines so that you can hold the kite in a U-Shape carrying position.
You can now move away from the water, put the kite down in the parked ‘setup’ position and weigh it down again with sand.
NEXT UP: How to water relaunch an LEI kitesurfing kite
No sliders selected. Edit this page and select a slider in the Crelly Slider editor block.No sliders selected. Edit this page and select a slider in the Crelly Slider editor block.
Be thorough when performing beach assessments for kitesurfing, especially for the first time at a new spot.
Table of Contents
Why We Do Beach Assessments for Kitesurfing?
Beach assessments are one of the most important things to learn during your kitesurfing tuition, which is why we teach it both at the beginning of Session 1, and refresh it at the start of any lessons we teach after that. Performing beach assessments for kitesurfing at the beginning of a session and re-assessing throughout is the first step to being a safe kitesurfer. Recognising hazards allows you to make decisions that maintain the safety of you and others around you.
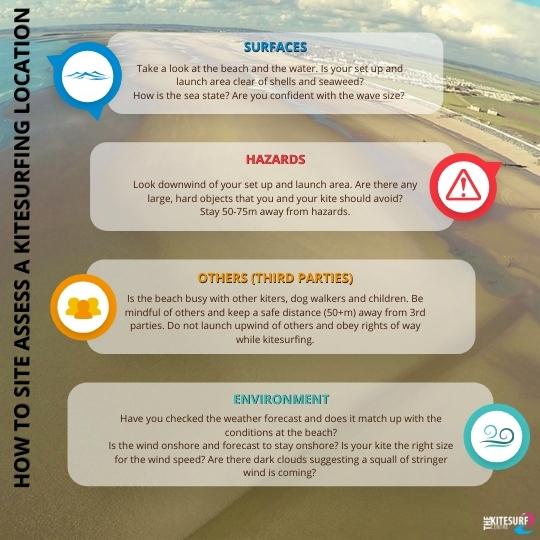
We use the mnemonic ‘SHOE’ when performing a beach assessment, to help us remember each step:
S – Surface
H – Hazards
O – Others
E – Environment
S is for ‘Surface’
Before setting up, you should already be doing beach assessments for kitesurfing and this will start with the surface upon which you are setting up your kite and the area on which you intend to launch your kite. While we’re focussing on the letter “S for Surface”, let’s also remember Sharp and Slippy as the two land surfaces that you’ll want to avoid. Aim to find a good open sandy area that is free of seaweed and shells.
Next, take a look at the water for movement and variation. When doing beach assessments for kitesurfing, you can use these to judge things like wind speed and water depth, which will help you decide both where to kite and what equipment to use.
The surface of the water can also give us clues about where to kitesurf and what equipment to use. Shallow water is created by sandbanks, so the waves will be higher in shallow water than they are in the surrounding area. Very shallow water can be spotted easily by either seeing through to the ocean floor or by very small ripples. On a flat or very slightly sloping beach, the very edge of the shoreline and for a few metres, the water is only a couple of inches deep and is normally flat. Whilst there is a temptation to try and kite on shallow, flat water, avoid it. The risk of crash injury is much greater.
H is for ‘Hazards’
It’s always important to check for hazards around you, both during the beach assessment before your session and throughout the session itself. The usual rule when setting up your kite is to make sure you are at least two line lengths (approximately 50 metres) away from any hazards. This way, if there is a problem during launch you have more time to correct it, and or release your kite, before coming too close to a hazard.
Different hazards can appear at different tide states, so it is important to know at which times you cannot kite safely at a beach due to these hazards. For example, at high tide there may not be enough beach space for you to launch keeping at least two line lengths away from hazards such as sea walls and buildings. At low tide, hazards on the sea floor such as shipwrecks and trash may appear.
O is for ‘Others’
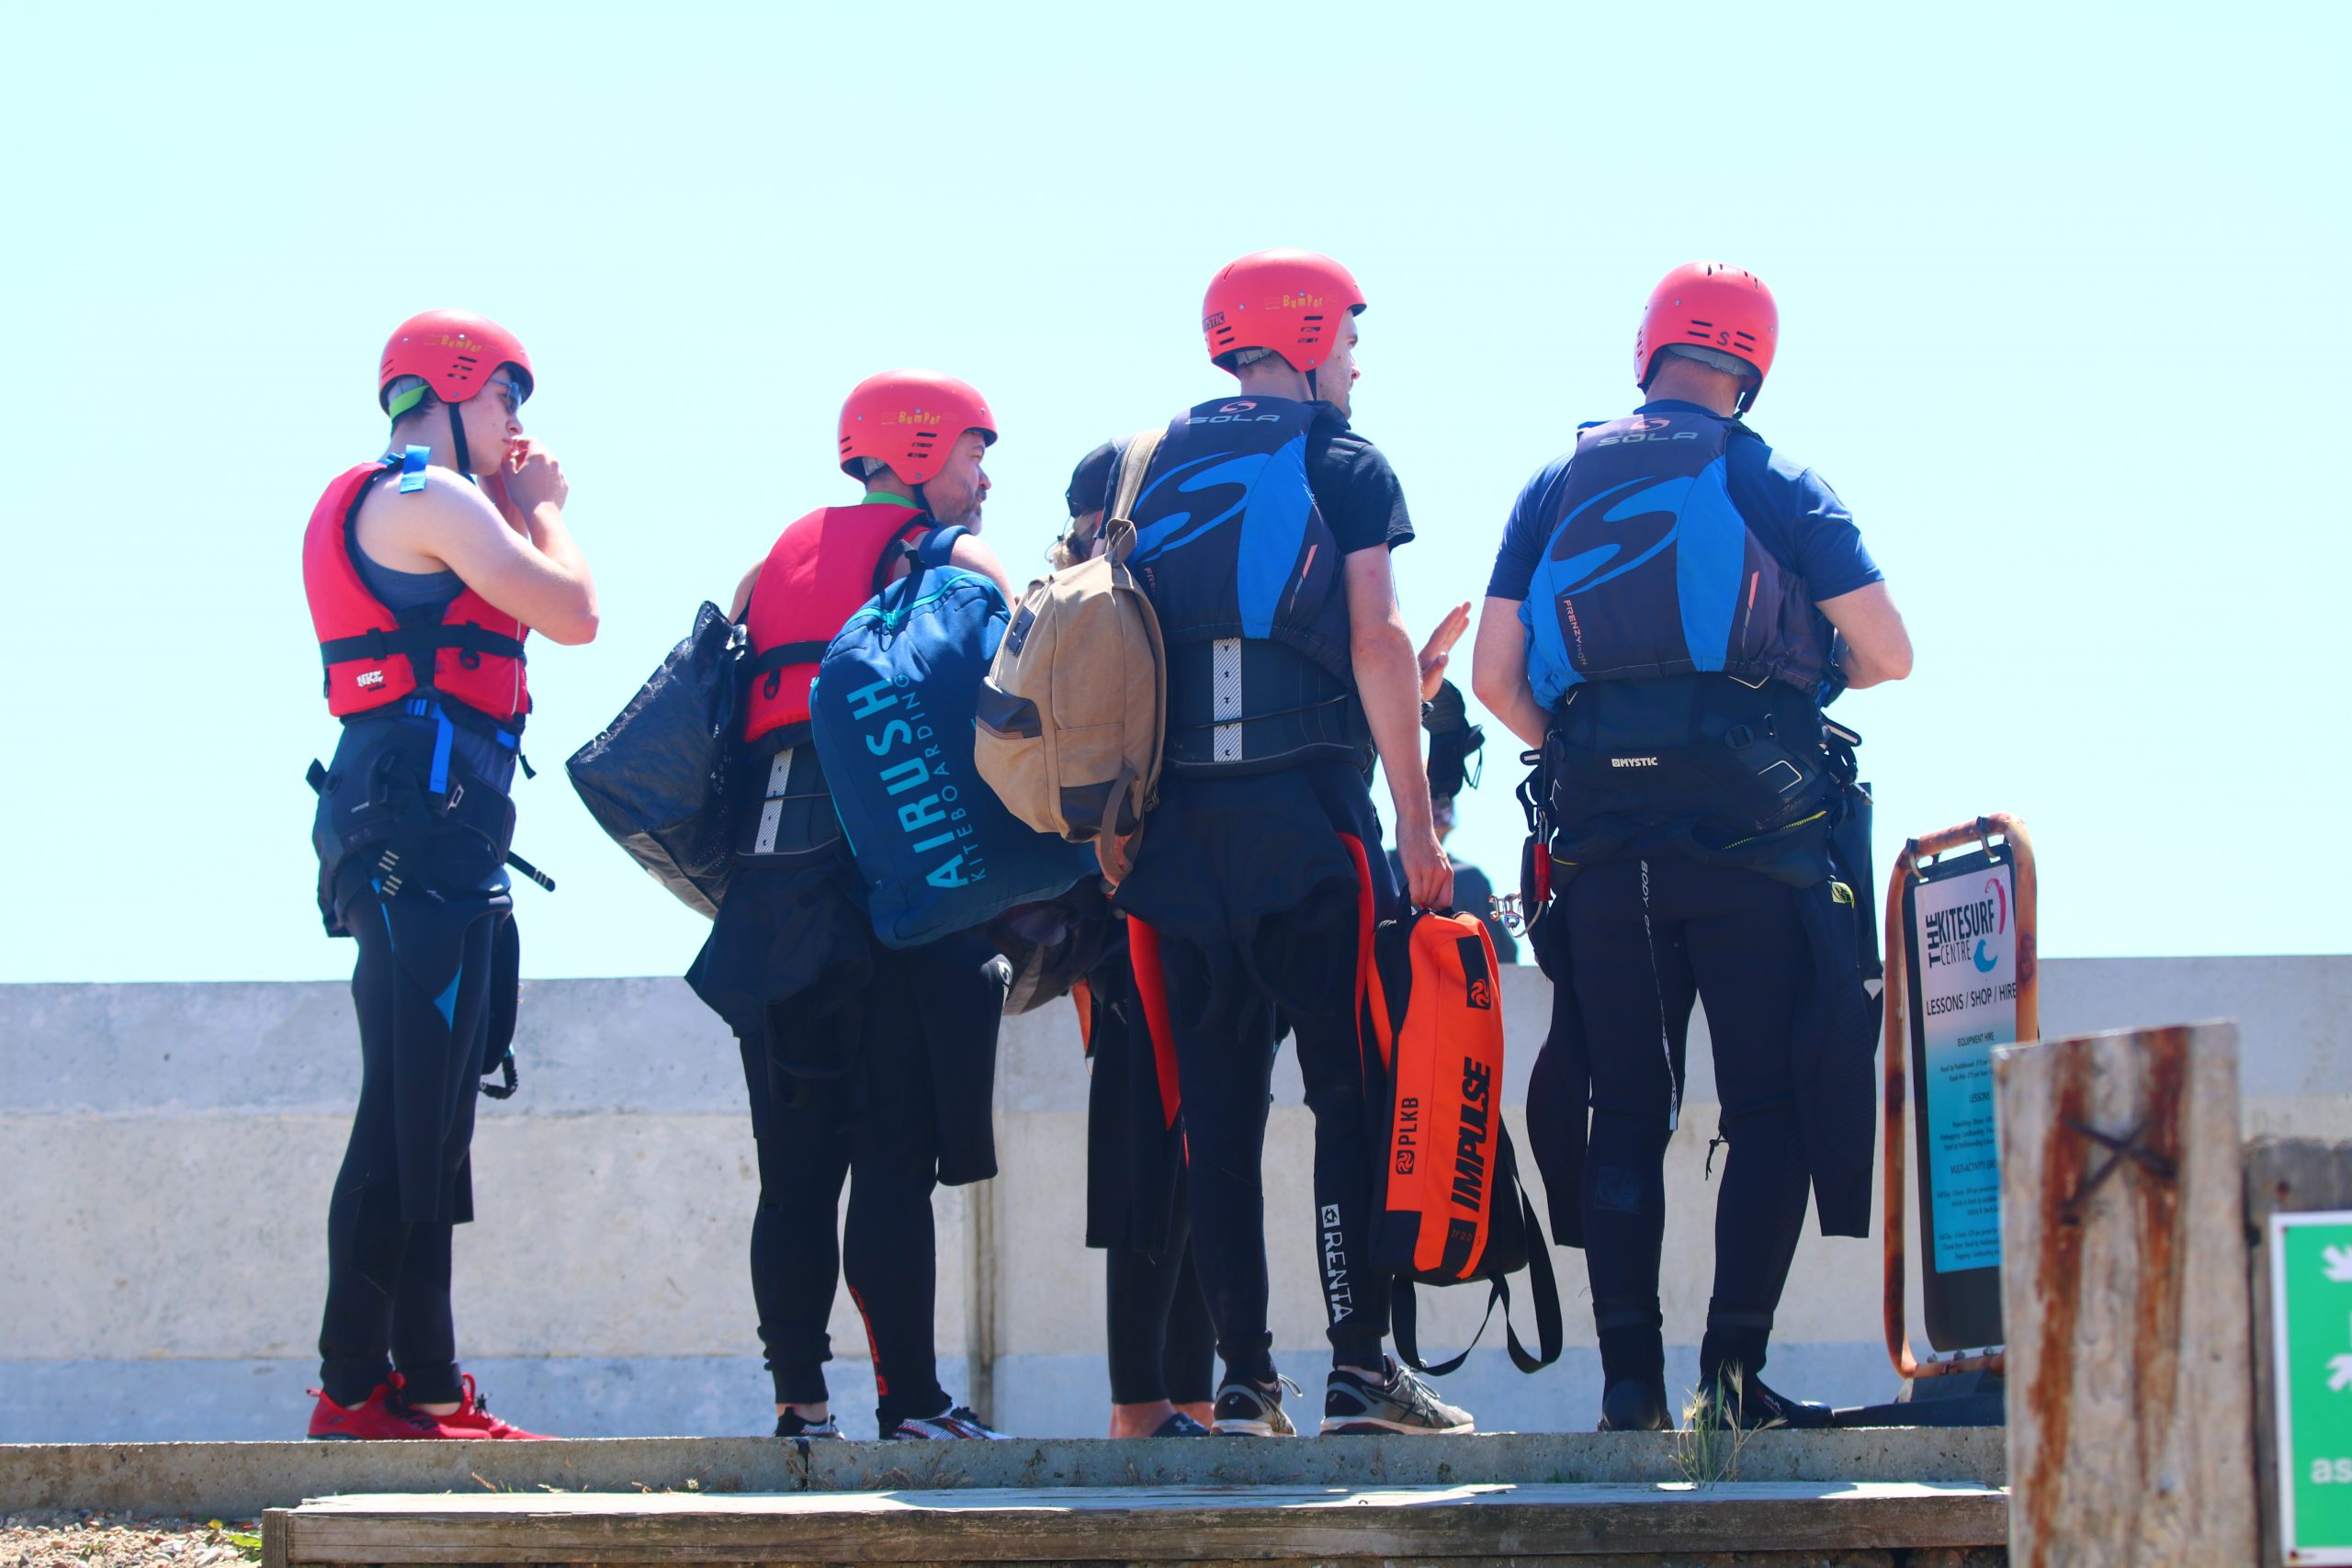
When you’re kiting, it’s highly unlikely that there will be no one else around. In fact, if there is no one around then it is important to check why – are the conditions not suitable for kitesurfing? Is there a hazard (that perhaps you are unable to see) at the beach, which makes it too dangerous to kite there? Be especially thorough with your beach assessments for kitesurfing. As kitesurfing becomes more and more popular it is likely that if there is no one else kitesurfing there is a very good reason that you shouldn’t either. The safest way to launch is also to have someone with you to assist you, and self-launching is only recommended for advanced level kiters.
Keep in mind that other people at the beach may not be kitesurfers, so they may not know that it is unsafe to walk underneath your lines or to swim out in an area where people are kitesurfing. If someone gets too close or is putting themselves in a position of danger politely ask them to move, explaining why. At some beaches there are designated kiting zones, so ensure you keep to them.
E is for ‘Environment’
As with hazards, it is important to check the environment in your beach assessment for kitesurfing. When planning to go kitesurfing at a particular beach, you should always check the weather forecast before leaving to avoid driving for hours to find a completely windless beach! However, it is important to remember that it is only a forecast, and you should base your kite size decisions on what is actually happening at the beach, not just the forecast.
In order to roughly determine the wind speed, you can look for certain things:
White caps start to form at around 8 – 10 knots, and become more frequent and prominent as the wind increases (take care to remember that things like land masses or harbours may mean that the water remains flat despite there being strong wind)
Seagulls are able to hover at around 20 knots
Sand starts to blow across the beach at approximately 25 knots
Windsocks allow you to gauge the wind more precisely. Each stripe on the windsock, starting from the one closest to the flagpole, indicates a speed of 3 knots. You can count how many stripes are flying horizontally (rather than appearing to hang down) and calculate the speed, up to 15 knots (the entire sock flying horizontally). If you’re looking to practise light wind flying, this is perfect!
You can use clues like this to determine which kite size to use, whether or not to take a larger or smaller board, and if you will adjust your line length.
Beaches like Camber Sands experience thermal winds which can add an extra 30% onto the forecast, so a 25mph forecast could mean a 33mph wind. This is one reason why we advise kitersurfers to bring all of their kites in the car with them, as it can be the case that the one kite you leave at home is the one you end up needing! If you are stuck in this position, you should never go out on the wrong sized kite as it can be very dangerous. Either rent a kite or do not go out.
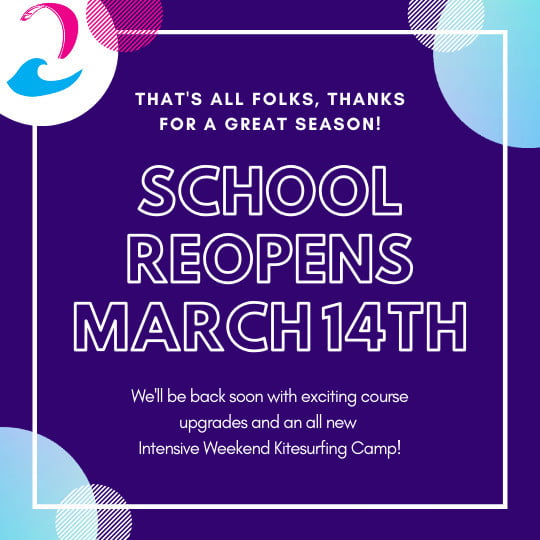
Thanks for an awesome 2022 season; our 2023 schedule is now live we can’t wait to see you again for more fun in Spring!
Do you have an unscheduled lesson on your account? Log in now and schedule the date you want before anyone else. We’re open from April 1st to October 31st 2023.
We’d like to start with a big thank you for joining us for the 2022 season; we’re extremely grateful that you shared your time with us for fun and progression as you learned a new sport. The school is now closed for a winter break and maintenance and will re-open April 1st 2023.
Throughout the 2022 season we ran our new group course structures, adding Session Four and Five to our offerings so that you could access more hours on the water at a better price.
Some of you joined us for the newly introduced Long Weekender Intensive Camps making the most of your weekends and using only a couple of days annual leave (or bank holidays) to cover the bulk of your progression to becoming independent kiters. These were a hit and we can’t wait to offer more next year.
You loved our bundle deals so much and we are stoked to say they’re here to stay for next season. We’ve added more group lessons to our schedule making it even easier to find a date to meet your needs.
As ever, we’re keen to help you find as many ways as possible to be outdoors and having fun. As well as Kitesurfing lessons, we’ll continue to offer Stand Up Paddleboarding and Wingboarding introductory courses. If you’re keen to get friends and family involved, Kitebuggying and Landboarding suitable for anyone aged 8+ and are the ideal way to get the whole family into kitesports.
We’ll be open for the 2023 season from April 1st right through until October 31st, teaching seven days a week, every week. Our team of full-time instructors are kitted out with a huge range of equipment to suit all conditions and they are always stoked to help you learn. You can book all of our lessons and courses for the whole of next season online now!
We always recommend booking in advance if you have particular dates in mind as on average we have a three-week wait for lesson slots once the season gets underway.
Coming Soon!
Over the winter, we’ll be overhauling our Student Zone and adding tons of new content to support your learning off the water.
You’ll be able to find all sorts of useful information about Kitesurfing, Stand Up Paddleboarding and Wingsurfing with all content written and curated by qualified instructors.
You can expect to find;
Supporting content to match the skills you’re learning on the water
Actionable steps you can take to improve your kiting
Weather forecasting, tide and beach guides so you’ll know how to interpret a forecast and tide chart so that you know exactly where it is windy and when you should go there.
The Kitesurf Centre is searching for a Booking Assistant, fitting the description below to start working for us for the upcoming 2024 summer season.
You’ll be joining our busy and reputable beachfront centre in Camber, East Sussex, UK. The centre is open 7 days a week, all season, and helps around 150 students per week learn how to kitesurf, land board, kite buggy, stand up paddleboard and wingsurf.
This job position is open from 25/03/2024 to 03/11/2024; you’ll be required to work 4 days per week, including weekends.
Please submit your CV and cover letter, expressing your interest and suitability for the role, to [email protected]
About The Kitesurf Centre
The Kitesurf Centre (est.2008) is a kitesurfing school on Camber Sands beach, East Sussex, UK. Our BKSA and BSUPA accredited school and instructor training centre offers a variety of thrill-seeking activities such as kitesurfing lessons, kite buggying, kite landboarding, stand up paddleboarding, wingsurfing & adventurous group activity days. With such a range of activities available for groups and individuals, we help people find a new passion, but most of all enjoy learning something fun and exciting!
We at The Kitesurf Centre pride ourselves in having a selection of the most experienced and highly regarded instructors in the UK. Our hand-picked instructors are all BKSA or IKO qualified with a vast amount of experience. Most of which have previously managed centres in the UK and abroad or do so in our winter months. Having great instructors really makes a difference in our students’ kitesurfing lessons, as learning a new sport can be challenging. This is why we are very selective when choosing our employees and continually change and improve our instruction methods with staff coaching.
Ready to join an exciting and active team who are passionate about providing high-quality tuition? We’re looking forward to your application.
About this role
We are looking for serious applicants who are motivated, proactive, and outgoing with a positive attitude and the ability to communicate well with a range of people. Good adaptation skills and experience in customer service roles are essential. Previous experience with booking systems or working within a watersports centre is desirable.
Applicants will preferably have some previous kitesurfing and SUP experience with a desire to progress their skills and knowledge within the sports we provide. Without prior kitesurfing experience, a strong interest in other wind and water sports or outdoor pursuits with a desire to learn kite sports is essential.
Perks of the job include the option to borrow kit when not working so you will have plenty of time to advance your own skills whilst with us.
Reporting to the Centre Manager this role includes:
* Answering phone/email enquiries and creating bookings for all activities using ‘Viking’ bookings platform
* Upselling lesson bundles in response to lesson enquiries
* Completing customer payments upfront when booking lessons
* Following up on outstanding payments
* Inform students of their upcoming lesson times for the following day
* Rescheduling lessons that are postponed by undesirable weather
* Customer service over the phone, by email and at our reception
* Greeting students, checking for up-to-date activity waivers and introducing students to their instructor
* Preparing students for their lessons and helping to get them kitted up
* Explaining rental equipment terms and conditions and providing detailed spot information for free riders
* Other general administration tasks
* Opening/closing the centre at the start/end of the working day
Requirements
* Previous customer service experience
* Computer skills: Able to follow processes within a bookings system and basic use of word and excel
* Strong written communication
* A good phone manner
* Personable and friendly
* Good organisational skills with attention to detail
* Adaptable to change (we work with weather conditions), approaching it with a positive attitude
Bonus skills
* Clean UK driving licence (1+ years)
* BKSA, IKO and BSUPA instructor qualifications (occasional teaching opportunities may be available, though this is secondary to the job description)
* First Aid Certified
* RYA Powerboat Level 2
Required languages
* English – fluent written and verbal
Employment type
* Seasonal contract
Working hours
* 5 days per week
* 8 hours per day (scheduled according to peak business hours)
Working hours do vary depending on lesson times for that week as we are tide dependent, earliest start time is 6:45am and latest finish time is 10pm in the peak summer months – On days where high tide falls in the middle of the day and lessons would be both early and late, you’ll work one side of the tide not on a split shift. This will be on a rota with two weeks’ notice.
Applicants must be able to determine their own right to work in the UK. This is not a sponsored role.
EU Applicants (under 30 years old) who have not worked or lived in the UK before may be able to access a Youth Mobility Scheme Visa.
If you are passionate about the sports we teach, love the outdoors and are excited about working with us we want to hear from you. The following positions are open for the 2024 season;
Full Season Kitesurfing / Multi-Sport Instructors (March – November)
Peak Season Kitesurfing instructor (June -October)
Senior Kitesurfing instructor (March – November)
Bookings Assistant (March – November)
Instructor Apprenticeships are available for people aged 18+. Contact us for more info.
The Kitesurf Centre is searching for kitesurf & SUP instructors fitting the description below to expand our team ready for our upcoming summer season.
Our teaching season runs from March 29th to November 3rd 2024 – We have full-season and peak-season roles available:
Full season Kitesurf & SUP instructor positions open from 29/03/2024 to 03/11/2024.
Peak season Kitesurf & SUP instructor positions open from 01/06/2024 to 29/09/2024.
Weekend instructors (full and peak season)
Please submit your CV and cover letter, expressing your interest and suitability for the role, to [email protected]
About the kitesurf & SUP instructor role
We are looking for serious applicants who are motivated, outgoing, extremely patient with students and demonstrate good adaptation skills and experience in teaching.
Instructors applying should be BKSA qualified* with a minimum of 1 season’s experience, be comfortable teaching group lessons and have the skill and knowledge to teach a high-quality lesson in all wind conditions.
You must also be ready to teach to a high standard we adhere to and work within the parameters set by The Kitesurf Centre and the BKSA.
* If a BKSA qualification is not held, a conversion course can be completed at The Kitesurf Centre.
Alongside Kitesurfing, The Kitesurf Centre also teach Kite Buggying, Kite Landboarding and Stand Up Paddleboarding. Experience in teaching land kiting is an advantage when applying for this role, though experience will be gained by co-teaching with experienced instructors.
BSUPA-qualified instructors will have the opportunity to increase their workload by teaching Stand Up Paddleboarding.
Requirements
· BKSA qualified (IKO instructors may do a conversion course in May/ June with costs reimbursed upon commitment to the 2025 teaching season)
· Minimum 1 season’s experience
· Experience teaching group lessons
· Comfortable teaching in all wind conditions
Bonus skills
· Clean UK driving licence (1+ years)
· SUP instructor (preferably BSUPA certified – other qualifications accepted)
· Kite and board repairs
· Able to teach advanced kitesurf lessons – Directional, Foil
· Able to teach intro wingsurfing lessons
Required languages
· English
Employment type
· Seasonal – subcontractor
Applicants must be able to determine their own right to work in the UK. This is not a sponsored role.
EU Applicants (under 30 years old) who have not worked or lived in the UK before may be able to access a Youth Mobility Scheme Visa.
About The Kitesurf Centre
The Kitesurf Centre (est.2008) is a kitesurfing school on Camber Sands beach, East Sussex, UK. Our BKSA and BSUPA accredited school and instructor training centre offers a variety of thrill-seeking activities such as kitesurfing lessons, kite buggying, kite landboarding, stand up paddleboarding, wingsurfing & adventurous group activity days. With such a range of activities available for groups and individuals, we help people find a new passion, but most of all enjoy learning something fun and exciting!
We at The Kitesurf Centre pride ourselves in having a selection of the most experienced and highly regarded instructors in the UK. Our hand-picked instructors are all BKSA or IKO qualified with a vast amount of experience. Most of which have previously managed centres in the UK and abroad or do so in our winter months. Having great instructors really makes a difference in our students’ kitesurfing lessons, as learning a new sport can be challenging. This is why we are very selective when choosing our employees and continually change and improve our instruction methods with staff coaching.
Ready to join an exciting and active team who are passionate about providing high-quality tuition? We’re looking forward to your application.
If you are passionate about the sports we teach, love the outdoors and are excited about working with us we want to hear from you. The following positions are open for the 2024 season;
Full Season Kitesurfing / Multi-Sport Instructors (March – November)
Peak Season Kitesurfing instructor (June-October)
Senior Kitesurfing instructor (March – November)
Bookings Assistant (March – November)
Instructor Apprenticeships are available for people aged 18+. Contact us for more info.
The Kitesurf Centre is searching for Senior kitesurfing / multi-sports instructors, male and female, fitting the description below to expand our team ready for our upcoming summer season.
This job position is open from 29/03/2024 to 03/11/2024. Please submit your CV and cover letter , expressing your interest and suitability for the role, to [email protected] – Application deadline – 15/02/2024
About The Kitesurf Centre
The Kitesurf Centre (est.2008) is a kitesurfing school on Camber Sands beach, East Sussex, UK. Our BKSA and BSUPA accredited school and instructor training centre offers a variety of thrill-seeking activities such as kitesurfing lessons, kite buggying, kite landboarding, stand up paddleboarding, wingsurfing & adventurous group activity days. With such a range of activities available for groups and individuals, we help people find a new passion, but most of all enjoy learning something fun and exciting!
We at The Kitesurf Centre pride ourselves in having a selection of the most experienced and highly regarded instructors in the UK. Our hand-picked instructors are all BKSA or IKO qualified with a vast amount of experience. Most of which have previously managed centres in the UK and abroad or do so in our winter months. Having great instructors really makes a difference in our students’ kitesurfing lessons, as learning a new sport can be challenging. This is why we are very selective when choosing our employees and continually change and improve our instruction methods with staff coaching.
Ready to join an exciting and active team who are passionate about providing high-quality tuition? We’re looking forward to your application.
About this role
We are looking for serious applicants who are motivated, outgoing, extremely patient with students, and demonstrate good adaptation skills and experience in teaching. In the role of senior instructor, you will offer guidance to less experienced instructors and apprentices, so your interest and willingness to share experience and lead by example are essential.
Some experience in equipment repairs is expected and within your role, you can be scheduled to do equipment maintenance and repairs over high tide. Basic maintenance skills for kites and bars are essential; further training can be provided for more extensive repairs.
This is an ideal role for any senior instructor wanting to balance a teaching role with the opportunity to gain more experience in the operations of a busy kite school. For the right applicant, additional responsibilities and opportunities for work are available assisting the management and bookings team so good verbal and written English and basic computer literacy to operate our bookings system will be required.
Instructors applying should be BKSA qualified* with a minimum of 2 seasons’ experience, be comfortable teaching group lessons and have the skill and knowledge to teach a high-quality lesson in all wind conditions. You must also be ready to teach to a high standard we adhere to and work within the parameters set by The Kitesurf Centre and the BKSA.
* If a BKSA qualification is not held, a conversion course can be completed at The Kitesurf Centre.
Alongside Kitesurfing, The Kitesurf Centre also teaches Kite Buggying, Kite Landboarding, Stand Up Paddleboarding and Wingsurfing. Experience in teaching land kiting and wingsurfing is an advantage when applying for this role, though experience will be gained co-teaching with experienced instructors.
BSUPA qualified instructors will have the opportunity to increase their workload by teaching Stand Up Paddleboarding.
In the role of senior instructor; you will have additional work opportunities beyond the standard instructor role;
– Repairs and maintenance of equipment
– Customer service & bookings
– Duty manager, ensuring smooth daily runnings in the centre manager’s absence (days off)
– Training apprentice instructors
Requirements
· BKSA qualified (IKO instructors may do a conversion course in May/ June with costs reimbursed upon commitment to the 2025 teaching season)
· Minimum 2 season’s experience
· Experience teaching group lessons
· Comfortable teaching in all wind conditions
· Kite, bar and board repairs
· Basic computer literacy – additional work opportunities available assisting the management and bookings team.
Bonus skills
· Clean UK driving licence (1+ years)
· SUP instructor (preferably BSUPA certified – other qualifications accepted)
· Able to teach advanced lessons – Directional, Foil
· Able to teach intro wingsurfing lessons
Required languages
· English
Employment type
· Seasonal – subcontractor
Applicants must be able to determine their own right to work in the UK. This is not a sponsored role.
EU Applicants (under 30 years old) who have not worked or lived in the UK before may be able to access a Youth Mobility Scheme Visa.
Please send your CV and a covering letter, expressing your interest and suitability for the role, by email to [email protected]
Fancy turning a hobby into a career?
If you are passionate about the sports we teach, love the outdoors and are excited about working with us we want to hear from you. The following positions are open for the 2024 season;
Full Season Kitesurfing / Multi-Sport Instructors (March – November)
Peak Season Kitesurfing instructor (June-October)
Senior Kitesurfing instructor
Bookings Assistant
Instructor Apprenticeships are available for people aged 18+. Contact us for more info.
Since kitesurfing is (often!) done on the sea, tides affect the sport a lot. Understanding how they work and what that means for kitesurfing is an important element of staying safe. Tides affect different beaches in different ways, so it’s important not just to have a general understanding, but also to know how they affect kiting at the spot you’re visiting.
Table of Contents
Why do we have tides?
Every beach on Earth is tidal, though the effects are so small at some locations that we don’t notice them at all, or they don’t affect when we can kitesurf. Tides are created by the gravitational pull on the Earth from the moon, and by the centrifugal force of the Earth spinning on it’s axis. Because one side of the Earth faces the Moon, the sea on this side is closer to it, so the Moon’s gravitational pull causes a tidal bulge – the first high tide.
The second high tide is caused by Earth spinning on it’s axis. This centrifugal force, the same force that throws you off a roundabout as a child (or an adult – we won’t judge!), creates a tidal bulge on the opposite side of the Earth to the first tide.
The Earth’s land masses affect the tidal pattern also. In most places, the tide is semi-diurnal, which means there are two highs and two lows each day, with each being roughly the same height. However, there are some places where the land masses create a mixed semi-diurnal tide, where they are of varying heights, or a diurnal tide, where there is only one high and one low each day.
What Happens During the Tides?
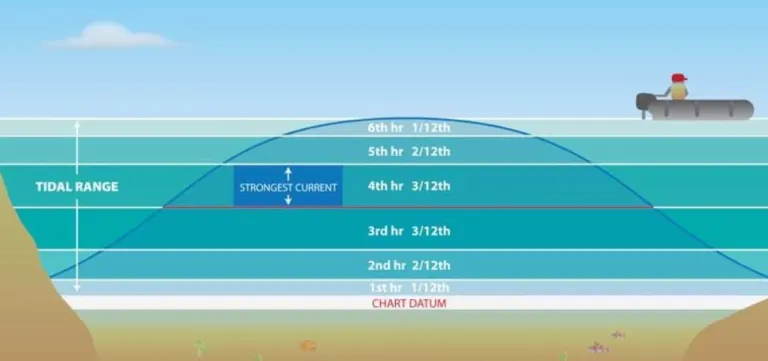
There are roughly 6 hours between each high and low tide, and the times of each moves each day. The rule of twelfths shows us how much water is moving in each hour between high and low. If you sit on the beach and watch, you can see that in the first hour before and after a tide shift, the water does not rise or fall much. This is why (much to the frustration of kitesurfers!), the water is at a similar level to high tide for a long time.
As you can see from the diagram, the largest volume of water moves during mid tide. This is when currents are strongest and the beach appears or disappears fastest, so it is important to stay aware at all times. At some locations, high tide may mean there is not enough space to safely launch or land your kite, or that there is a shore dump. It is important to ensure you know how the tide effects the spot you are kiting at.
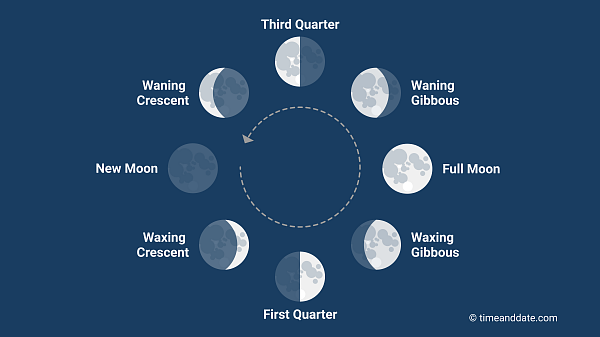
Spring’s and Neap’s
During new and full moons, the sun, Earth and moon are in a straight line. During this time, the tidal forces of the sun and moon act together, meaning tides on Earth are both higher than the average at high tide and lower than the average at low tide. During the first and last quarter moon phases the sun and moon are at right angles to each other, so their tidal forces counteract each other, and tides on Earth are lower than average at high tide and higher than average at low tide.
Since we know the movements of the sun, Earth and moon, we can create tide charts years in advance. Three or four times a year, the spring tide occurs whilst the moon is in perigee (the closest it comes to Earth during it’s orbit). At this point, we get what is known as a perigean spring tide or ‘King Tide’, as the moon’s pull on the Earth’s seas is at its strongest.
Weather
The weather can also affect the tides; strong winds can push water on or offshore and slightly increase or decrease the tidal movements outside the predictions. High and low pressure systems can also affect it. For every millibar over standard pressure (1013mb) a system is, the tidal height is reduced by 1cm. Conversely, for every millibar lower than standard pressure a system is, the tidal height is increased by 1cm.
How Tides Affect Kitesurfing
Knowing how the tide affects kitesurfing at any spot you visit is vital. The first thing to make sure you know is the differences at each state. Whilst at some beaches it is possible to kite at high tide, at others there may be no space to safely launch and land without being too close too hazards. Because of the rule of twelfths that we discussed earlier; this may be the case for several hours of the day.
Camber Sands, our home beach, is not safe for kitesurfing from 5 hours around high tide. As the times of the tides moves each day, this can mean that high tide happens early morning and late night, so you can kite almost all day, but it can also mean that the high happens in the middle of the day, so you can only kite in the early morning or evening. There’s nothing more frustrating than turning up to a spot to realise you can’t get out for another four hours, so it’s important to check the tidal chart before setting out.
As well as meaning that it’s not possible to kite at all, different tidal states can bring new hazards or challenging conditions which may not be suited to lower level riders. It’s not just high tide that can be hazardous; shore dumps may be present at any point, making it necessary to upwind body drag until in a safer and easier place to board start. At low tide, it is possible that there may be hazards such as shipwrecks that are now above the water line, so it is necessary to stay well away from these at all times.
Different states may also create different conditions on the water, which can be both helpful and a hindrance. Sandbanks may create lagoons of flat water perfect for both beginners learning to board start and advanced riders trying wakestyle tricks. High tide may create waves perfect for boosting from or riding a surfboard.
Again due to the rule of twelfths, tidal state can change rapidly. Whilst it may seem that there is plenty of beach left, if it’s mid tide, it can disappear pretty quickly if it is on its way out and can also mean areas of shallow water on sandbanks appearing very quickly if the tide is on it’s way down. What was waist deep water 20 minutes ago can very quickly be ankle deep. It’s important to be able to check for areas of shallow water by noticing where the waves are bigger than they are in the surrounding area (part of your SHOE site assessment) to ensure you remain in at least waist deep water.
How to Read a Tide Chart
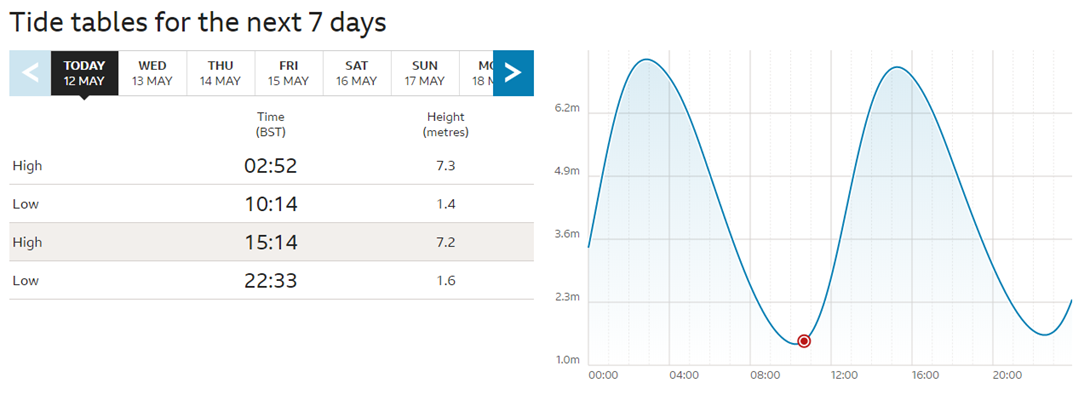
When looking at a tide chart in terms of kitesurfing, we need to take note of when each high and low tide is, and the size.
As we’ve discussed, it’s important to know what tidal states are safe for the beach you’re going to, so you’ll need to know how to tell at what time those will be. On a tide chart, they are normally shown in a wave pattern, with the peak being high and the trough being low. Most online charts will show a table next to the chart with the time of each high and low tide, but if not, simply check along the x-axis to see what time corresponds with the peak of the wave.
As you can see in the image above, the table on the left shows that high tides are at 2:52am and 3:14pm, which corresponds with the peak of the waves in the chart on the right. The y-axis shows the height from the datum (usually the lowest astronomical tidal point). In this example, the high in the afternoon is 7.2m, meaning the water will be 7.2 metres above datum. For kitesurfing purposes, it is important to know the height so you can see whether the water will be ‘up’ for longer. In some cases, if there is a large high tide and strong winds, those high tidal conditions can last for up to an hour longer than predicted.
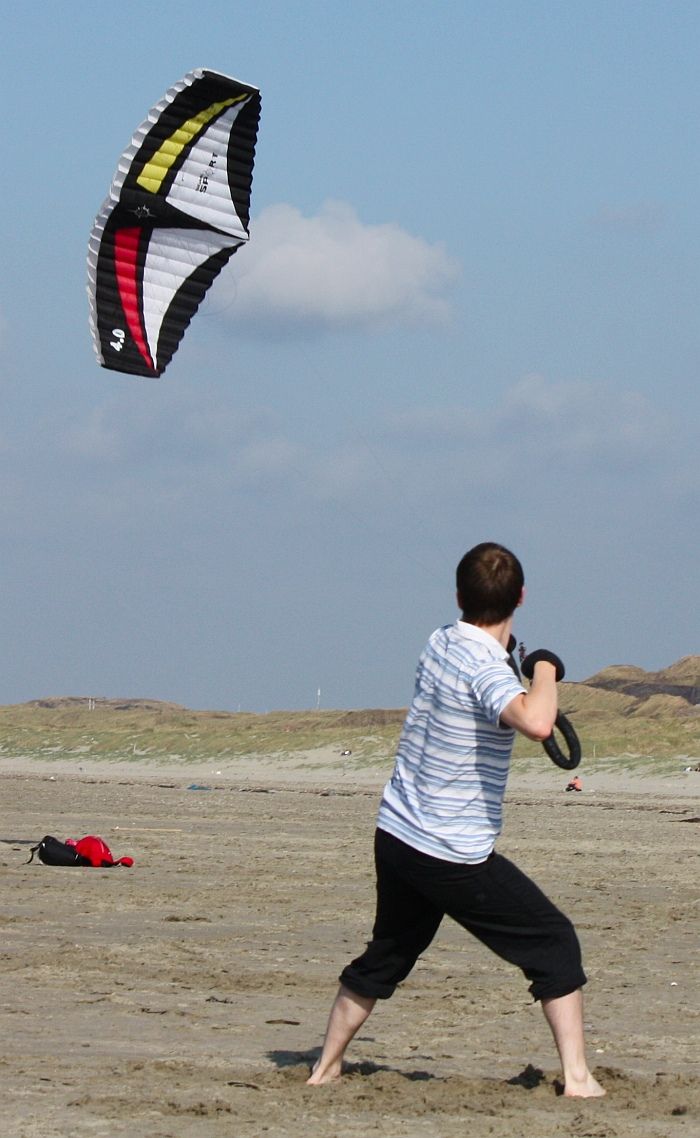
Learning to fly a powerkite is the first step to learning to kitesurf and is something you can continue to do to further improve your kite flying skills. Since 80% of kitesurfing is kite control, it is the best way to speed up the learning process. Powerkite flying is also useful for students who want to learn either kite buggying or kite landboarding, rather than heading into the water. Powerkite flying is taught on Day 1 of all of our group kitesurfing courses, at the beginning of the kite buggying and kite landboarding courses, and we also teach a standalone powerkite flying lesson.
Site Assessment
As with any kiting, the first stage of setting up and flying your powerkite is to perform a full site assessment of the location you have chosen. The site assessment is important to ensure the safety of you and others around you, as well as reducing the risk of damaging your kite.
Once you have performed a site assessment and decided it is safe to fly where you are, it is time to set up the kite. The instructions below are for a Peter Lynn Impulse Trainer, which we use in our school, but they will work for other 3 line trainer kites. We use the Impulse Trainer because it is incredibly easy to use, super fun to fly and pretty indestructible – you’re bound to crash the kite a few times as you learn so this is important! The Peter Lynn Impulse Trainer comes with pre-attached flying lines, making it very easy to set up.
Setting Up
During the site assessment you will have determined which way the wind is blowing, so you know which direction downwind is. You will also have noted how strong the wind is, which will affect your choice in kite size. The Impulse Trainer comes in 3 sizes; 1.5m, 2m and 3m. At The Kitesurf Centre use these on the majority of our lessons, though if the wind is particularly strong we may also use a Flexifoil Buzz 0.6m.
First, take the kite out of the bag and roll it out gently on the floor downwind of where you will be standing to fly it, with the lines on top of the kite and the open, vented edge (known as the Leading Edge) furthest away from you. Check the bridles are not tangled – if you have packed the kite away neatly (which you’ll learn later in this tutorial), this should not be a problem. However, it is always important to check.
Next, weigh down the trailing edge of the kite. If you are flying on the beach you can use sand (taking care to avoid stones and shells), if you are flying inland you can use small weighted bags.
Walking backwards upwind, unwrap your lines, checking for any damage as you go. Once you get to the end of the lines, lay the bar on the ground with the red side of the bar on the left, and the safety line running cleanly through the bar. Check the bar and safety line for any damage whilst you do this.
Walk back up the lines towards your kite, separating them as you go by running them between your index and middle fingers. The red (left) steering line will go the left bridle, and the right (black, green or blue) line goes to the right bridle. If your kite has 3 lines, as the Impulse Trainer does, the safety line attaches to a bridle along the trailing edge. On 2 line kites, the safety line is one of the steering lines, so the kite will flag out along this, with your wrist safety leash attaching to the right side of the bar.
If your lines do not come pre-attached, use a larks head knot to connect each line to its corresponding bridle. You can make a larks head knot by passing the loop at the end of the line over the line and pulling the line through to create a new loop, then running the knot at the end of the line you are attaching through this loop and pulling the loop close next to the knot. Check each knot is secure before flying the kite.
Double check that everything is set up properly, that each connection is secure, the bar is the right way, and that there is no damage to the kite, bar or lines.
Launching the Powerkite
The safest way to learn to fly a trainer or powerkite is to take a lesson with a fully qualified instructor. This will ensure you learn the correct techniques and safety procedures. However, there are some basic kite flying techniques you can go through on your own (and even repeat after a lesson) to improve your skills. You can fly the kite on your own or with a friend – it’s good for safety to have someone to help you with setting up and launching / re-launching the kite, but it’s also just great fun to have a friend to fly with!
Before launching, it is important to become familiar with how the kite is controlled; how it steers; how you can reduce the power. You can control the kite in a similar way to a bicycle, if you pull your right arm towards you and extend your left arm away from you, the kite will steer right. Likewise, if you pull your left arm towards you and extend your right arm away from you, the kite will steer left. The wrist leash allows you to remove all of the power in the kite instantly by letting go of the bar. The kite will fall to the ground without any pull.
Once you are familiar with the controls for the kite and are ready to fly it, attach your wrist leash and pick up the control bar. Check the surrounding area again for any hazards – trees, people, rocks etc. Ensure your back is still to the wind, as the direction may have changed slightly whilst you were setting up the kite.
All checked? – you’re ready to fly! Holding the bar in your hands, step backwards away from the kite. This should cause the kite to pick up the wind enough that the sand you have used to weigh down the trailing edge falls off. If it is not enough, try taking another small step backwards and gently pulling the bar towards you. Keep your bar straight so that the kite launches and flies straight overhead, coming to rest at 12 o’clock in the wind window.
Flying the Powerkite
When you are ready, gently steer left and right with small movements of the bar, remembering to keep your back to the wind and steering the bar like a bicycle, rather than like a car steering wheel. Keeping the kite high produces less power, steering the kite lower increases the power. As you become more confident, you can begin to use larger movements and steer the kite through the power zone to generate more power.
Always aim for symmetry in the movement of your kite – using smooth and controlled motions. Imagine the upper half of a clock face in front of you and fly the kite in a figure of 8 motion, first between 12 o’clock and 2 o’clock, and then between 12 o’clock and 10 o’clock.
You can also practise keeping the kite still at each position on the clock; 10 o’clock, 11 o’clock, 12 o’clock, 1 o’clock and 2 o’clock. This will take time, but the more you practise the more natural steering and keeping the kite still will become, and these control skills are directly transferable to flying LEI kites which you use in kitesurfing.
Once you have mastered the basic control of the kite, you can try to control the kite with one hand. This is a skill you will use a lot when kitesurfing, so it’s great to cover it early. You can also practise flying the kite without looking at it, trying to feel where the kite is in the air from the sensations coming through the bar.
Remember, if at any point you feel you are not in control of the kite, simply let go of the bar and all of the power in the kite will dissipate instantly. You can then begin the launch process again, making sure to check for any damage again before you relaunch.
Still not sure? Have a look at this video for some more visual aids
There is no better time for a coastal adventure than the summer! Our team at The Kitesurf Centre are well-equipped to provide you with a variety of lessons and courses where you can catch the waves.
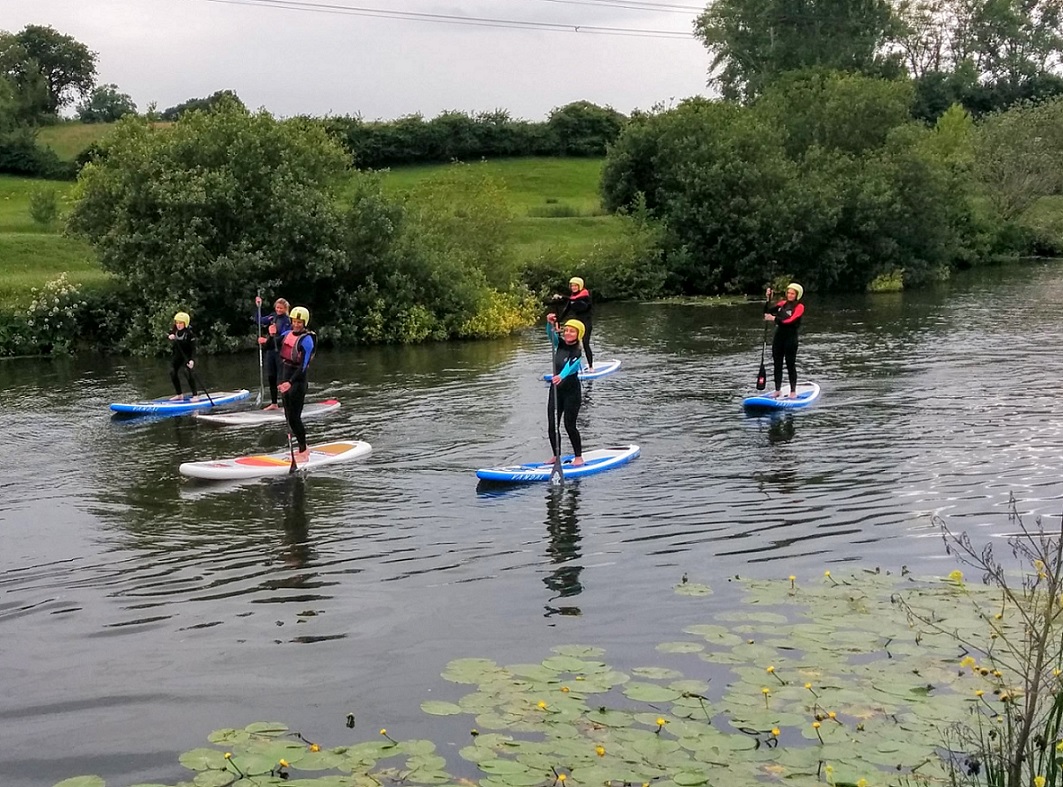
Why not spend some of your summer learning the art of kitesurfing? We offer an extensive course covering all there is to know, from ‘pre-flight’ checks to kitesurfing upwind. Alternatively, try out Stand Up Paddleboarding on a lengthy river tour in rural East Sussex or along the South East coast.
If you’d prefer not to get wet during your adventure, you can always try the latest sport of wingboarding, or get involved in a kite buggy lesson.
After exhausting yourself with one of these coastal activities, you’ll need a relaxing base to rest in! Sykes Holiday Cottages offer a wealth of accommodation that’s dotted throughout the county.
Sykes offers over 30 years of experience in the holiday letting industry along with a team of fantastic travel experts. There are all sorts of East Sussex cottages to choose from, from holiday homes by the sea to quiet retreats tucked away in the countryside.
Win a Prize Worth Over £1000!
The Sykes team have created a great competition to celebrate summer’s arrival, with a chance to win a prize worth over £1000! The prize features a £500 holiday voucher, a ‘Big 5’ experience for 2 with How Stean Gorge, a free family surf with Adventure Parc Snowdonia and a GoPro HERO10.
All you need to do is show how you ‘Find Your Inner Adventure’ by sending high-quality photos or videos of you enjoying a UK outdoor adventure to Sykes. You can choose any outdoor sport you like, whether that’s paddle boarding or kite buggying.
To learn more about the competition, and to see the full list of the best outdoor activities in the UK, make your way over to Sykes Holiday Cottages.
Send over your content to be in with a chance of winning. From all the team at The Kitesurf Centre, good luck!
Let 2022 be the year you learn something new, book your lessons with us for next year now!
With exciting new course structures, intensive courses, kite camps and more lesson availability than ever, we are ready to welcome you next season!
Firstly, we want to thank all of you for an incredibly busy 2021 season. We have seen a record number of students visiting us and have created more independent (and safe) kiters, SUP’ers and land buggiers than any previous year. Many of you have left us reviews that make our hearts feel warm and fuzzy (thank you again) and using all of the feedback that you have provided, we have decided to make some fun and exciting changes for next year…
Available to book now, our five-session course that aims to give maximum progression in a group setting with discount savings if you purchase three or five sessions! This means that even if you have had lessons with us before you now have the option of joining a group course depending on your level making it more affordable to learn.
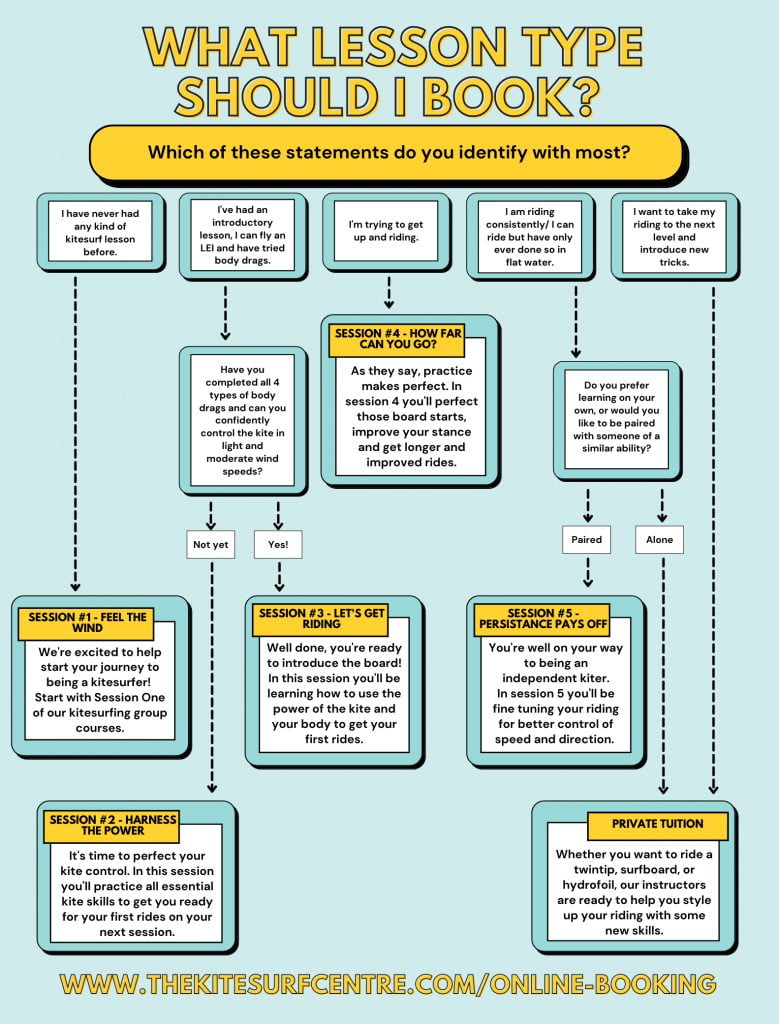
Not sure which kitesurfing lesson you should book? Check out our new flowchart!
Fancy getting really stuck in? New for 2022 we have created an intensive kitesurfing long-weekender course, designed for those of you that want to take minimal annual leave but get in maximum time to learn to kite; designed with complete beginners in mind.
As always we have private tuition slots available every single day! You loved our popular 6 for 5 bundle deal so that is here to stay for next season and with more buggy lessons, stand up paddleboarding tours and surf SUP lessons than ever before in our schedule we are ready to help you find a new sport you’ll enjoy.
Our school reopens March 14th 2022 with lessons running right through until November 6th and we’ll be teaching seven days a week, every week. With our large team of full-time instructors, a huge range of kit to suit all conditions and the only school in the South East with a centre that’s right on the beach, we are always here to help you learn.
You can book all of our lessons and courses for the whole of next season online now!
We always recommend booking in advance if you have particular dates in mind as on average we have a three-week wait for lesson slots once the season gets underway.
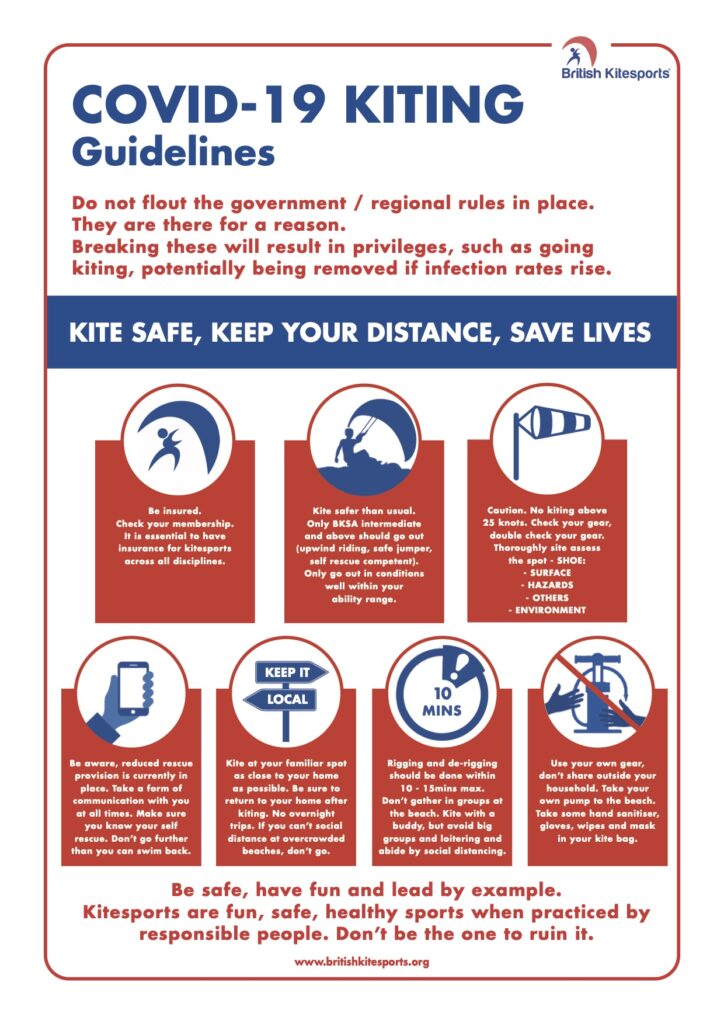
Due to the second COVID lockdown, our school will be closed until December 3rd. Our shop is still OPEN online and for collections.
The school’s operating season is affected by government lockdowns, therefore no lessons will be offered within lockdown dates. Any lessons booked before a lockdown is announced, but within the restricted dates, will be rescheduled to a date when the school is permitted to operate.
The good news is…
Kitesurfing and SUP are still allowed!
As part of your daily exercise, you are allowed to kitesurf and stand up paddleboard. If you’re not yet geared up to head out on the water, get in touch with our team for equipment advise and deals.
Our shop is OPEN online and for collections
The shop is open for online orders and are shipping as normal. Please order online, by phone (07563 763 046) or email ([email protected])
We are offering a Click & collect service. This must be arranged prior to visiting the centre.
For any questions or clarification please contact us on 07563 763 046 or [email protected]. As new advice is released The Kitesurf Centre’s terms and conditions and COVID-19 management policy will be updated accordingly.
Gear yourselves, friends and family up for winter fun!
Equipment Hire for independent riders is still available
All equipment remains available to hire, but we do recommend bringing your own wetsuit if you have one. Equipment is strongly disinfected after every use.
Anyone hiring equipment is required to have completed our normal ‘Independent & Safe to Hire’ assessment & questionnaire before being able to do so.
Please note, we’re operating with very limited staff & resources so pre-booking is required for all services. During this time, hire will only be provided as a ‘day rate’ service. Hourly rate hire will not be offered.
Any person hiring must have previously completed the pre-hire assessment.
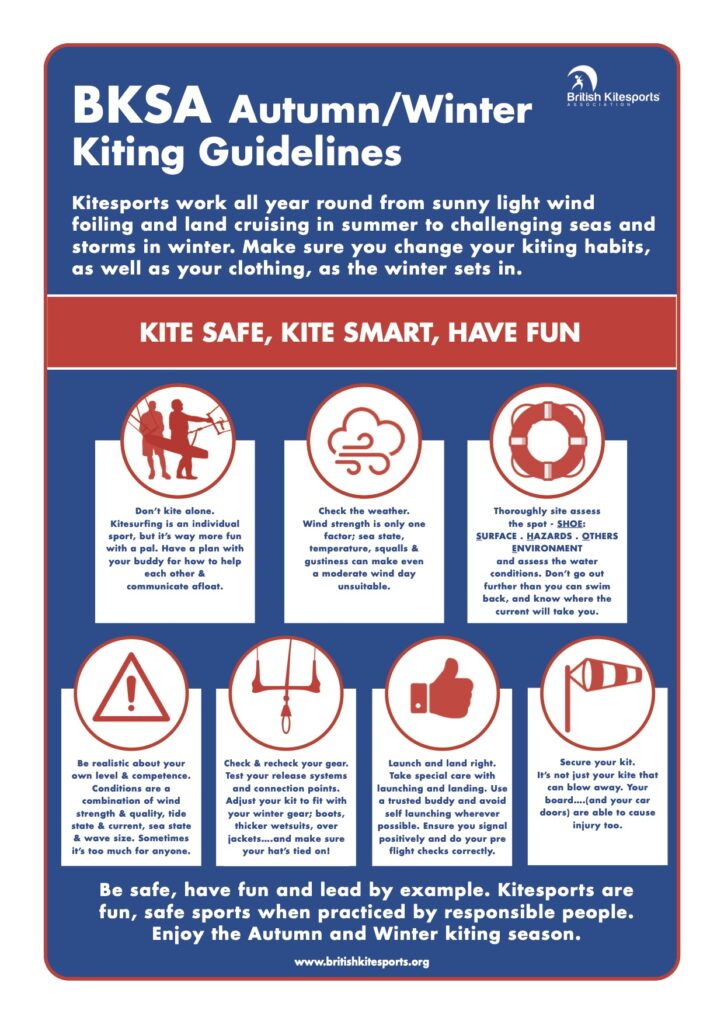
Kite safe, kite smart, have fun!
The BKSA have released guidance for kiters heading out during the lockdown. Kiting is allowed for independent riders, who have reached BKSA level 2, and riders should kite at their local kite spots within a short car journey.
A simple message has been issued – Kite safe, kite smart, have fun!
Winter kiting brings about more challenging, colder, stronger gustier conditions. Be sensible when kiting, stay within your limits and use all reasonable precautions.
Due to having a smaller team of instructors than normal and having to work through a 4 month backlog of lessons cancelled during lockdown, we’re sad to announce that we’re currently not taking bookings for the remainder of the 2020 season. As soon as it’s possible to return to taking bookings we will, but in the meantime please contact us on [email protected] to be added to the waiting list. Please describe your current level, lesson goals, what type of lesson you’re interested in and the dates and / or days of the week you’re able to come.
If you’re unsure what type of lesson to book, please head over to this page to check out the range of lessons we offer. Group course (1, 2 and 3 day courses, stand up paddleboard lessons, powerkiting, kitebuggying and landboarding lessons) will run until the end of November. Kite camps will run until October. Private tuition will continue all year round.
If you have a voucher that was / is due to expire this year, this will be extended for a year free of charge. Please contact us with your voucher number in order to extend it.
This is often one of the very first questions I get asked on the first day of a course, which is reassuring as it is a fundamental consideration when choosing what equipment to take and set up. If over looked, this can put both the rider and others in considerable danger. Kite sizes range from a tiny 3 meters to a huge 20 meters, and kitesurfers will be out riding in conditions from 6 knots to 50 knots, so there’s certainly plenty of sizes to choose from. How to choose the right sized kite revolves around the combination of 2 factors – the wind speed and the rider’s weight.
Table of Contents
The Kite Choice Equation
This is an equation The Kitesurf Centre instructors often use when choosing the right sized kite for their lesson. It takes the wind speed, weight and ability. See the full break down of each below. The important part is wind speed, as you’re likely to know your weight and ability fairly accurately, but wind speed is a guess at best if you don’t have the technology to accurate measure it. So always lean on the side of caution and go with a smaller kite if in doubt.
Rider Weight / Wind Speed x Ability = Kite size
Rider Weight
Wind Speed
Ability
=Kite Size
70kg
20 knots
1.8 (beginner)
6.3m
70kg
20 knots
2.1 (intermediate)
7.35
70kg
20 knots
2.3 (independent rider)
8m
The equation can be used until you’re comfortable choosing the correct sized kite. It generally brings up a smaller kite than needed for the conditions, which is ideal for learning. Play around with the numbers and find something that works for you and your ability, then stick to it.
Wind Speed
Before you arrive at your kite spot you should have an idea of what the wind forecast will be. Online sources such as Windguru and XC Weather will provide you with a good indication from within 2-3 days. What’s the basic rule with kite size and wind speed? I’m sure you guessed it. As the wind speed increases, the size of your kite decreases, this being the most effective way to moderate the kite’s power. This is the same in both windsurfing and sailing, where you put on a different size sail, or reduce the sail’s surface area, also known as reefing. Let’s assume an average riders weight of 80kg, and see how this stacks up in different wind speeds.
Wind Speed (knots)
8 – 15
15 -25
25 – 40
40 +
Kite Size (m²)
15 – 12
12 – 9
9 – 6
6 –
Kite Wind Range
As the wind speed goes up, the kite size comes down. You’ll also notice that different sized kites can be used in the same wind strength. That is because each kite has a wind range. For example, a 9 meter can be ridden in anything from 15 to 30 knots. This varies with each type of kite, influenced by the canopy profile and the bridle system. Bow kites have a good wind range, partly because the shape of the kite allows for a lot of de-power from the bar. C kites on the other hand, partly due to their narrow wing tips, have a much reduced de-power function, and therefore don’t have such high wind ranges.
Rider’s Weight
One of the great things about kitesurfing is that a student or rider’s weight bares little significance, though adjustments need to be made somewhere, and the kite is the obvious choice. A little like a car, the heavier it is, the more power is needed to get it going, though this consideration is not nearly as significant as to how wind speed affects the kite size, and is also a little murkier to define.
This is how I play it – take a look to see what is the most common sized kite being ridden, and take that as the average choice; the size of each kite is usually written on the wing tips. Assuming 80 kg is the average rider weight, you add or subtract 1 meter of kite size for every 10kg you are above or below that average weight. So if most riders are on 12’s, and you weigh 110kg (30kg more than 80kg, therefore +3 meters), you’d go out on a 15, or if your weight is 50kg (30kg less then 80kg, therefore -3 meters), you’d be better on a 9.
Like I said, not so easy to define, and actually you’ll be surprised at how quickly your kite size choice will become second nature to you, being more a familiar feeling rather than high maths. There are formulas and charts available online, though these are intended as guidance only.
So those are the two main considerations when choosing your kite size. What are the more subtle, though by no means subtle, variables?
Kite
As already mentioned, kite type does make a noticeable difference. I tend to ride on C kites, for no particular reason, and these generate power in a different way to bow or hybrid kites. C kites generate pull more from forward movement rather then catching the wind – again with the car analogy, more like an Italian sports car rather than a chugging American V8. So when most riders are out on 9 meters, I’m maybe out on a 12, or if they’re out on 6’s, I’m on my 9. The majority of riders fly hybrid kites, which is halfway house between a bow and C kite.
Board
As with the kite, board type makes a difference to a rider’s kite size, and this relation between board and kite is often a measure of the board’s efficiency. The more efficient a board is, the less power required from the kite, and therefore the smaller a kite can be used. For example, often to assist students with getting up on the board, larger twin tips tend to be the choice, as these have a lower planing speed. As such, a smaller kite, can be used, which is the safer choice for those with little experience on a kite.
Another example is with wave riding. This is a style that is, as the name suggests, as close to surfing as a kitesurfer will get, and as they use surf boards, smaller kites can be used. This works well as smaller kites are more dynamic in flight and faster on the turn, which is ideal when ripping up and down waves.
Riding Style
As riders progress down the line, they tend to fit into a style of riding that they most enjoy. Some like to cruise whilst others like to catch big air. The current world record holder is Mike Mac Donald, setting a record of 33.9 meters. Pretty high! For those seeking such fame, going out slightly over powered, or ‘lit’, on large kites will maximise their jumping potential. This is referred to as boosting. In contrast, those who’d rather cruise comfortably will choose a kite size that is down the middle for the wind strength.
All this begs the question –
How Many Kites Do I need?
When you buy your first, we recommend a kite size that will suite the most common conditions that you’ll be progressing in, whilst taking into account your weight. This tends to be a size from 9 to 12 meters. As you develop, and start to explore wind speeds either size of this, you’ll need to invest in more kites, and the riding style you choose to pursue will define the type of kites these will be. Most riders find that 3 kites is enough to suit all conditions, some choosing even more to increase their wind range further.
Some Final Words
How to choose the right sized kite is fundamentally about your safety, and as long as you follow these steps, you’ll be safe.
Always turn up
to your session knowing the forecast, and make sure you take a kite
that is realistic for this wind speed. Make sure you’ve got plenty
of time between tides, darkness, friends and family.
Choose your
kite size based on your own knowledge and understanding of your
kite. Always take a look to see what size others are riding on.
Setup your kite
with time and patience. If it doesn’t look or feel right, it
probably isn’t, so disassemble and start again.
As with
anything in kitesurfing, if you are unsure, ALWAYS ASK another
experienced kitesurfer – there is no substitute for the experience
and advice of others. We at The Kitesurf Centre are always around to
give advice and guidance.
As I said, with a bit of time, this will become second nature to you. See you out on the waves!
One thing for sure is that if you want to get into kitesurfing you need to have lessons. Thankfully, learning how to kitesurf is great fun. The process is broken down into simple steps, such as learning theory, developing kite flying techniques, and introducing the board, and these processes are taught in a way that is both informative and engaging.
Why Have Lessons?
Although kitesurfing is a perfectly safe sport, the potential for things to go wrong is considerable, so it is always necessary to have lessons to ensure that you learn how to use the equipment correctly, you develop the correct techniques, and you understand the procedures and when to use them. Of course not everyone follows this rule, and here at Camber Sands these cowboys stick out like sore thumbs. We call them Ebay-ers, as they tend to get hold of some kit online, setup according to what seems to make sense, and then what happens next is anyone’s guess. As you are reading this blog I take it you’ve decided to have lessons. Well done!
What’s The Minimum Number Of Lessons?
I always recommend a 3 day course as good introduction to Kitesurfing. The course begins with the basic theory that surrounds the sport, with particular focus on what set of conditions you need for kiting. Then it’s straight on to the practical side, with flying small kites on the beach to explore the wind window and develop good flying technique. Quick bite to eat, into wetsuits and introduction to the bigger LEI kites, including safety. … more information on what’s involved here – https://www.thekitesurfcentre.com/kitesurfing-school/3-day-course
And Then?
These 3 days will give you a good understanding of kitesurfing, and depending on your ability to learn, you may even be up and riding on the 3rd day. After this, I would recommend 2 more days of instruction as a minimum, and this can be done by either extending your group lessons, or booking in a couple of 1 to 1 privates. In these lessons the instructors will take a more passive approach, giving you room to apply your knowledge as if you were an independent rider, whilst providing corrections and tips where necessary. This helps to secure the processes in your mind, and allows us to asses you to see if you’re ready to head out on your own.
What’s the maximum?
Of course, there is no limit to how many lessons you can have. Everyone learns in different ways and at different paces. Here at The Kitesurf Centre we’ve had students that are still having lessons three years down the line. Sometimes it’s more enjoyable to have the company of an instructor, and because there is no real limit to how far you can develop as a kitesurfer, there is no limit to how many lessons you can have. What is important is that when you decide to become an independent rider, both you and your instructor are sure of your ability to remain safe.
So what can you bring to your lesson?
Previous Experience
A question we get asked a lot is does previous board or wind experience effect how long it takes to learn. The short answer is yes, and no! Students who have experience in other board or wind sports, particularly snowboarding, tend to be more able at grasping certain aspects of learning, for example applying the board during board starts. This is perhaps unsurprising, however, the kite is the levelling factor. Flying LEI’s is a new experience to almost all students, and as kitesurfing is 10% board, and 90% kite, every member of the group is pretty much at the same point of development when it comes to kite flying.
Psychology
I would say the most significant point which will affect how long you are learning is your own approach to lessons. When I first learnt I remember thinking I was going to extract every ounce of experience and knowledge from my course – after all I had paid for it! So I made sure I turned up on time, paid attention to my instructor, and really gave the practical elements all I could. I even took notes! On my 3rd day I was up and riding, and it was a truly memorable buzz. Of course, from time to time we do have students who don’t pay much attention in their lessons, and don’t apply themselves to flying the kite or riding on the board. As a result they don’t develop as quickly as others, and seldom enjoy their lessons. So if you’re gonna learn, go for it!
Time
A good approach in terms of time to learn, is to commit a season to it; this summer I’ll learn how to kitesurf. In a perfect life we’d have all our lessons together, one after the other, but of course lift isn’t like that, and the teaching process is often peppered with life’s other commitments. This is not really a problem, and often a break after a lesson allows you to reflect on the day, and help to consolidate what you have just learnt. If you’re booked into a group lesson, here at The Kitesurf Centre we organise every day to fit in with your requirements. What can really help to retain knowledge between lessons is to keep revising using books and online sources of information, and if the kite flying was a bit of a sticking point, buying a small foil kite to practice with is a great idea.
Different ways of learning
There are different ways to learn how to kitesurf, and some students respond to certain methods better then others.
Group Lessons
Most students are taught as part of group, and this is the best way to get off the ground. It’s always reassuring to begin something new with others who are in the same boat. The opportunity to make new friends and learn off each other’s interpretation is a fun and effective way to learn. Of course, this means that compared to a private lesson, you spend less time on the kite and with the instructor, but again, this helps students to learn. As previously mentioned, much of the learning occurs when you are not directly engaged with the kite or board, enabling you to reflect on the experience, and also to learn by observing the techniques of your fellow group mates and to discuss and critique. It certainly makes the lessons more fun, and perhaps most importantly for kitesurfing, it teaches you to be patient, and communicate with fellow riders.
Private Lessons
Private lessons are a great way to learn if you have something more specific in mind, for example learning how to ride toeside, or how to ride upwind. These enable you to have the instructor’s undivided attention, allowing them to focus on the more particular details of your technique. These lesson tend to be more intense and shorter, and are a great way to progress in the sport once you’ve been taught the fundamentals.
Holidays
If you want your Kitesurfing tuition to be involved in a more rounded experience, we provide holidays to warmer climes, where tuition is part of the package. This is a great option if you want to blast out a solid course, whilst taking in the cuisine and culture of somewhere a little more exotic. All equipment is included, and you just need to turn up to the airport in your wetsuit or speedos. More info here – https://www.thekitesurfcentre.com/kitesurfing-holidays
Conclusion
So how many lessons do I need for kitesurfing? Minimum 5, and maximum – however many is necessary to make you safe in the water with a kite. Your preferred method of learning will most likely become apparent on your first course, and can therefore be applied at it’s conclusion. Kitesurfing is not a hard sport learn, and as mentioned at the beginning of the blog, the best part of it is that it is all good fun! Give us a call to discuss.
Often when you look out and see kitesurfers on the waves, you’ll also see windsurfers in the mix, so this seems like a rather logical comparison. Indeed, when you look into the history of kitesurfing, you’ll see that it owes a lot of it’s development and progression from the world of windsurfing. When kitesurfing was in it’s infancy, mainly in the 90’s, it exploded onto the watersports scene with its visual splendour, lofty kites and big jumps. This tempted many windsurfers to jump onto the wagon, and so naturally some of the big windsurfing manufacturers followed, with perhaps the most notable example being Naish. Many who now enjoy kitesurfing started out as windsurfers, and still mix up the two disciplines that have their fair share of differences. So if your looking into getting into a wind powered watersport, which is right for you? I’ll break it down into learning and developing curves, with some safety discussion, ending with a little about the equipment.
Learning
Generally speaking, learning to get up and ride is easier with windsurfing, and most beginners will experience the thrill of windsurfing on their first lesson. This is almost entirely due to the fact that the equipment is more user friendly, taking less instruction and time to grasp. The sails on a windsurf are simple to use and are held up by the riders arms, whilst with a kite there is more involvement with it’s control, keeping it flying and prevent it from falling out of the sky.
Another
significant point is the buoyancy of the boards. Unlike a typical
kitesurfing board, a windsurfing board will float with a riders
weight, requiring no forward motion to
keep it above the water surface.
This means that a student can step up onto the board, sheet in the
sail, and get moving with
little coordination or effort, though
some balance.
The equivalent moment in kitesurfing is a bit more of a crescendo,
where the skills that have been learnt
over the previous few days are bought together in what is known as a
board start. This is where standing and a forward motion are combined
momentarily to hopefully
make a kitesurfer.
So in terms of getting up on either a kitesurfing board or a windsurfing board, windsurfing is easier. However, this is where the advantage stops.
Development
Assuming you wish to return to your car at some point, you’re going to have to be able to come back the way you came, and with kitesurfing you simply send the kite the other way and swap the back of the board for the front by shifting your weight; there is no need to turn it around. As windsurfers use directional boards, or boards that only go one way, riders must turn the entire rig around, and this involves much dexterity and skill to master. It is also necessary for the rider to rotate around the sail, which when seen being done, is impressive.
The bit in between is pretty relaxed on both. When cruising in a straight line, the key is to trust your harness, learn back against the pull of the sail or kite, and enjoy the ride.
In terms of tricks and treats to develop into, kitesurfing comes out on top, this largely due to it’s smaller board size, the distance of the kite to the rider, and the impressive jumping potential. That’s not to say that windsurfers can’t get some serious air and do some head spinning flips with some strong wind and decent waves.
Fitness
Mainly due to the reasons explained in the development section, windsurfing does require a reasonable amount of strength. Sheeting in, and lowering and raising the sail, which is necessary when on the turn, requires a good bit of core grit. Kitesurfing in comparison has a lighter touch on the control of the kite, as almost all of the power is directed through a waist harness, and there is no need for any complex rotations when changing direction. As such, kitesurfing has no prerequisite for strength or fitness. Being a competent swimmer is essential for both.
Safety
The key here is knowing how to use the equipment correctly; as long as this is guaranteed by the rider, both of these sports are safe. The potential for things to go wrong is greater in kitesurfing. This is mainly because the power source is 25 meters away from the rider, as opposed to directly in front. In windsurfing you can simply let go of the sail to de-power. The process in kitesurfing is also very simple and effective, but if it the process is not understood correctly, or is disabled due to a bad setup, the consequences can be considerable. That is why having lessons is a must; so the student can learn and practice these procedures in a controlled, risk free way.
The gear
So what about the gear? This is where kitesurfing really shines. Everything that you need can be simply packed down into a large backpack, slung onto your shoulders and taken back on the bus. When broken down a windsurfing rig is more considerable and necessitates the need for a van or sizeable car. Of course this won’t be a problem if you have one of these.
Conditions
Both sports require the same set of conditions. With the recent advent of ultra light foil kites and super efficient boards, kitesurfing can be done in winds as low as 8 knots, and windsurfing claims similar speeds of winds as a minimum requirement. Onshore winds are the sensible choice of direction, as are spacious beaches that have been specifically designated for such sports. Windsurfing is not so dependant on low tide as these is no landing or launching procedure, though low tides are a good idea as a safety precaution. They do need to be able to walk in the sea to get their craft deep enough to ride.
To Conclude
So the answer to the question is kitesurfing easier than windsurfing is a little like the skiing/snowboarding comparison. Windsurfing, like skiing, is easy to get going on, but more challenging to develop in, whilst kitesurfing, like snowboarding, is trickier to get riding on, but easier to progress in once you start putting in turns and developing a more dynamic ride. Both these sports are an absolute blast, as what they both come down to is shooting across the surface of the sea at wicked speeds – I don’t think to call that biblical is an exaggeration.
Intrigued? Here’s some more reading you may find interesting, and a link to our videos page.
Any guesses on what all these sports have in common? I’ll throw skateboarding in the mix for another clue. You probably guessed it – they’re all board sports, and are all great fun to learn and do. So how are these sports similar, and how are they different? After all, some you can do locally, some you probably can’t, some are easier to learn then others, and some are more expensive then others. It’s a very broad question, and one I’ll attempt to answer by discussing the fundamental considerations of each. Here we go for a Kitesurfing/Snowboarding/Surfing/Windsurfing comparison & crossover!
The Basics
Let’s talk about the riding surface. Again, any guesses on which one is the odd one out? You probably guessed again. Snowboarding. Kitesurfing, windsurfing and surfing all take place on the water, as denoted by the term surf. Snowboarding takes place on snow, which provides a very low friction surface to gain some very fast speeds on – heads up to our own Rupert Cawte, who clocked an amazing 151 kph to match the British snowboarding speed record. And for kitesurfing? Links for both of these at the bottom of the page.
Secondly,
propulsion. This splits the field down the middle. Both windsurfing
and kitesurfing use the wind to propel rider across the sea, whilst
snowboarding and surfing rely on gravity to either pull the rider
down the mountain, or down the face of a wave. This makes for an
interesting ride dynamic. Both snowboarding and surfing are what I
call stop and go sports, with sessions being peppered with
chair lift rides or wave seeking, whilst windsurfing and kitesurfing,
providing the wind plays ball, are more or less a constant ride. So
snowboarders look out for snow, surfers check the swell forecast, and
windsurfers and kitesurfers are looking for a good wind forecast.
Learning
One of the beauties of all these sports is that they all relate in terms of board control. Simply put, if you lean the board left, you turn left, and if you lean the board right, you turn right, much like a skateboard. This technique is key across all the sports as it decides you direction of travel, is a way of controlling your speed, and very much adds to the fun factor. Great!
This means that, generally speaking, if you’ve learnt one of the sports, it’s easier to learn another. A great example of this is kitesurfing and snowboarding. Due to my experience as a kitesurfer, and specifically my ability to ride toeside, I was able to apply these techniques to snowboarding, and after an afternoon of steady progression, I managed to get down the mountain looking like a snowboarder – to my relief frankly.
Fitness
We have another odd one out here. Perhaps, not so easy to guess, this is surfing. Surfing requires a high level of cardio and core strength. Paddling back out to catch a wave, and paddling onto a wave requires both, whilst once on the wave, you have to pop yourself into a standing position, ready to make the turn into the wave. In decent surfing conditions, the environment is demanding, as tides, wind and underwater hazards are thrown into the mix to add to the challenge, but also the fun.
Next in line for fitness I would say is windsurfing. Lifting up the
sail, sheeting in, and changing direction requires a reasonable
amount of agility and strength, particularly in the upper body,
though once hooked into the sail via a harness, cruising is pretty
easy peasy.
Both kitesurfing and snowboarding are easily accessible, with neither requiring a particular focus on strength or fitness; gravity and wind do pretty much all the hard work! Again, as long as you follow the prescribed routes into these sports, fitness shouldn’t be much of any issue. Of course your body will adjust according to the demands that you place on it, and you will develop the fitness required as you learn.
Practicality
How practical is the sport to you? Are the right conditions easily accessible to you? How easy is it to ship the equipment around? As an example, here in Camber sands, both kitesurfing and windsurfing are logical choices of board sports to pursue. We have good beach access, plenty of reliable wind, and a well established community of wind sports-ers to join.
Surfing, on the other hand, is not a good choice. It’s not often that we get the perfect storm necessary to make good surfing waves. As is well known, this discipline belongs to the more westerly coasts of the UK. As the channel gives way to the Atlantic, there is plenty of fetch to enable good waves to develop, whilst these coasts are more exposed to receive the rollers coming in from the Atlantic.
Snowboarding of course can only be done where there is snow, making it very much a seasonal pursuit and requiring the need to fly, though any nearby dry slope can do a pretty good job at replicating the sensation.
OK, half way house in our Kitesurfing/Snowboarding/Surfing/Windsurfing comparison & crossover!
The Gear
The beauty of kitesurfing is that all the gear can be packed down
into a sizeable backpack, with folding boards available to further
reduce the size. This makes getting around on public transport a
relatively easy affair, though you’ll no doubt receive some
perplexed looks from fellow passengers. In contrast, windsurfing
equipment, once broken down, still necessitates the need for a van or
large car, making it almost impossible for anyone who doesn’t have
these facilities.
Surfing comes in close behind in terms of size, and due to their fragile construction, always carry a risk when being flown anywhere. Renting on location is often a better option. With any good board bag, snowboarding is relatively easy to get on location, with many airlines offering a specific service. But what trumps the lot? A good old Penny skateboard!
Cost
The initial outlay for windsurfing gear is about a 3rd more expensive then kitesurfing gear, but as the sails are more sturdy then kites, over time they don’t need to by replaced as often as kitesurfing gear. As an alternative to new, both sports have well developed second hand markets, though it’s important to know exactly what you’re buying as some older gear can be dangerous. In terms of lessons, kitesurfing tends to require more, this partly due to the fact that there is more safety to be taught, and that the risks are greater to yourself and others if you don’t have lessons. With windsurfing you’ll likely be on the board and riding on your first lesson. All in there’s little to it between kitesurfing and windsurfing. For our lesson prices have a look here – https://www.thekitesurfcentre.com/prices
Surfing is cheaper, as once you have your wetsuit, you only need a board, which can cost anything from £50 to £500. Lessons are not required to get out and have some safe fun, though a good understanding and respect for the beach that you choose to surf at is. Snowboarding kit all in is comparable with surfing, though lessons are advised, and factor in the holiday cost: after flights, accommodation and lift pass, you can be looking at a tidy sum. I would say £500 all in for a week in the Alps will be the bare minimum; pain au chocolats not included.
Feel Of The Ride
Each of these sports differs significantly in how it feels, and what is most enjoyable to you is of course dependant on your preferences. Having experienced all 4 to some extent, for me nothing compares to the thrill of snowboarding. But as I live near the south coast of the UK, and not the Alps, kitesurfing is the best option for me. I would choose this over windsurfing as, largely due to kitesurfing’s jumping ability, the potential to develop tricks and techniques is almost boundless, whereas windsurfing is relatively limited to cruising, though this is also a great buzz. Surfing isn’t really an option due to the lack of decent conditions, though if I were really committed it wouldn’t be impossible, particularly with the advent of SUP boards, that are more adept at catching surf then their traditional counter parts.
So that’s my Kitesurfing/Snowboarding/Surfing/Windsurfing comparison and crossover. All of these sports are great fun, and are a great way to help you keep fit, happy and healthy. Hopefully this will provide you with an understanding of the main considerations. At the end of the day, there is no substitute for putting on a wetsuit, or pair of salopettes, and giving it a go yourself, so book some time off work, book a lesson, and get involved.